


How to Build a DIY Dado Blade Storage Case
A stacked dado blade set is one of the most useful accessories for a table saw. But keeping the scoring blades, chippers, and shims organized can be a challenge. This DIY dado blade storage case provides a simple solution that keeps everything together, protects the cutting edges, and makes the entire set easy to carry around the shop.
Best of all, you can use your dado blade to build its own storage case.
GET THE STEP-BY-STEP WOODWORKING PLANS: Build a Dado Blade Storage Case
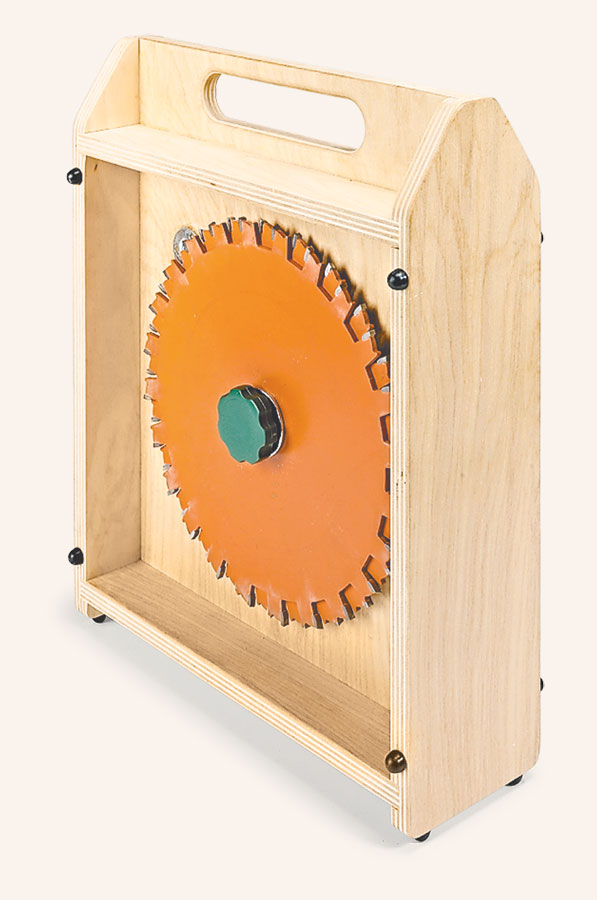
A Simple Storage Solution for Your Dado Blade Set
A stacked dado blade set contains several individual components. In addition to the two outer scoring blades, there are multiple chippers and thin shims used to fine-tune the width of a dado or groove.
Keeping these parts together makes it easier to set up your table saw and helps protect the carbide teeth from accidental damage.
This shop-made dado blade storage case solves both problems with a compact, two-sided design.
One side holds the outer scoring blades, while the opposite side stores the chippers. A separate holder keeps the shims organized and ready to use.
The open design makes it easy to see and access each component without sorting through a box or drawer.
A built-in carrying handle makes the case convenient to move between your storage area and table saw.
Why build this storage case?
- Keeps scoring blades, chippers, and shims together.
- Protects carbide teeth from damage during storage.
- Provides easy access to individual dado blade components.
- Includes a convenient carrying handle.
- Uses inexpensive plywood and common woodworking hardware.
- Requires only basic table saw joinery techniques.
Building the Dado Blade Storage Case
The case is made from 1/2" Baltic birch plywood, making it lightweight, durable, and easy to assemble.
The basic construction consists of a center panel, two sides, a bottom, and two top pieces.
Rather than relying on complicated joinery, the parts fit together using simple dadoes and grooves cut at the table saw.
These joints help align the components during assembly and provide a strong connection between the plywood pieces.
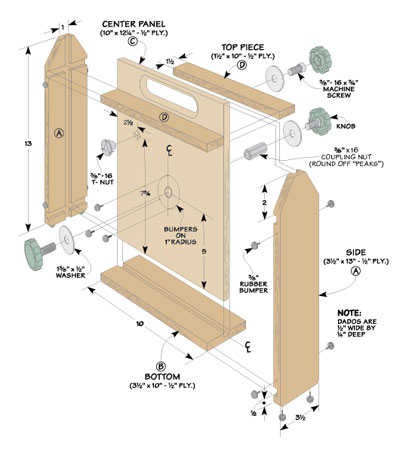
Step 1: Cut the Dadoes for the Top and Bottom
Start by cutting the dadoes in the side pieces that will hold the top and bottom of the case.
Install a 1/4" dado blade in your table saw and position the rip fence to establish the location of the first dado.
Make the initial cut, then adjust the fence and make another pass to widen the dado until it matches the actual thickness of your plywood.
Because plywood thickness can vary slightly from its nominal dimension, it's important to test the fit using a piece of the material you're working with.
Repeat the process to cut the dadoes for the top pieces.
The goal is a snug-fitting joint that holds the parts securely without requiring excessive force during assembly.
Step 2: Cut Perfectly Centered Grooves
The center panel separates the two sides of the storage case and provides the mounting surface for the dado blades and chippers.
To hold this panel securely, you'll need to cut centered grooves in the side pieces and bottom.
There's a simple table saw technique that makes this easy.
Begin by setting the rip fence so the dado blade cuts a groove slightly off-center on the workpiece.
Make the first pass, then turn the workpiece end for end and make a second pass with the opposite face against the fence.
These two passes create a groove that's centered on the thickness of the workpiece.
Next, make small adjustments to the rip fence and repeat the process until the groove matches the thickness of the center panel.
This technique is useful for more than just this project. It's a reliable way to create centered grooves for cabinet backs, drawer bottoms, and other woodworking assemblies.
SHOP TIP: When cutting centered grooves, make matching passes with opposite faces against the fence. This keeps the groove centered even if your initial fence setting is slightly off.
Shaping the Case and Adding a Carrying Handle
Once the joinery is complete, it's time to shape the sides and create the handle.
Step 3: Shape the Sides
The sides of the storage case have rounded lower corners and shaped upper ends.
These details eliminate sharp edges and give the case a more finished appearance.
After trimming the upper ends to shape, smooth the edges and corners with sandpaper.
Step 4: Make the Carrying Handle
The handle is formed by cutting an elongated opening near the top of the center panel.
Start by drilling a hole at each end of the handle opening.
Next, use a jigsaw to remove the waste between the holes.
Finally, smooth the opening with a router and flush-trim bit, using an appropriate guide or template, and ease the edges for a comfortable grip.
The result is a simple, built-in handle that makes the case easy to carry around your workshop.
How to Store Dado Blades and Chippers Safely
With the plywood components prepared, the next step is adding the hardware that holds the dado blade set.
The design uses a coupling nut mounted through the center panel to support the blades on both sides.
Step 5: Install the Blade Storage Hardware
Drill a hole through the center panel to accept a metal coupling nut.
The coupling nut provides a threaded mounting point for securing the blades and chippers.
Depending on the size of your coupling nut and the arbor holes in your dado set, you may need to ease the corners of the nut with a file or sandpaper so the blades slide over it easily.
Secure the coupling nut in the center panel with epoxy.
One important detail is its position.
The coupling nut should extend farther from the side that holds the chippers because the stacked chippers require more space than the two outer scoring blades.
This arrangement allows both sides of the storage case to accommodate their respective components.
Step 6: Add Rubber Bumpers to Protect the Blades
Protecting the carbide teeth is an important consideration when storing a dado blade set.
To prevent the blades from resting directly against the plywood, install small rubber bumpers on the center panel.
These bumpers raise the blades slightly above the surface, making them easier to remove while helping protect their cutting edges.
Additional bumpers around the outside edges and along the bottom provide cushioning when the blades are stored.
This small detail makes a big difference in how convenient the storage case is to use.
A Simple Way to Organize Dado Blade Shims
The final storage feature is a dedicated holder for the thin metal shims used to adjust the cutting width of a stacked dado blade set.
Because these shims are small and easily misplaced, keeping them attached to the case saves time when setting up a dado cut.
The solution is straightforward.
Drill a hole in the center panel and install a T-nut.
Then use a washer and threaded knob to secure the shims in place.
When you need to adjust the width of a dado, simply loosen the knob and remove the appropriate shims.
Once you're finished, return them to the holder so they're ready for the next project.
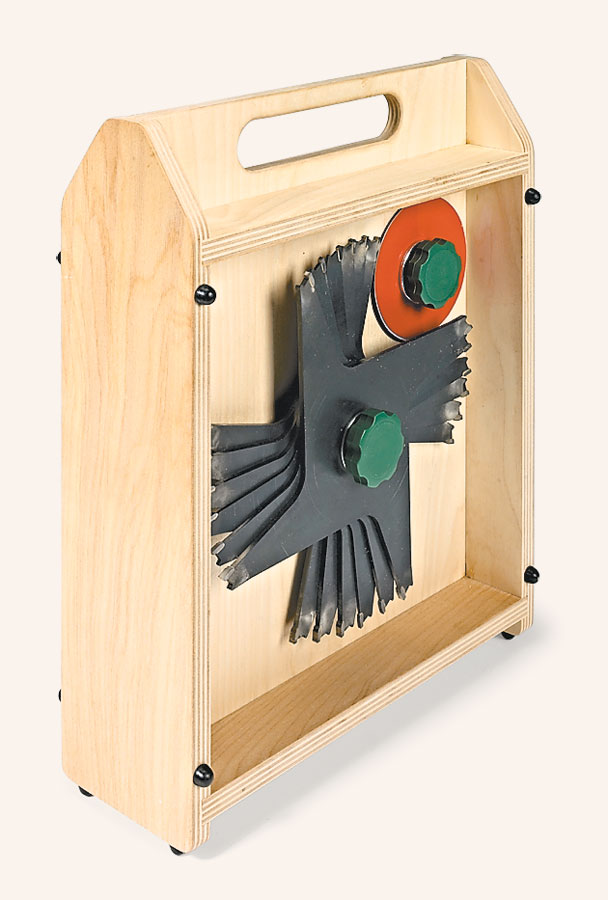
Why a Shop-Made Dado Blade Storage Case Makes Sense
A dado blade is a valuable table saw accessory, and keeping all its components organized makes woodworking more convenient.
This storage case provides a dedicated place for every part of the set while making it easy to carry everything to the table saw.
It's also a satisfying woodworking project because the construction relies on many of the same techniques you'll use when building cabinets, drawers, and furniture.
You'll practice cutting accurate dadoes, creating centered grooves, shaping plywood, and installing hardware.
And when the project is complete, you'll have a practical shop accessory that can serve you for years.
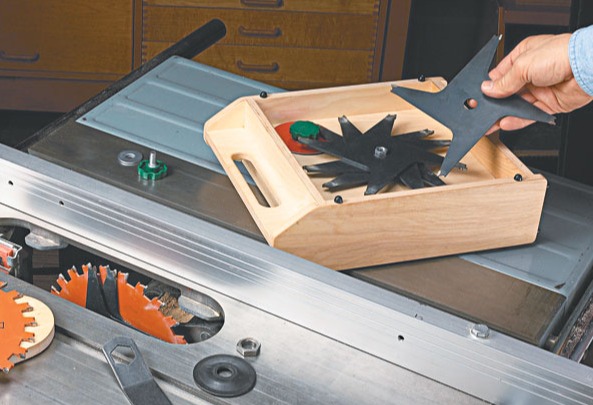
Get the Dado Blade Storage Case Woodworking Plans
Ready to build your own dado blade organizer?
The complete Woodsmith woodworking plans include detailed drawings, a materials list, and step-by-step instructions to guide you through the project.
Whether you're looking for a better way to organize your table saw accessories or simply want a useful weekend woodworking project, this dado blade storage case is a great addition to your shop.
GET THE STEP-BY-STEP WOODWORKING PLANS: Build a Dado Blade Storage Case
Frequently Asked Questions About Dado Blade Storage
What is the best way to store a dado blade set?
A dedicated storage case keeps the outer scoring blades, chippers, and shims together while protecting the carbide teeth from damage. A two-sided case with individual mounting hardware makes the components easy to access and organize.
Can I build a dado blade storage case from plywood?
Yes. This design uses 1/2" Baltic birch plywood, which provides a good balance of strength, stability, and light weight. The case is assembled using basic dado-and-groove joinery.
How do you keep dado blade chippers organized?
The chippers can be stacked on a mounting post or coupling nut inside a dedicated storage case. Keeping them separate from the outer scoring blades makes it easier to select the components needed for a particular dado width.
How should dado blade shims be stored?
Thin dado blade shims are best kept together in a dedicated holder. This storage case uses a T-nut, washer, and threaded knob to secure the shims so they won't get lost between projects.
What woodworking tools do I need to build this storage case?
The project uses a table saw with a dado blade for the primary joinery. A drill, jigsaw, router, and basic sanding tools are used to shape the case and create the carrying handle.
More Ways to Organize Your Table Saw Blades

Looking for more ways to keep your saw blades organized and protected? Check out 3 DIY Saw Blade Storage Ideas: Cabinets, Racks & Pegboard for three practical shop storage solutions. From a space-saving pull-out cabinet to a pegboard organizer and a simple wall-mounted rack, these easy-to-build projects help keep your blades safely stored and within reach.
RELATED ARTICLE: 3 DIY Saw Blade Storage Ideas: Cabinets, Racks & Pegboard


