


Small details can make a big difference in the workshop. Knowing which sanding grit you're holding saves time, a protective pad prevents workholding marks, and a simple spacer can keep a saw from scratching a project.
In this collection of Woodsmith Quick Tips, four readers share practical ways to identify sanding pads, protect workpieces during hand-tool operations, improve tool markings, and trim dowels cleanly.
1. Label Micro-Mesh Sanding Pads with Their Grits

Micro-Mesh sanding pads are useful for working through progressively finer grits, but remembering which color corresponds to which grit can be a challenge. If you misplace the grit chart that came with the pads, identifying them becomes even more difficult.
Greg Kopp of Norwalk, Iowa, found an easy solution.
He uses a fine-tipped marker to write the grit number directly on the edge of each sanding pad. Now, instead of looking up the color on a separate chart, he can identify the grit at a glance.
It's a small change that makes it easier to keep sanding pads organized and work through the grits in the intended order.
Woodsmith Tip: Mark an area that won't contact the workpiece, and let the ink dry before using the pad. Check the manufacturer's grit chart when labeling a new set, since color coding can vary between abrasive products.
Shop tip submitted by Greg Kopp, Norwalk, Iowa.
2. Use a Leather Strop as a Holdfast Cushion

Holdfasts are a convenient way to secure workpieces to a bench, especially during hand-tool operations such as chopping dovetails. But the pressure from a holdfast can leave dents in softer woods.
Bill White of Grand Portage, Minnesota, found a clever use for another tool already on his bench: his leather strop.
When he needs to hold a workpiece securely, Bill places the strop between the holdfast and the wood. The leather cushions the contact point and helps prevent the holdfast from denting the surface.
It also keeps his strop close at hand. While working, he can quickly use it to touch up his chisel's cutting edge before returning to the dovetails.
Woodsmith Tip: Position the strop so the holdfast bears on a stable area and the workpiece can't slip. Keep the stropping surface free of grit and debris that could scratch the wood or damage a cutting edge.
Shop tip submitted by Bill White, Grand Portage, Minnesota.
3. Make Wrench Sizes Easier to Read with a Paint Pen
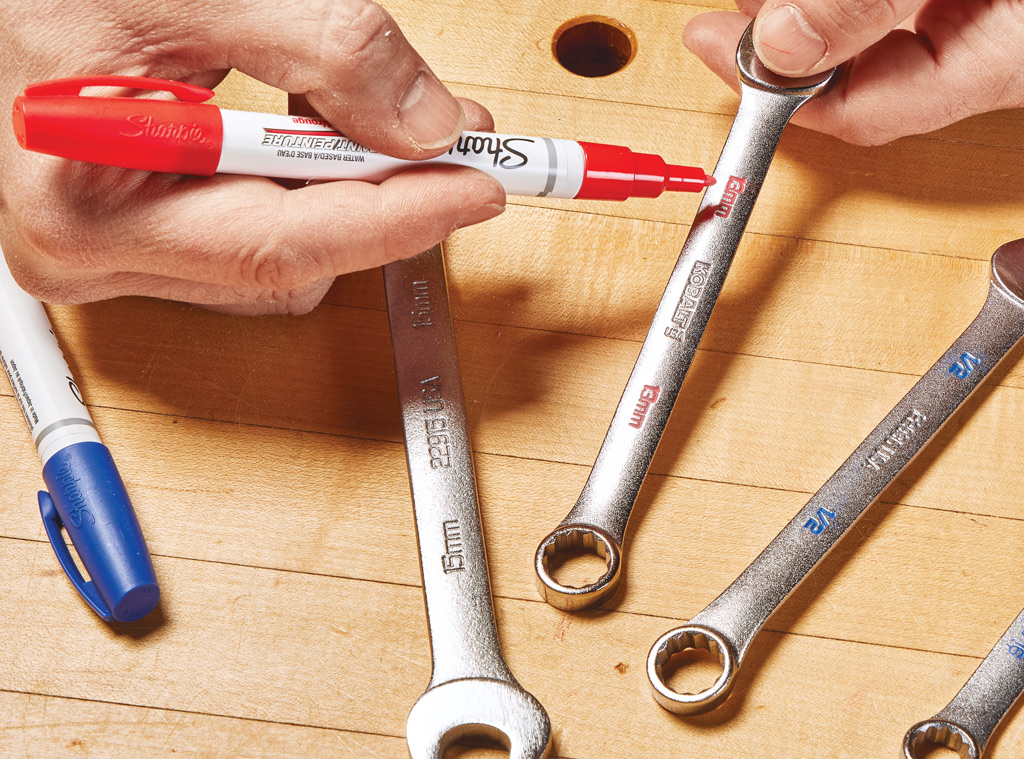
Engraved or stamped markings on wrenches can be difficult to read, particularly in a dimly lit shop. When several similar-sized wrenches are stored together, finding the one you need can take longer than it should.
Ronald Yoder of Burnsville, Minnesota, uses an oil-based paint pen to make the markings stand out.
He applies paint over the recessed lettering and size numbers, allowing it to flow into the markings.

Then he wipes away the excess paint from the surrounding surface. The paint left in the recesses creates a bright contrast, making the wrench size easier to identify.
It's a straightforward upgrade for tools with shallow or hard-to-read markings.
Woodsmith Tip: Clean the wrench before applying the paint, and choose a color that contrasts with the metal. Follow the paint pen's instructions for drying and curing before putting the wrench back into service.
Shop tip submitted by Ronald Yoder, Burnsville, Minnesota.
4. Use a Sanding Disc as a Spacer When Trimming Dowels

A flush-cut saw is handy for trimming dowels after assembly, but it's possible to scratch the surrounding wood if the saw blade rubs against the project.
Logan Wittmer of Runnells, Iowa, uses a sanding disc to provide a little clearance.
When he needs to trim a dowel, Logan slips the disc over the dowel and against the project surface. He then cuts the dowel using the disc as a spacer between the saw and the wood.
The thickness of the disc leaves the dowel slightly proud of the surface. After removing the disc, he sands the remaining material flush.
This two-step approach helps protect the surrounding surface while still producing a clean, flush dowel.
Woodsmith Tip: Use a clean disc with the abrasive side facing away from the finished surface, and keep it steady while cutting. Leave enough material for final sanding rather than trying to cut the dowel perfectly flush in one pass.
Shop tip submitted by Logan Wittmer, Runnells, Iowa.
Simple Improvements for More Precise Woodworking
These four reader-submitted tips show how small changes can make familiar tasks easier. Labeled sanding pads eliminate guesswork, a leather strop protects workpieces from holdfast dents, painted wrench markings improve visibility, and a sanding-disc spacer helps prevent scratches when trimming dowels.
Each idea is easy to adapt to your own workshop using tools and materials you may already have.


