


How to Make a Table Saw Push Block from Scrap Wood
A good table saw push block is one of the most important accessories you can keep within reach of your saw. It allows you to guide a workpiece through a rip cut while keeping your hands away from the blade. And when you're cutting narrow boards or thin strips, having better control over the workpiece makes a big difference.
While there are plenty of commercial push blocks and push sticks available, this simple shop-made design is one of our favorites. It's inexpensive, comfortable to use, and built from materials you probably already have in your scrap bin.
Best of all, the parts that contact the saw blade are designed to be replaced, so you can keep using the same handle for years.
In the video above, we demonstrate how to build this DIY table saw push block using scrap 2x4 lumber, a piece of hardboard, and a few screws. You'll also see how the design provides both forward and downward pressure for better control when ripping boards.
DOWNLOAD THE FREE STEP-BY-STEP PLANS - BUILD A TABLE SAW PUSH BLOCK
Why Use a Push Block at the Table Saw?
When ripping lumber at the table saw, it's important to maintain control of the workpiece throughout the cut while keeping your hands a safe distance from the blade.
A traditional push stick typically contacts the back edge of the board, allowing you to push it forward. While push sticks are useful in many situations, a well-designed push block offers an additional advantage.
By resting on top of the workpiece, a push block allows you to apply both forward and downward pressure. This helps keep the board against the saw table as it moves through the cut.
The result is better control, especially when working with narrow or thin stock.
A push block isn't a substitute for the saw's blade guard, riving knife, or other safety equipment. Instead, it's another tool that helps you maintain control and keep your hands away from the cutting area.
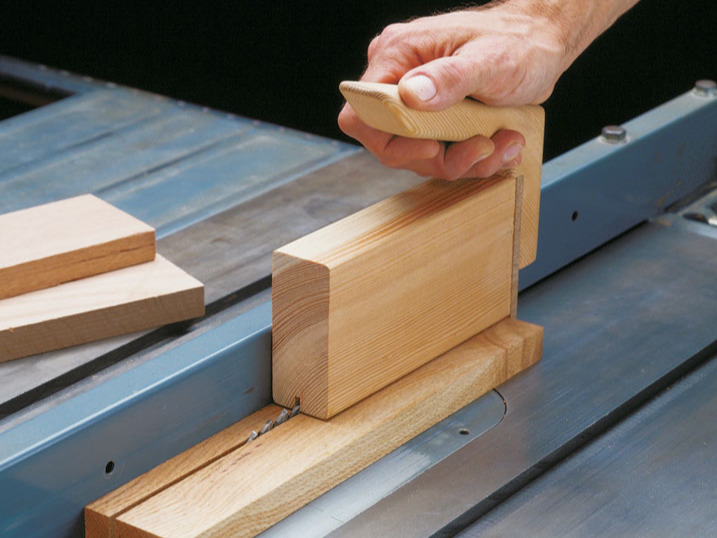
A Simple Push Block Made from Scrap Wood
One of the best features of this design is its simplicity.
You don't need expensive hardwood, specialty hardware, or complicated joinery. The entire push block consists of three basic parts:
- Wooden handle: Cut from a scrap 2x4, the angled handle provides a comfortable grip and keeps your hand elevated above the workpiece.
- Sacrificial base: Another piece of 2x4 forms the body of the push block and provides a broad surface for applying downward pressure.
- Replaceable heel: A piece of 1/4"-thick hardboard or plywood extends below the base to catch the back edge of the workpiece.
The handle is attached to the base with screws, sandwiching the hardboard heel between the two pieces.
This straightforward construction makes the push block quick to assemble and easy to repair when the working surfaces become worn.

How to Make a DIY Table Saw Push Block
Building this table saw accessory requires only a few basic woodworking operations.
Shape the Handle
Start with a scrap piece of 2x4 lumber.
The handle features a comfortable opening that provides plenty of room for your fingers while positioning your hand above the workpiece.
Begin by drilling the rounded portion of the handle opening with a large Forstner bit at the drill press.
Then move to the band saw to cut the remaining handle profile.
The angled design creates a natural grip while keeping your hand away from the blade during use.
After cutting the handle, smooth the edges to remove sharp corners and create a comfortable gripping surface.
Add the Base and Replaceable Heel
The base is simply another piece of 2x4 lumber.
Cut a strip of 1/4"-thick hardboard or plywood to serve as the heel. Position it between the handle and base so it extends slightly below the bottom of the block.
This projecting heel is what catches the back edge of the workpiece and helps push it through the cut.
Secure the handle, heel, and base together with screws.
Because the assembly is screwed together rather than glued, the sacrificial parts can be removed or repositioned as they wear.
Why the Replaceable Parts Matter
Unlike many woodworking jigs, a table saw push block is designed with the expectation that parts of it may eventually contact the blade.
That's why this design uses inexpensive, replaceable materials for the base and heel.
As you use the push block, the saw blade may cut into the sacrificial base or hardboard heel. When those surfaces become worn, you can disassemble the block and flip the components to expose fresh edges.
Once both sides are worn, simply replace the damaged pieces with new scraps.
The handle can be reused, so there's no need to rebuild the entire push block every time the working surfaces wear out.
This makes the design especially practical for a busy woodworking shop.
Push Block vs. Push Stick: What's the Difference?
Both push blocks and push sticks have a place in the woodworking shop. The best choice depends on the cut you're making, the size of the workpiece, and the clearance around the blade and fence.
A table saw push stick generally contacts the rear of the workpiece to move it forward. Its narrow profile can be useful where space is limited.
A table saw push block, on the other hand, provides a larger contact surface. This allows you to apply downward pressure while moving the board forward.
The projecting heel also helps maintain positive contact with the back edge of the workpiece.
For many ripping operations, especially when working with thin stock, a push block provides a useful combination of control and hand clearance.
Regardless of which accessory you choose, make sure it is appropriate for the cut and does not interfere with the blade guard, riving knife, or fence.
Tips for Using a Table Saw Push Block Safely
A push block is most effective when used as part of a safe, well-planned cutting setup.
Before making a cut, inspect the push block for damage and make sure the handle and heel are securely attached.
Position the block so it provides firm contact with the workpiece without forcing your hand toward the blade.
Maintain steady feed pressure and keep the workpiece controlled as it passes the blade. Use appropriate featherboards, push sticks, or other accessories when additional guidance is needed.
Always use the blade guard and riving knife when the operation permits, and avoid standing directly in the potential path of kickback.
Finally, replace worn or damaged push block components before they affect your ability to maintain control.
Download the Free Table Saw Push Block Plans
A useful woodworking jig doesn't need to be complicated or expensive.
This shop-made push block combines a comfortable handle, replaceable components, and straightforward construction into an accessory you'll reach for regularly.
With a couple of 2x4 scraps, a small piece of hardboard, and a few screws, you can build a practical table saw accessory that helps you maintain control while keeping your hands away from the blade.
DOWNLOAD THE FREE STEP-BY-STEP PLANS - BUILD A TABLE SAW PUSH BLOCK
Download the complete step-by-step Woodsmith woodworking plans, including detailed drawings and dimensions, to build your own table saw push block.


