


The mortise-and-tenon joint is one of the most useful joints in woodworking. Its combination of mechanical strength and generous gluing surface makes it ideal for everything from tables and chairs to cabinets and workbenches. But the strength of the joint depends on getting a good fit between the mortise and tenon.
When I make mortise-and-tenon joints, I generally cut the mortise first and then size the tenon to fit. This makes cutting the tenon the critical part of the process. The shoulders need to be straight and square, the cheeks should be smooth, and the tenon needs to fit snugly into the mortise without requiring excessive force.
Fortunately, the table saw makes this job fairly straightforward. There are two reliable ways to cut tenons: using a stacked dado blade to remove the waste in multiple passes, or using a standard blade with a tenoning jig to make precise cheek cuts. Both methods produce accurate results, but each has its advantages.

Understanding the Parts of a Tenon
Before getting started, it helps to understand the basic parts of a tenon. The shoulders are the surfaces that meet the mortised workpiece when the joint is assembled. The cheeks are the broad faces of the tenon that fit against the walls of the mortise, providing much of the gluing surface.
When cutting tenons, I focus on three goals. First, the shoulders need to be clean, straight, and square to the faces and edges of the workpiece. Second, the tenon must be accurately sized for a snug fit in the mortise. Finally, the cheeks should be reasonably smooth to provide good glue contact.
Both table saw methods can accomplish these goals. The difference comes down to the blade and setup you use. A dado blade makes it easy to remove material quickly, while a standard blade and tenoning jig can produce especially smooth cheeks with minimal cleanup.
Method 1: Cutting Tenons with a Dado Blade
Using a stacked dado blade is a straightforward way to cut tenons, particularly when you have several identical joints to make. The wide blade allows you to establish the shoulders and remove the waste from the cheeks in just a few passes.
I often choose this method when making multiple tenons because the setup is simple and the cutting goes quickly. Once the blade height and fence position are dialed in, you can cut a batch of matching tenons without changing the setup.
Set Up the Table Saw
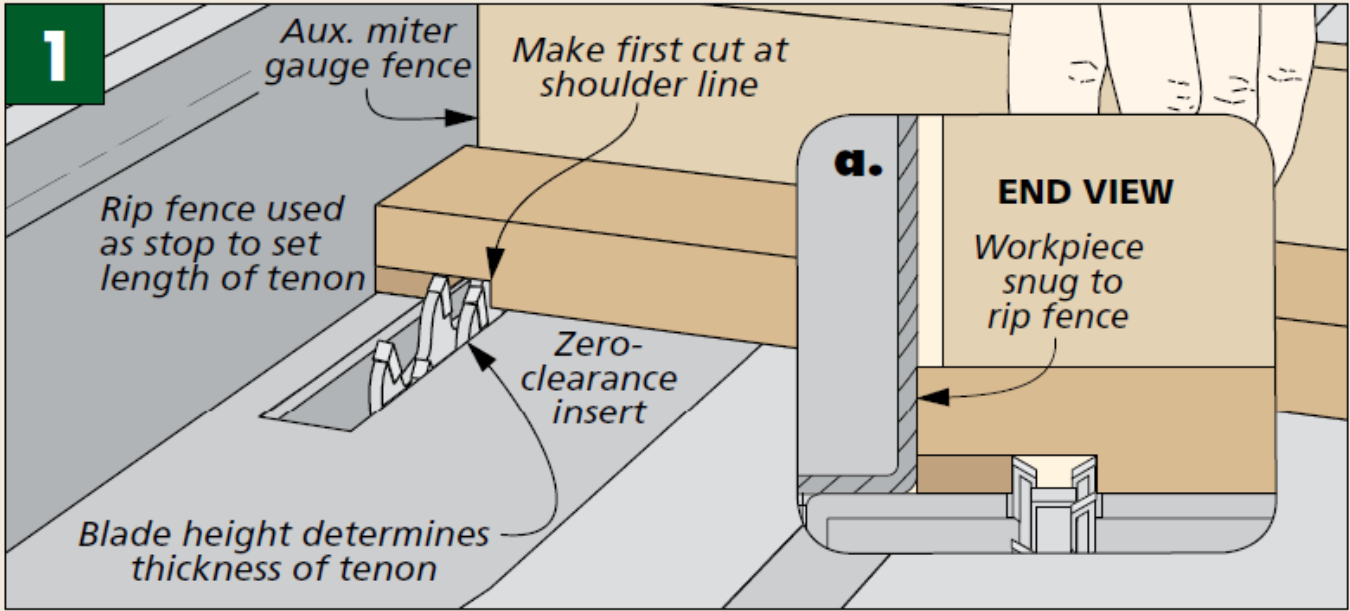
Start by installing a wide dado blade and a suitable zero-clearance insert in your table saw. Attach an auxiliary fence to the miter gauge to support the workpiece and back up the cut. The rip fence serves as a stop to establish the length of the tenon.
The first adjustment is the blade height, which determines the thickness of the tenon. Rather than trying to set the height by measurement alone, I use a scrap piece of the same thickness as the actual workpiece.
Set the blade slightly low and make a cut across the end of the test piece on both faces. Compare the resulting stub tenon to the mortise, then raise the blade slightly and repeat the process until the test tenon fits snugly.
Next, adjust the rip fence to establish the tenon length. Start with a cut just short of the shoulder layout line, then move the fence incrementally until the cut reaches the desired position.
Cut the Tenon Cheeks
With the setup complete, start by making a cut along the shoulder line. Keep the workpiece flat on the saw table, snug against the auxiliary miter gauge fence, and properly positioned against the rip fence stop.
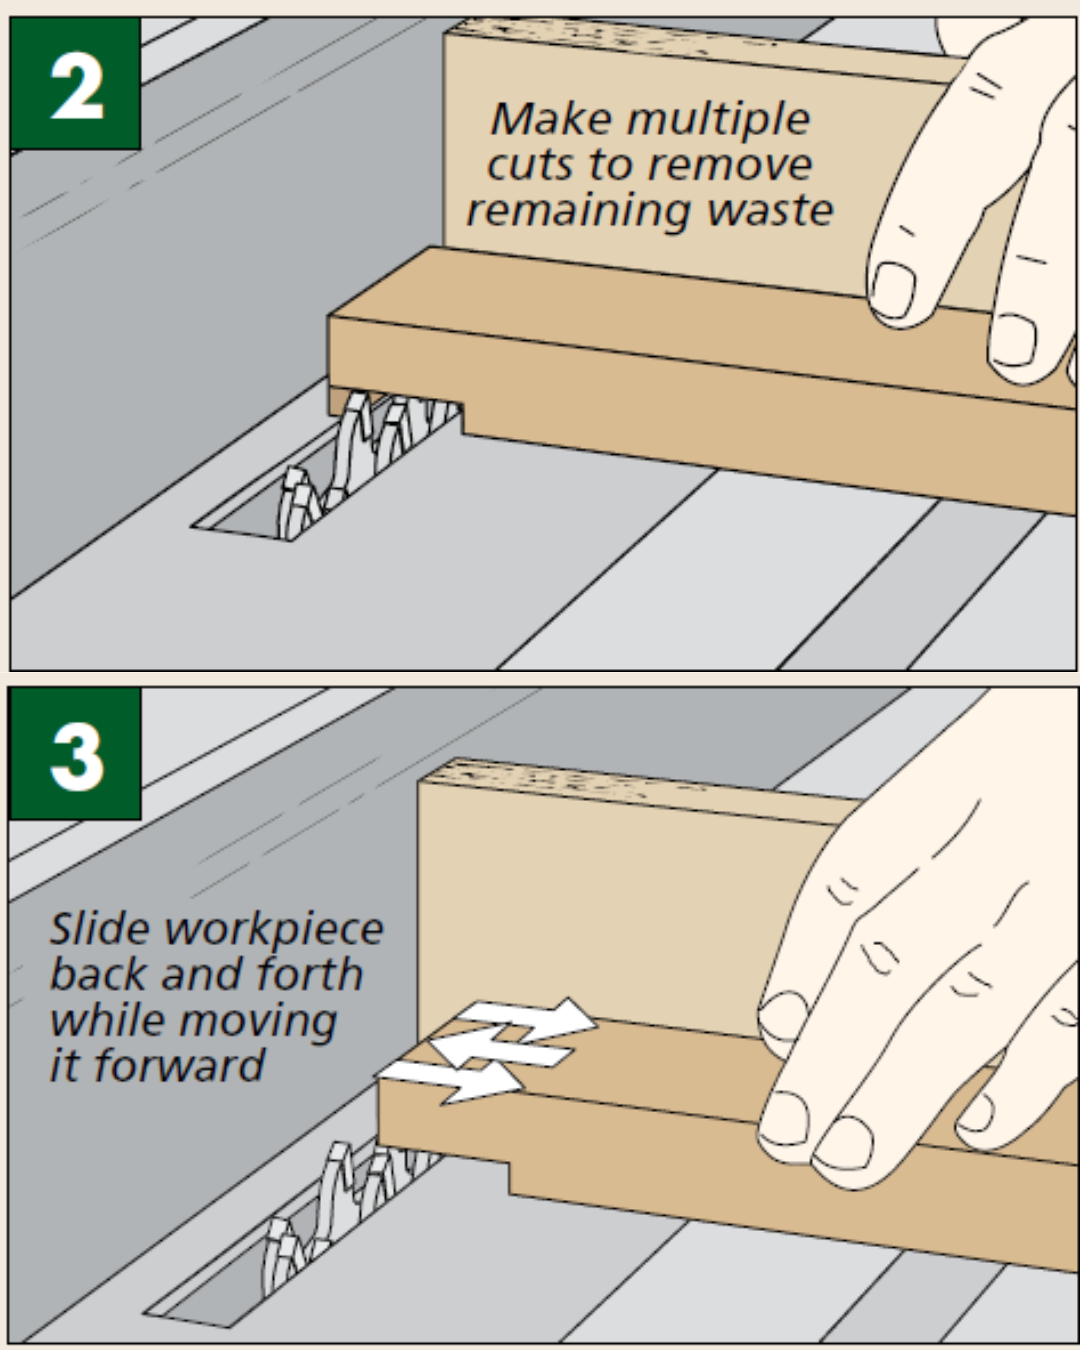
Once the shoulder is established, remove the remaining waste by making additional passes over the dado blade, working back toward the end of the tenon. Repeat the process on the opposite face.
The dado blade may leave small ridges or score marks on the cheeks. You can smooth these out with a series of controlled side-to-side passes over the dado blade, as shown in the original illustration.
Cut the Short Shoulders and Size the Tenon Width
At this point, the tenon has its final length and thickness. The next step is to cut the short shoulders and edges to establish its width.
You may need to adjust the blade height, but the rip fence remains in the same position. Hold the workpiece on edge against the auxiliary miter gauge fence and begin cutting at the end of the tenon rather than at the shoulder. This helps prevent splintering where the edge meets the cheek.
Continue removing the waste in successive passes, working back toward the shoulder. Finish with a light cut along the shoulder line, taking care not to damage the long shoulders. Repeat the process on the opposite edge, and the tenon is ready for a test fit.
Method 2: Cutting Tenons with a Standard Blade and Tenoning Jig
A standard table saw blade offers another accurate way to cut tenons. This method is particularly useful when you want smooth, clean cheeks, such as when making a bridle joint or other joinery where the cut surfaces may remain visible.
Unlike the dado blade method, this technique separates the shoulder cuts from the cheek cuts. The shoulders are cut with the workpiece lying flat on the saw table. Then the workpiece is held upright in a tenoning jig to remove the waste from the cheeks and edges.
The tenoning jig supports the workpiece and helps keep it square to the blade, making it easier to produce consistent results.
Start by Cutting the Shoulders
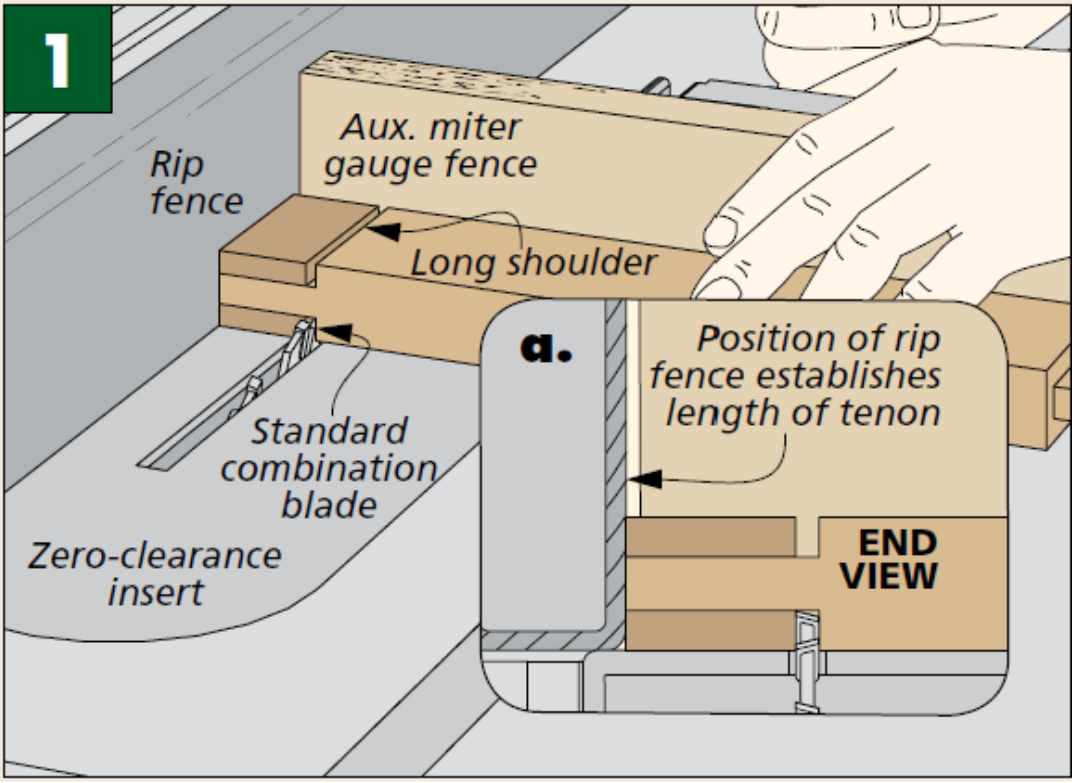
Begin with a standard table saw blade. A combination blade works well for this technique. Attach an auxiliary fence to the miter gauge, just as you would for the dado blade method.
Set the blade height to establish the depth of the long shoulders. This setting doesn't need to be quite as precise as it does with the dado blade method, since the cheek cuts will determine the final tenon thickness. I generally make a few test cuts across the end of a scrap piece to get the blade height close.
Next, position the rip fence to establish the tenon length. This adjustment is important because the shoulder cuts determine how deeply the tenon will seat in the mortise.
With the settings established, make a cut across each face of the workpiece to form the long shoulders. Keep the workpiece flat on the table and snug against the auxiliary fence throughout each cut.
Cut the Short Shoulders
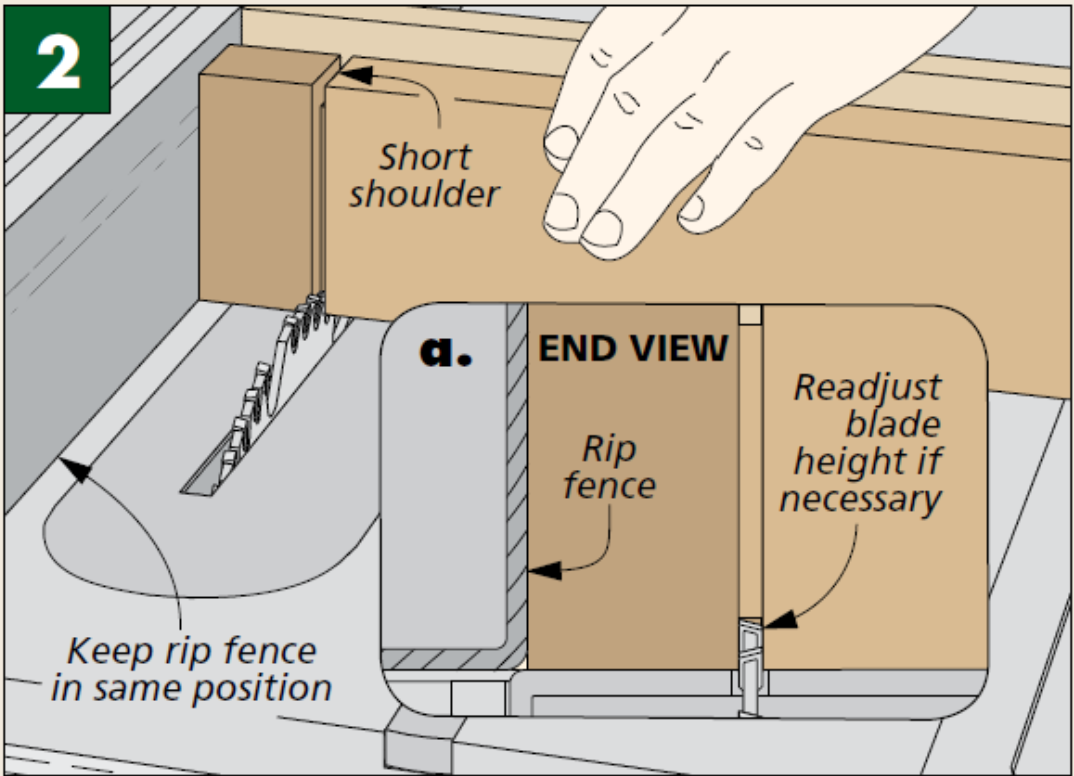
The short shoulders are cut using the same basic setup. Stand the workpiece on edge against the auxiliary miter gauge fence, adjusting the blade height if necessary.
Make a cut across each edge to establish the short shoulders. Take care not to cut into the long shoulders you've already formed. These surfaces need to remain clean and square for the joint to close properly during assembly.
Once all four shoulders are cut, you're ready to remove the waste and form the tenon.
Set Up the Tenoning Jig
A tenoning jig holds the workpiece vertically as it passes the table saw blade. There are several designs available, but the shop-made jig shown in the original article is essentially a saddle that rides along the saw's rip fence.

A vertical fence keeps the workpiece straight and square, while the jig provides a stable surface for clamping. Adjusting the position of the cut is as simple as moving the rip fence.
Before cutting the cheeks, set the blade height. Stand the workpiece beside the blade and use the shoulder cut as a reference. Raise the blade so it cuts just slightly below the shoulder line.
Next, position the rip fence to establish the tenon thickness. Make sure the waste falls freely to the outside of the blade rather than becoming trapped between the blade and jig.

Make the Cheek Cuts
Clamp a test piece securely in the jig, starting with a fence setting that leaves the tenon intentionally oversized. Make the first cheek cut, then flip the workpiece side-for-side in the jig to cut the opposite cheek.
Compare the resulting tenon to the mortise. If it's too thick, adjust the rip fence slightly and make another pair of cuts. Continue testing and adjusting until the tenon slides into the mortise with a snug fit.
Once the fence is dialed in, you can cut the cheeks on the remaining workpieces. Keep each piece seated firmly against the jig and clamped securely as you feed it past the blade.
The result should be a tenon with smooth, straight cheeks and a consistent thickness.
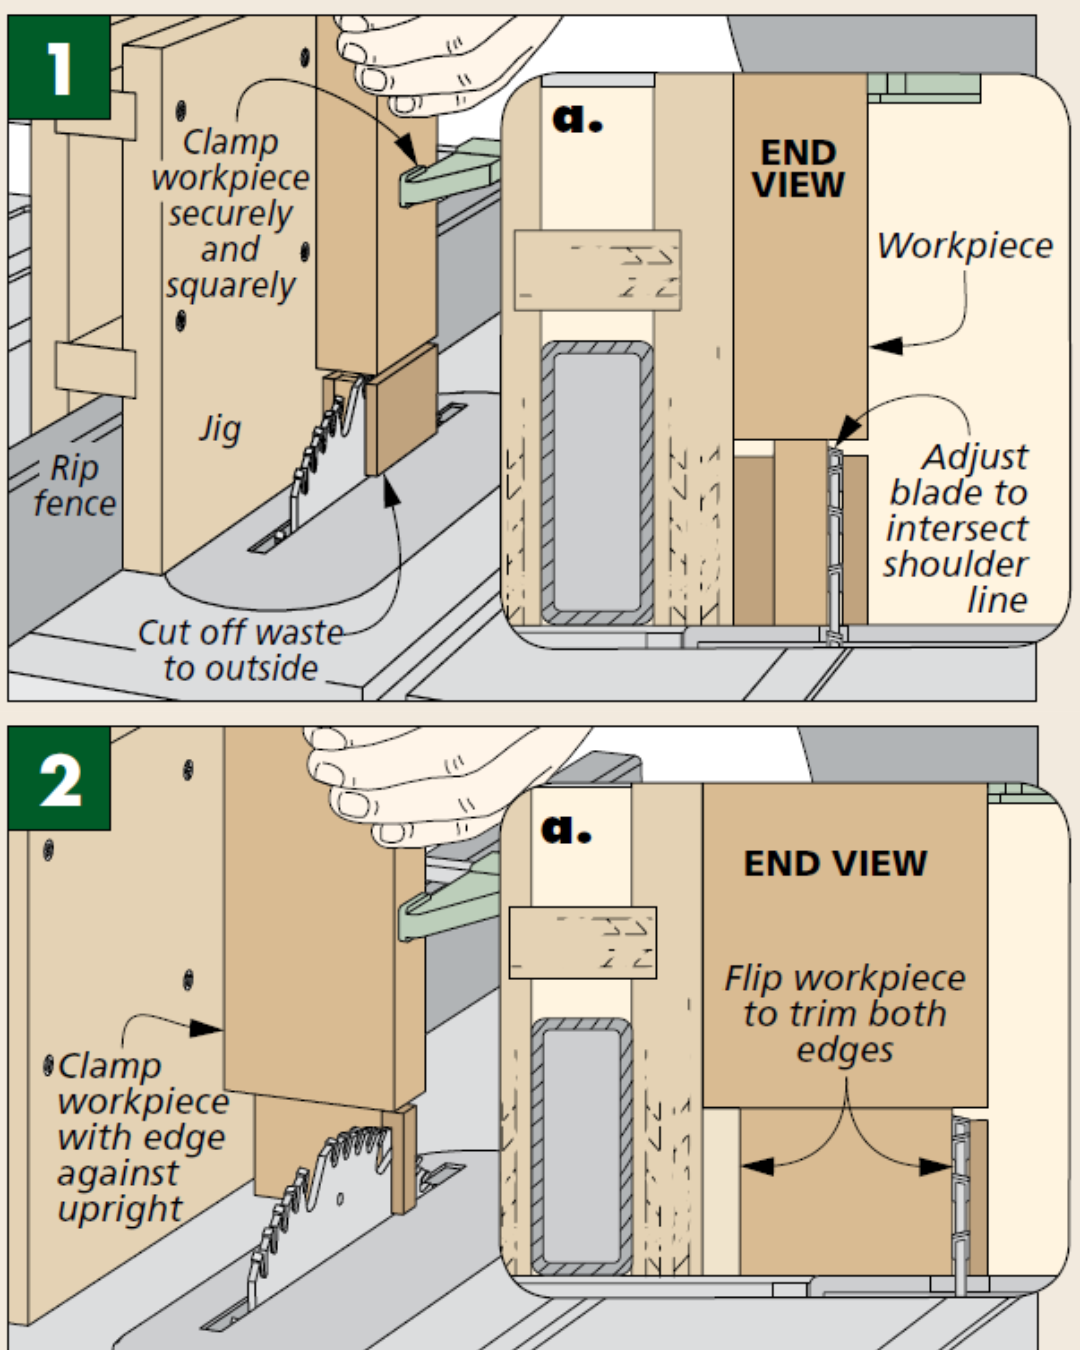
Trim the Tenon to Width
The final operation is to size the width of the tenon by trimming its top and bottom edges. This is also done with the workpiece clamped vertically in the jig, but turned 90° from its previous orientation.
Adjust the rip fence to establish the width, keeping the waste on the outside of the blade. Make a cut along each edge, then test the tenon against the mortise.
A properly sized tenon should slide into the mortise with firm hand pressure. If it's too tight, make a small adjustment and remove a little more material.
How to Fine-Tune the Fit of a Tenon
Even with a carefully adjusted table saw, you may need to do a little final fitting. Small imperfections in the shoulders or cheeks can prevent a joint from closing completely. Fortunately, most of these problems are easy to correct with a few hand tools.
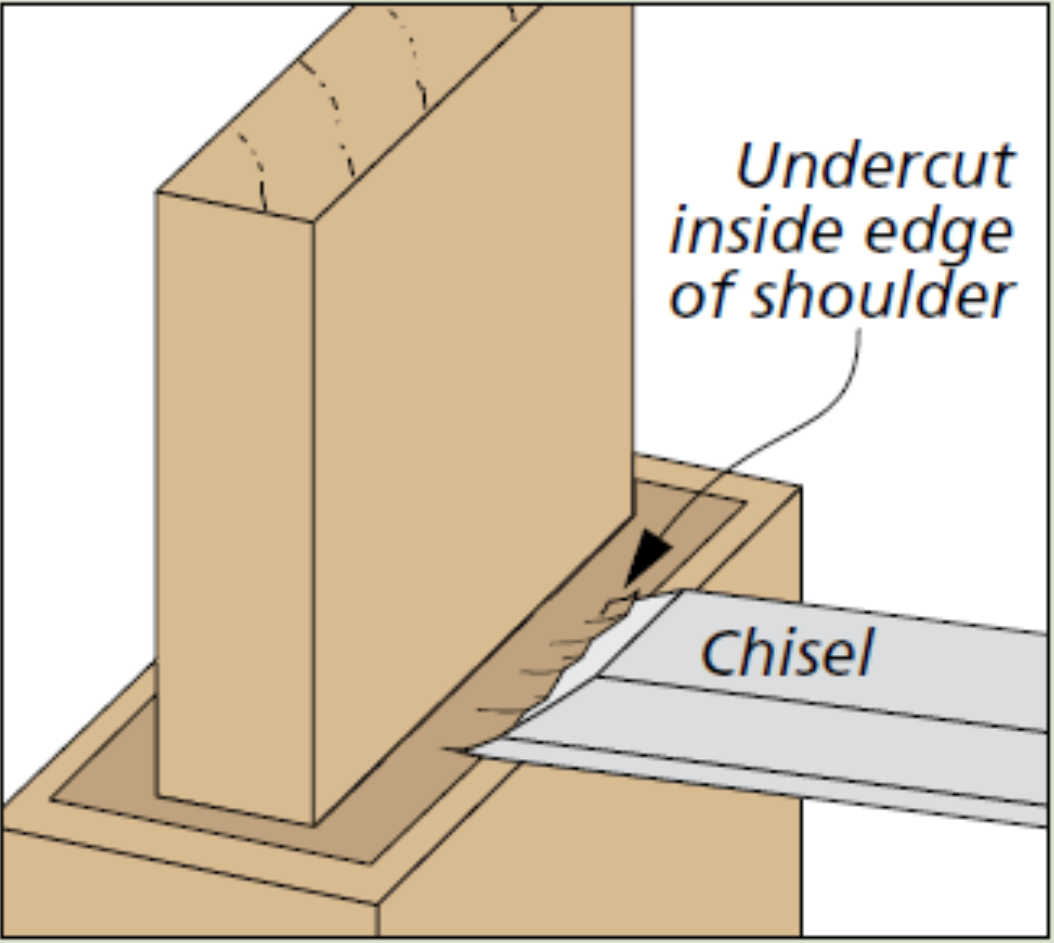
1. Undercut the shoulders: Use a sharp chisel to slightly undercut the shoulders. This creates a little relief behind the visible edges and helps the joint close without gaps.
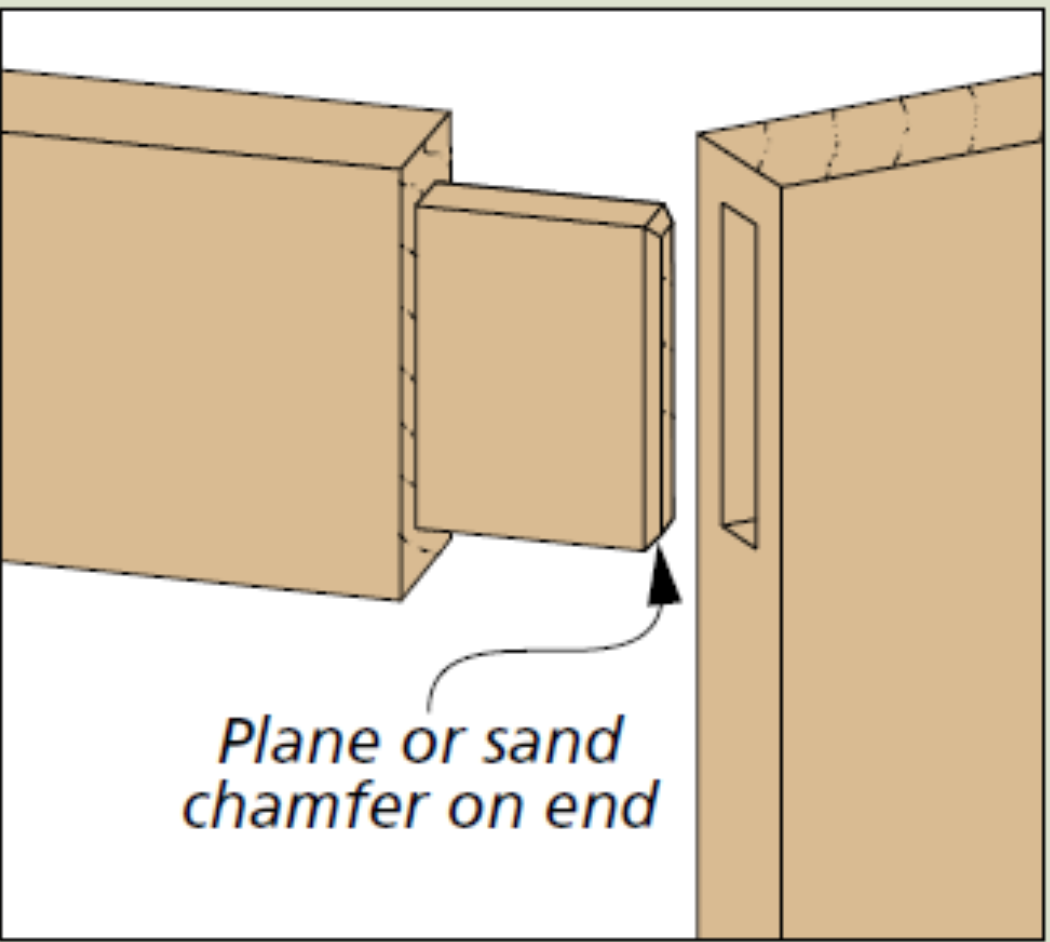
2. Chamfer the tenon ends: A small chamfer on the end of the tenon makes assembly easier and provides a little clearance for excess glue.
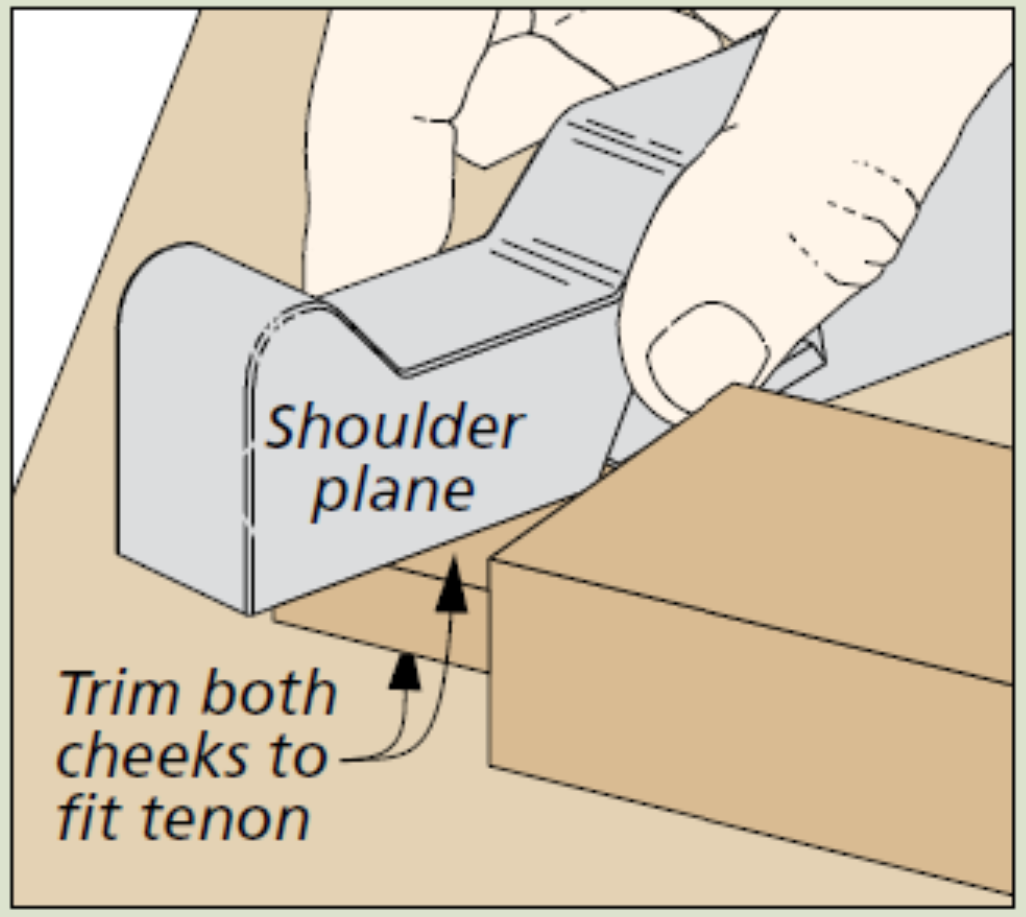
3. Correct an overly tight fit: If the tenon is slightly too thick, use a shoulder plane, rasp, or sandpaper to remove a small amount of material. Work gradually and check the fit frequently.
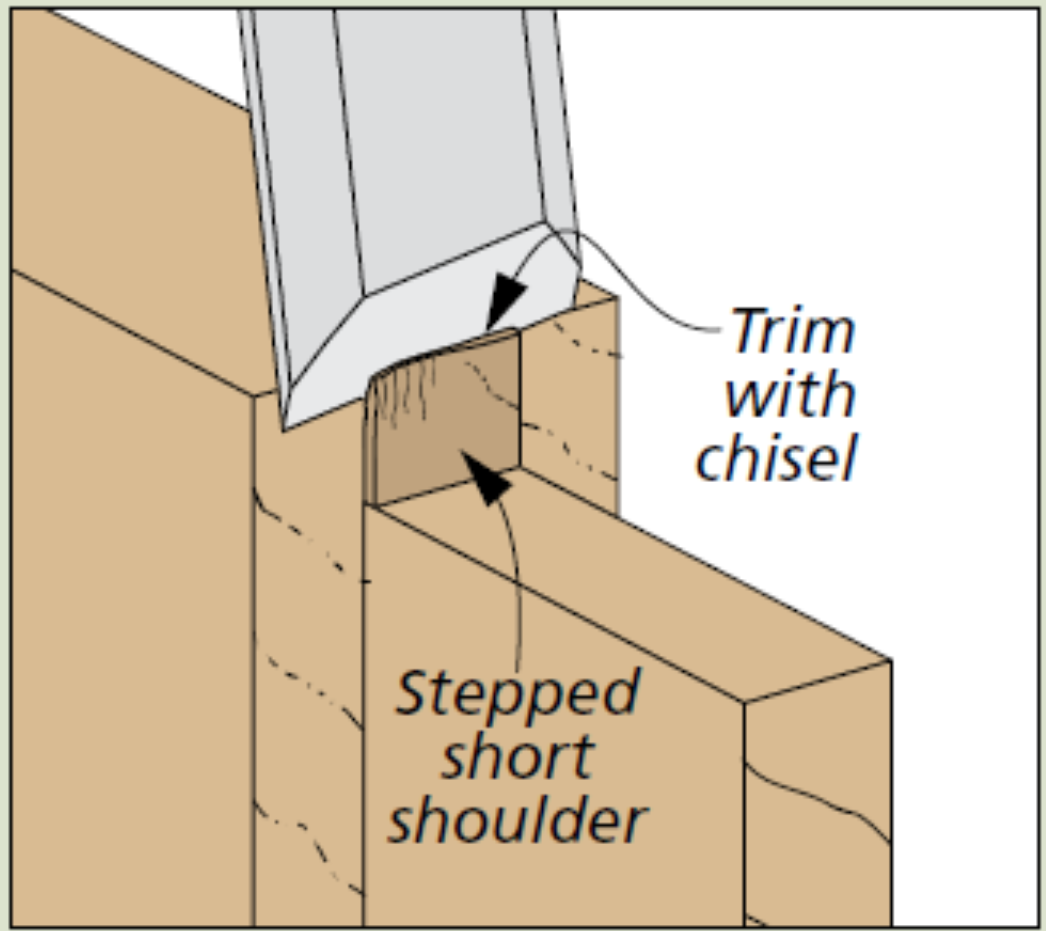
4. Trim uneven shoulders: If a short shoulder has a small step or ridge, pare it flush with a sharp chisel. A clean shoulder helps the joint close tightly against the mortised piece.
Which Table Saw Tenoning Method Should You Use?
Both methods can produce accurate, strong mortise-and-tenon joints. The choice depends on the type of joint you're making, the equipment you have available, and how many tenons you need to cut.
The dado blade method is especially convenient when cutting a batch of identical tenons. Its wide cutting surface removes waste quickly, and the setup is relatively simple. However, the cheeks may require some additional cleanup to remove ridges left by the blade.
A standard blade and tenoning jig offer greater control over the cheek cuts and can produce smoother surfaces. This approach is particularly useful for joinery where the cheeks will be visible or where a clean cut is especially important.
Whichever method you choose, the key is to cut the mortise first, use test pieces to dial in your setup, and gradually adjust the tenon until it fits properly. Once you've established a reliable process, cutting accurate tenons on the table saw becomes a straightforward part of your woodworking routine.
Explore More Mortise-and-Tenon Techniques
Cutting accurate tenons is only half the process. If you're looking for ways to cut the matching mortises, Woodsmith has several techniques and shop-made jigs to help you get the job done.
Start with our article on making mortise-and-tenon joints in three simple steps for a basic approach using a drill press and table saw. For more specialized methods, explore our router mortising techniques and precision mortising jigs.
With a good understanding of both sides of the joint, you'll be ready to tackle mortise-and-tenon joinery in everything from simple shop projects to fine furniture.


