


Tambour doors have a bit of woodworking magic to them. Slide the door open and the entire wooden panel seems to disappear inside the cabinet. But despite their unusual appearance and movement, making a tambour door is easier than you might think.
A traditional wooden tambour door consists of narrow wood slats attached to a flexible canvas backing. The canvas holds the individual slats together while allowing the completed panel to bend around curves and travel through grooves cut into the sides of a cabinet.
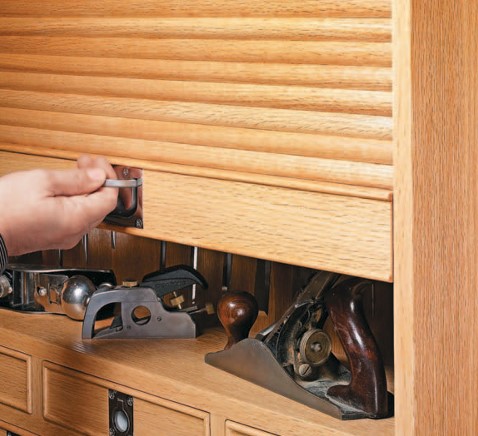
Besides looking impressive, tambour doors offer a practical advantage. Unlike a hinged cabinet door, a sliding tambour door doesn't require any clearance in front of the cabinet. The entire door remains contained within the case, making it a great space-saving option for tool cabinets, roll-top desks, appliance garages, and other woodworking projects.
The process can be broken into three main stages: making the tambour slats, attaching them to the canvas backing, and completing the final fitting and assembly.
How a Tambour Door Works
The secret behind a tambour door is its flexibility. A series of narrow wood slats are glued side-by-side to a piece of canvas. Although the individual slats are rigid, the canvas between them acts like a hinge, allowing the entire panel to flex.
The ends of the tambour ride in grooves cut into the sides of the cabinet. These grooves guide the door around a curved path and into a hidden pocket at the back of the case.
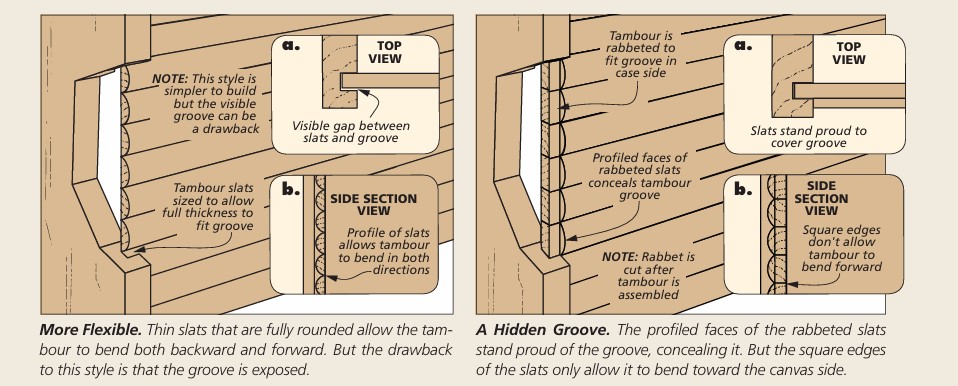
There are several ways to design the slats. A simple tambour can use slats sized so their full thickness fits inside the grooves. This works well, but the grooves remain visible when the door is closed.
For a cleaner appearance, I prefer using thicker slats and rabbetting the ends of the completed tambour to fit the grooves. This allows the rounded faces of the slats to stand proud of the grooves and conceal them when the door is closed.
Plan for the Bend Before Making the Tambour
One detail to consider before cutting any wood is how the finished tambour needs to flex.
Fully rounded slats can allow a tambour to bend in both directions. Slats with rounded faces but square edges where they meet will generally allow the panel to bend in only one direction.
That isn't necessarily a disadvantage, but you'll need to account for it when designing the cabinet. A one-way-bending tambour may require a wider entry channel at the back of the case so the completed panel can be fed into its grooves.
Once you have the design worked out, it's time to make the slats.
Making the Wooden Tambour Slats
Making tambour slats is a repetitive process, but it isn't especially difficult. The key is consistency. Every slat should have the same profile, thickness, and length so the completed door looks uniform and slides smoothly.
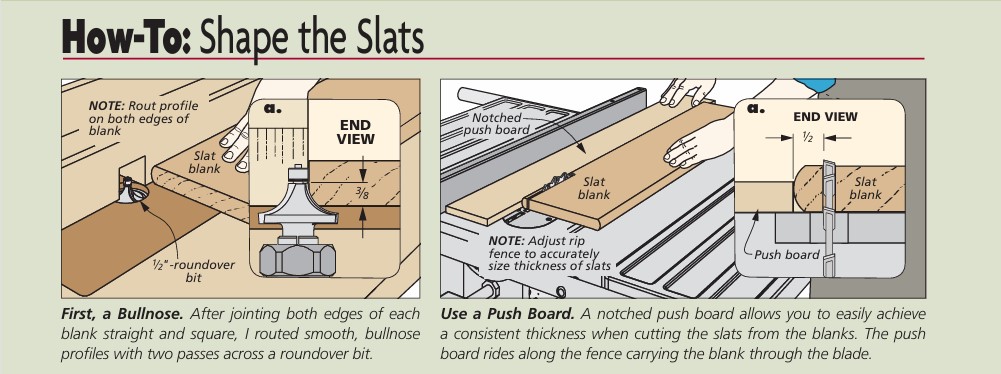
Rather than shaping each narrow slat individually, start with several wide blanks. For this door, I used extra-long blanks about 6" to 8" wide and planed them to 3⁄4" thick. Joint the edges so they're straight and smooth before moving to the router table.
Rout the Bullnose Profile
The rounded face of each tambour slat begins as a bullnose profile routed along the edge of the wider blank. Rout the profile on both edges before heading to the table saw.
Take your time with this operation. The slats will be one of the most visible parts of the finished cabinet, so a smooth, chatter-free profile is important.
After routing both edges, rip the profiled slats from the blank at the table saw. Then return to the router table, shape the newly exposed edges, and repeat the process until you've made all the slats you need.
Keep the Slats a Consistent Thickness
Consistency is especially important when ripping the individual tambour slats. Variations in thickness can create uneven gaps and make assembling the canvas-backed panel more difficult.
A notched push board that registers against the rip fence makes this repetitive operation much easier. It automatically positions the blank for each cut, helping produce slats of consistent thickness while keeping the process moving efficiently.
It's also worthwhile to make a few extra slats. You can then reject any pieces that aren't perfectly straight or arrange the slats for the best grain and color match.
For this particular tambour, I made 40 slats. That's more than necessary simply to cover the cabinet opening. The additional slats extend into the cabinet and help counterbalance the weight of the door as it opens and closes.
Cut Every Slat to the Same Length
Once all the slats are shaped and ripped, cut them to final length.
The exact dimension will depend on your cabinet, but what's most important is that every slat is exactly the same length. In our project, the slats were cut to 27 3⁄16".
A stop block attached to a long auxiliary miter gauge fence makes quick work of this task and ensures that all the slats match.
Build a Jig for Assembling the Tambour
With the slats complete, you're ready for the most important part of the process: attaching the canvas.
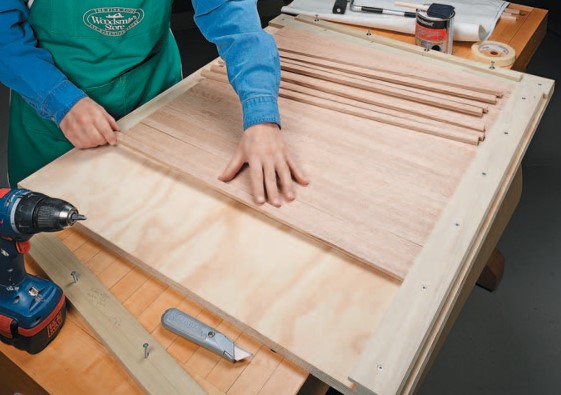
A simple tambour assembly jig makes this job much easier. The jig keeps the individual slats square, tightly packed, and perfectly aligned while the canvas backing is glued in place.
The jig consists of a plywood base with rabbeted cleats and stops that capture the ends and edges of the slats. Another removable cleat holds the canvas in position during glue-up.
This may seem like an extra step, but the jig takes much of the frustration out of making a canvas-backed tambour door.
Arrange the Slats in the Jig
Place the slats in the assembly jig with their bullnose faces down. Start against the fixed stop and slide each slat underneath the rabbeted cleat.
Once all the slats are positioned, install the removable cleat tightly against their opposite ends. Then position the end stop so all the slats are pressed firmly together.
At this point, you should have a flat, tightly packed panel with every slat held securely in alignment.
Position the Canvas Backing
Cut the canvas to the required width but leave it extra long for now. For our tambour, the finished canvas width was 24 1⁄4".
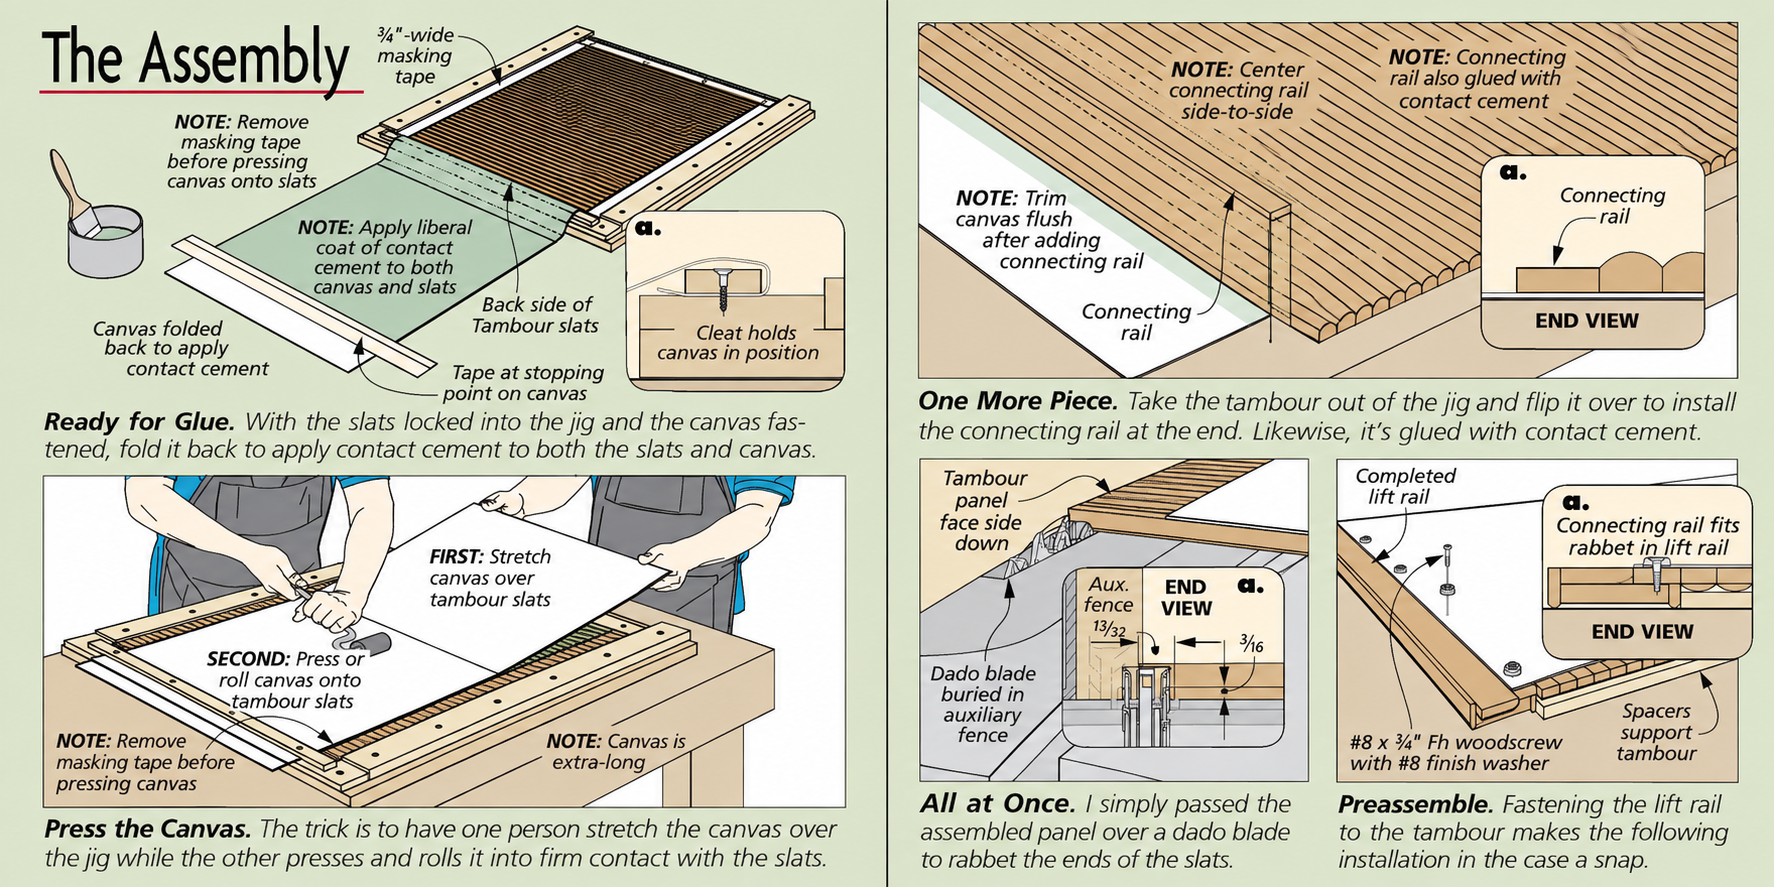
Position the canvas over the back of the slats, leaving an even 3⁄4" gap along each side. Secure one end with the canvas cleat and fold the material back to expose the slats underneath.
Leaving the canvas extra long gives you something to hold while applying it and allows the final edge to be trimmed cleanly afterward.
Glue the Canvas to the Tambour Slats
Contact cement is ideal for attaching the canvas backing because it forms an immediate bond between the canvas and wood.
Before applying the adhesive, use masking tape to protect the jig and any portions of the slats where you don't want contact cement.
Apply a liberal, even coat of contact cement to both the back of the tambour slats and the mating surface of the canvas. Follow the adhesive manufacturer's directions and allow the cement to become ready for bonding before bringing the two surfaces together.
Because contact cement bonds immediately, you won't have much opportunity to reposition the canvas once it touches the slats.
Press the Canvas Onto the Tambour
This step is much easier with two people.
Have one person pull the canvas taut over the tambour while the other gradually presses it into contact with the slats. Start at one end and work progressively across the panel.
A roller works especially well for pressing the canvas firmly against the wood. Work from the center toward the edges to create solid, even contact across every slat.
Once the canvas is securely bonded, remove the tambour from the assembly jig.
Add the Connecting Rail
With the main tambour assembled, flip the panel over and install the connecting rail at the end.
The connecting rail is also attached with contact cement. Center it from side to side and position it tightly against the final tambour slat before pressing it firmly into place.
After the adhesive has bonded, trim the excess canvas flush with the connecting rail.
Rabbet the Ends of the Completed Tambour
Rather than cutting a rabbet into every individual slat before assembly, it's much easier to rabbet the entire tambour panel at once.
With the tambour face down, the canvas-backed assembly is surprisingly stable. This allows you to pass each edge of the completed panel over a dado blade at the table saw to create the rabbets.
The rabbets reduce the thickness at the ends of the slats so they fit into the cabinet's guide grooves while leaving the rounded faces proud of the case sides.
The result is a much cleaner-looking installation because the tambour effectively conceals the grooves when the door is closed.
Preassemble the Tambour and Lift Rail
The final woodworking step is attaching the lift rail to the tambour.
Position the lift rail and tambour face down on the bench and align the two parts. Drill pilot holes and temporarily fasten the lift rail using screws and finish washers.
Spacers underneath the tambour can help support the panel and maintain the correct alignment while you work.
Preassembling these pieces now ensures everything fits correctly. The lift rail can then be removed so the tambour can be installed in the cabinet grooves before final assembly.
Installing the Tambour Door
Once the case and guide grooves are ready, feed the tambour into the grooves and around the curved portion of the track. Reattach the lift rail and check the movement through the full range of travel.
A properly made tambour should move smoothly without excessive side-to-side play or binding. If it doesn't, check the width and depth of the grooves, the rabbets on the ends of the slats, and the alignment of the case.
Once everything is working properly, you'll have one of woodworking's most interesting mechanisms: a flexible wooden door that smoothly slides out of sight inside the cabinet.
Tambour Doors Are Easier to Build Than They Look
At first glance, building a wooden tambour door can seem like a complicated woodworking challenge. But there's really no single difficult step. Success comes down to making consistent slats, keeping them carefully aligned during assembly, and securely bonding the canvas backing.
A good assembly jig takes care of much of the alignment work, while shaping the slats from wider blanks makes producing dozens of identical pieces manageable.
And once you see that completed tambour disappear smoothly around the corner of the cabinet, all that repetitive slat-making is well worth the effort.


