



Working with Sheet Goods: Plywood, MDF & Hardboard Tips
Solid wood gets most of the attention in woodworking, but plywood, MDF, and hardboard are just as valuable in the shop. From building cabinets and furniture to making jigs, templates, and workbenches, these versatile sheet goods offer advantages that solid lumber can't always match.
The key is knowing which material to use and how to work with it. Some sheet goods provide excellent strength and stability, while others offer smooth surfaces, consistent thickness, or an inexpensive alternative to solid wood. And each material comes with a few challenges when it comes to cutting, routing, and joinery.
Let's take a closer look at the most common woodworking sheet goods and some practical techniques for getting better results.

Understanding the Different Types of Sheet Goods
Most sheet goods used in woodworking fall into two broad categories: plywood and engineered wood panels.
Plywood consists of thin layers of wood veneer glued together with the grain of adjacent layers running perpendicular to one another. This cross-grain construction makes plywood strong and dimensionally stable, reducing the expansion and contraction associated with solid wood.
Engineered wood products, such as medium-density fiberboard (MDF) and hardboard, are manufactured from wood fibers bonded and compressed into panels. They generally offer smooth, consistent surfaces and are especially useful for shop projects, jigs, templates, and painted furniture.
Choosing the Right Type of Plywood
Not all plywood is constructed the same way. The number of plies, thickness of the veneers, and materials used in the core all affect its performance.
Veneer-Core Plywood. This common plywood uses layers of wood veneer throughout its thickness. Domestic hardwood plywood typically features decorative hardwood face veneers over a core made from softer woods. It's a practical choice for cabinets, furniture, and general woodworking projects.
Baltic Birch Plywood. Baltic birch features numerous thin layers of birch veneer, creating a strong, uniform panel with attractive exposed edges. Its consistent construction makes it a favorite for drawer boxes, shop jigs, fixtures, and projects where strength and accuracy matter.
MDF-Core Plywood. This material combines decorative hardwood face veneers with a smooth MDF core. The result is a flat, uniform surface that works especially well for veneered furniture and cabinet panels. However, it's heavier than veneer-core plywood and doesn't offer the same structural strength.
Composite-Core Plywood. By combining wood veneer layers with MDF components, composite-core plywood offers a balance of strength and surface smoothness. It's useful for furniture and cabinetry, although sharp humidity changes can sometimes cause checking in the face veneers.

How to Cut Plywood Without Tear-Out
One of the biggest challenges when cutting plywood is preventing chipout along the thin face veneers. Whether you're ripping a sheet to width or crosscutting a cabinet panel, the blade you choose makes a noticeable difference.
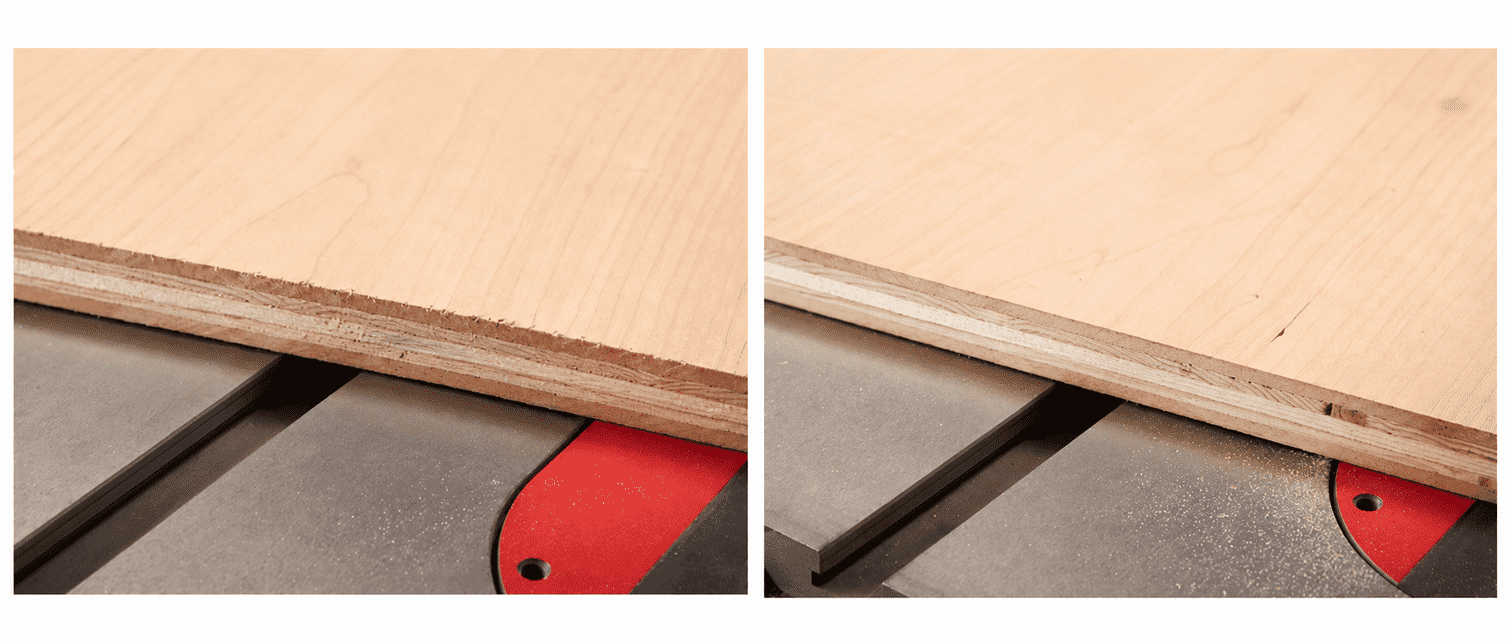
For the cleanest results, use a high-tooth-count crosscut blade or a dedicated plywood blade rather than a coarse ripping blade. The additional teeth make smaller, cleaner cuts through the delicate face veneers.
A sharp blade is important, too. Dull teeth tend to tear the wood fibers instead of cutting them cleanly, leaving ragged edges that require additional cleanup.
Best Router Bits for Plywood
Routing plywood presents a similar challenge. A standard straight router bit can tear away the thin veneer layers, particularly when trimming edges or following a template.

Two types of router bits are especially useful:
Spiral Flush-Trim Bits. A spiral flush-trim bit with a downcutting flute produces a clean upper edge. When working with a template beneath the plywood, the template supports the lower veneers and helps prevent chipout.
Compression Router Bits. Compression bits combine upcutting and downcutting flutes. This cutting action directs the wood fibers toward the center of the panel, helping produce clean edges on both faces.
For routing plywood panels, especially those with thin decorative veneers, these specialized bits can make a significant difference in the finished results.

Working with MDF (Medium-Density Fiberboard)
Medium-density fiberboard, commonly called MDF, is one of the most useful engineered sheet goods in the woodworking shop.
Manufactured from finely processed wood fibers and resin compressed under heat, MDF has a dense, uniform structure with smooth faces. Unlike plywood, it has no grain direction or internal veneer layers.
That makes MDF particularly well suited for painted projects, veneered surfaces, router templates, and shop fixtures.
However, MDF has limitations. It's heavy, doesn't offer the same strength as solid wood or quality plywood, and can be challenging when fastening screws into its edges.
How to Join MDF with Screws
Driving a conventional tapered wood screw into the edge of MDF can cause the fibers to separate, creating a bulge or even splitting the panel.
A better approach is to use straight-shank sheet metal screws along with properly sized clearance and pilot holes.

Here's the process:
-
Drill a clearance hole. In the first piece, drill a hole approximately equal to the outside diameter of the screw threads. This allows the screw to pass freely through the first panel.
-
Countersink both sides. Countersink the top and underside of the clearance hole. The underside countersink provides room for any displaced MDF fibers, allowing the two pieces to pull tightly together.
-
Drill the pilot hole. In the mating piece, drill a pilot hole approximately equal to the screw's core diameter. This leaves enough material for the threads to grip.
-
Allow extra depth. Drill the pilot hole slightly deeper than the screw's length to prevent the tip from compressing the MDF fibers and creating a bulge.
This simple fastening technique helps create tighter, stronger MDF joints, especially when assembling cabinets, fixtures, and shop projects.
Working with Hardboard
Hardboard is another engineered wood product that deserves a place in the shop. It's typically available in thin sheets and offers a smooth, durable surface that works well for a variety of applications.
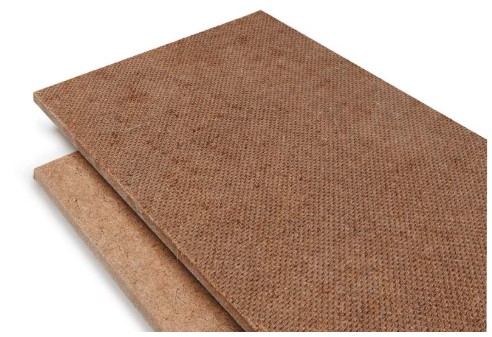
Like MDF, hardboard is manufactured from compressed wood fibers. However, the manufacturing process can produce panels with different levels of flexibility, rigidity, and surface texture.
Understanding Hardboard Types
Hardboard is commonly produced using wet, wet/dry, or dry manufacturing processes.

Wet-Process Hardboard. This type often has one smooth face and a textured, waffle-like pattern on the back. It tends to be more flexible than dry-process hardboard.
Dry-Process Hardboard. With a more random fiber orientation, dry-process hardboard produces a relatively rigid panel that's particularly useful for woodworking templates and guides.
Tempered Hardboard. Some hardboard is treated with oil and heat to improve surface hardness and moisture resistance.
Best Uses for Hardboard in the Workshop
Hardboard is an excellent choice for woodworking applications that don't require the structural strength of plywood.

Router Templates and Jigs. Hardboard's smooth surface and consistent thickness make it ideal for templates, guides, and fixtures. A cleanly shaped hardboard edge provides an accurate surface for a router bearing to follow.
Drawer Bottoms. Thin hardboard works well for drawer bottoms in shop cabinets, tool storage projects, and other utility furniture.
Cabinet Back Panels. Hardboard provides an economical way to enclose the backs of cabinets and storage units.
Decorative Panels and Splines. Certain types of hardboard can be used for painted door panels or as splines to align and connect wooden parts.
For templates and jigs, I generally prefer the rigidity of dry-process hardboard. For drawer bottoms, panels, and other applications where some flexibility is useful, wet-process hardboard is often a practical choice.
Choosing the Best Sheet Goods for Your Next Woodworking Project
There's no single sheet good that's best for every woodworking task.
Plywood offers strength and stability for cabinets, furniture, and structural assemblies. MDF provides a smooth, uniform surface for painted projects, veneering, and shop fixtures. Hardboard excels at templates, drawer bottoms, cabinet backs, and other lightweight applications.
The important thing is to match the material to the project and use the right cutting, routing, and fastening techniques.
Once you understand the strengths and limitations of plywood, MDF, and hardboard, you'll find plenty of opportunities to put all three to work in your shop.
Which Plywood Is Best for Your Next Woodworking Project?

With so many types of plywood available, choosing the right sheet can make a big difference in your project. Should you use Baltic birch, traditional veneer-core plywood, MDF-core plywood, or MDF? In our article and accompanying video, Phil Huber breaks down the differences, explains the advantages of each material, and shares practical advice for choosing the best plywood for furniture, cabinets, jigs, and other woodworking projects.
Read the Article & Watch the Video: Choosing the Best Plywood for Woodworking


