

If I were to tally up my shop time, making drawers would account for a decent chunk. Drawer joinery is rarely intensive, but a good deal of the projects we build have at least one drawer — if not several.
Thankfully, there are enough ways to bring drawers together to keep the task interesting. How sturdy do these drawers need to be? How often will they be used? Will they sit flush with or proud from their case? Do I want to attach a false front? And, of course, that’s before even considering the hardware.
WHAT’S THE DEAL WITH DRAWERS?
I don’t need to explain what a drawer is, but it is important to look at why they’re built the way they are. Looking at the bare joinery of any drawer, you’ll find that the front is always built more solidly than the back. The front drawer joint takes all the action, so it needs to be made accordingly.
The aesthetics of a drawer also play a large part. Simple, utilitarian joints may not look all that impressive, but they come together quick. Complex joints, like locking rabbets, require a bit more time to set up, but they make strong, light drawers with attractive details. False fronts may add some heft, but they offer a wide swathe of design options for wherever you want to take your project.
DRAWER JOINERY.
Either way you slice it, it’s the front that we’re most concerned with, and that’s where we’ll focus here. There are three common joints I use when making drawers, and which one I go for depends on what it’s going to house, where this project will live, and what look I’m aiming for.
SIMPLE DRAWER JOINTS
I wouldn’t call myself lazy, but I’ll admit that I like taking the path of least resistance once in a while. So, when it comes to joinery, if I know I can make due with a simple joint then chances are that’s what I’ll do. The two you see at right can be made quickly, and both are more than sufficient at what they do.
RABBET JOINT.
You don’t get much simpler than a rabbet joint (upper right illustration). If I need to make some smaller drawers, especially if they’ll be going in the shop or the garage, then a rabbet joint is a nice way to get the job done quick.
As you might’ve put together though, this joint does have a pretty big downfall: it’s not very strong. The rabbet provides no mechanical support for the frequent pulling a drawer front will undergo, and the glue is adhering to end grain, making for poor gluing strength.
The answer here is fasteners. The easiest solution is what you see above. A row of nails through the side into the rabbetted front will support the joint, and angling them back will help prevent the front from pulling away from the sides through use. This works well on small drawers that will hold screws or washers, but if you’re going bigger, you’ll need to step up to using woodscrews, or even dowels to hold the front.
Regardless, this is still an easy, functional joint. However, it’s usually too utilitarian for my tastes outside the shop. For a project I want to show off, I next look to another easy-to-make joint.
TONGUE & DADO.
 A tongue and dado joint has a distinct mechanical advantage over the rabbet joint. Despite that, if I’m going for a tongue and dado front on my drawers, it’s likely for a different reason.
As you can see in the top-down illustration, the tongue and dado drawer front leaves the sides’ end grain exposed. This is where a false front comes in to hide that exposed end grain.
False fronts can be a nice addition on some pieces. If you want to use light-weight, stable plywood to make the drawers in a dresser with a hardwood case, then false fronts can preserve that look. A chamfer around a false front softens a drawer, while an ogee’d edge can make the drawers pop onto centerstage. However, using false fronts on a set of drawers adds a considerable amount of material to the project, not to mention the additional weight.
Tongue and dado drawer fronts are a nice middle-ground choice. It may take longer to size and locate the tongues and dadoes than it does to cut rabbets, but the joint provides more mechanical support while offering a wide variety of choices for style with the false fronts, even if it adds a bit of extra wood. Yet if you’re looking for a joint that provides the benefits of both for a little extra shop time, then look no further than our third joint.
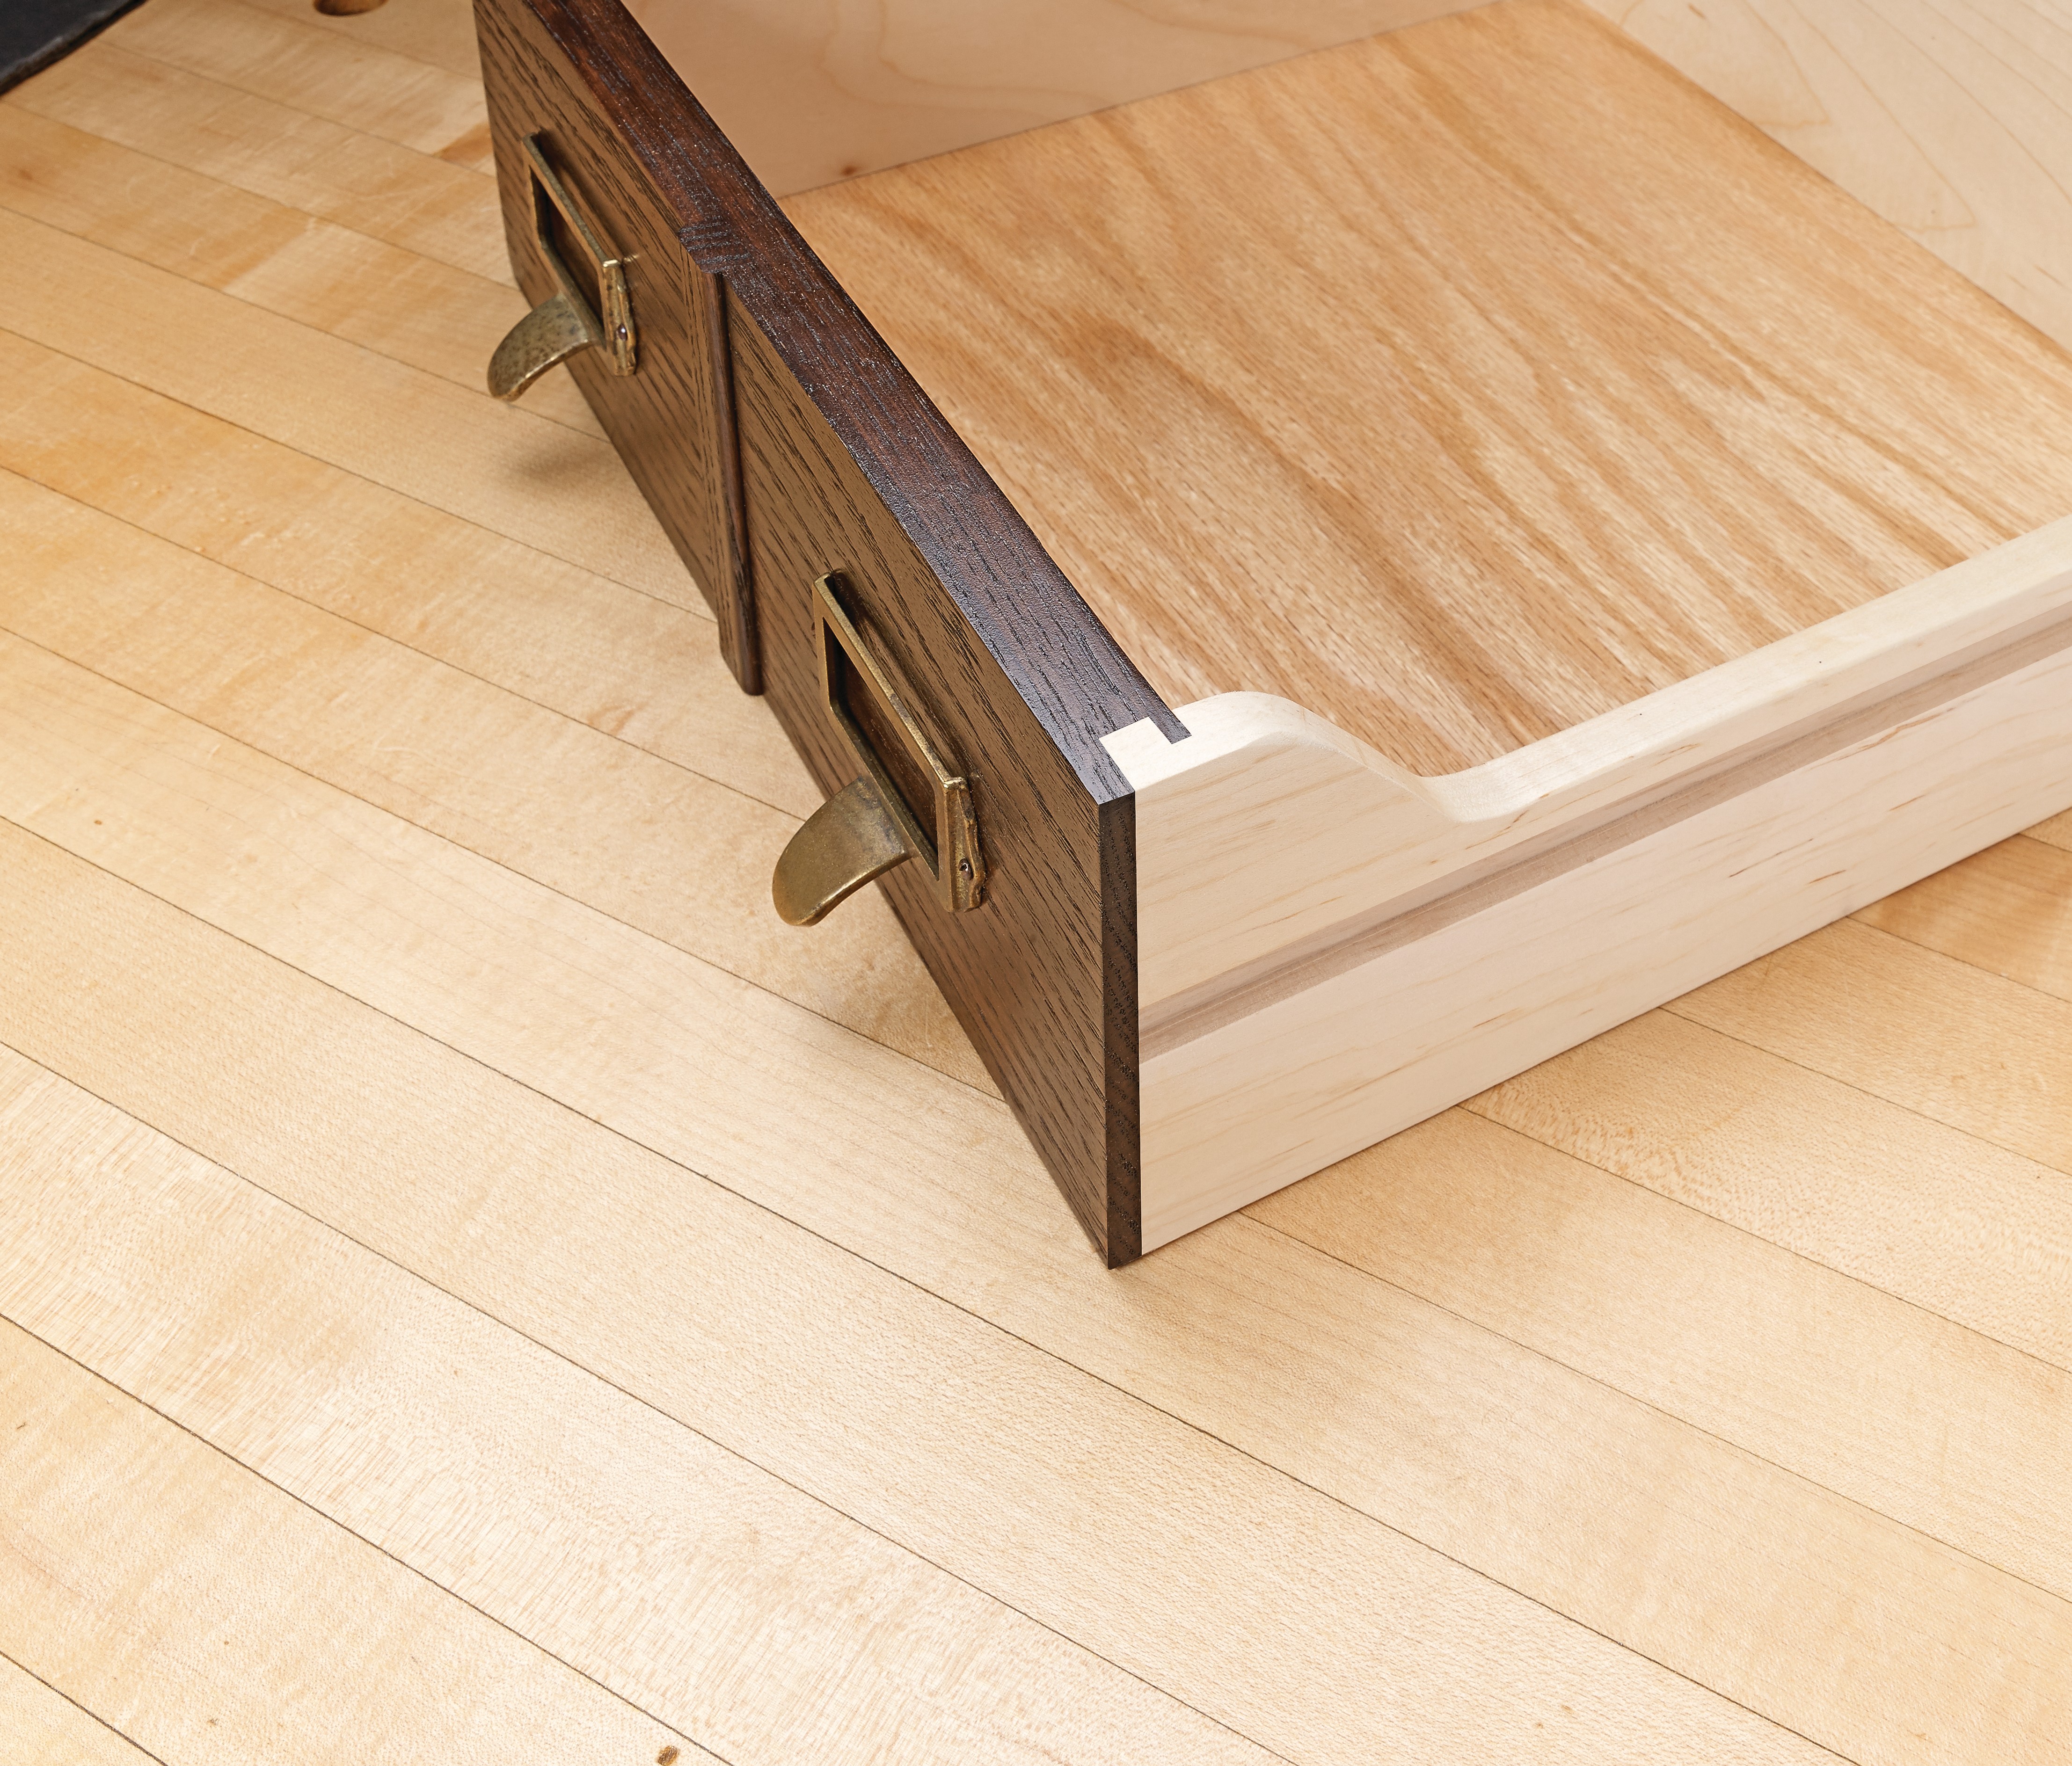
LOCKING RABBET
The last drawer joint I use is shown in the left illustrations. The locking rabbet is a classic drawer joint, and for good reason. It benefits from the same tongue-and-dado mechanical advantage as the previous joint, but it adds an additional front lip. The lip covers the end grain and locks the two pieces together.
Though the glue surfaces here are end grain, they adhere together quite securely in this orientation. The drawers themselves will be recessed in their case, sitting flush to its front. This creates a similar look to the rabbet joint, but with the added “locking” detail and a sturdier connection.
The downfall of locking rabbets is that they’re a bit finnicky. There’s a certain procedure to follow (which we’ll cover on the next page), and you’ll need to make some test cuts. Thankfully, if you’re making multiple drawers, the joinery can be cut on each drawer after you’ve dialed in the correct fit for that cut.
 |
 |
| As the name implies, the locking rabbet joint interlocks the sides and front of drawer, creating a sturdy and intriguing joinery detail that masks the sides’ ends. |
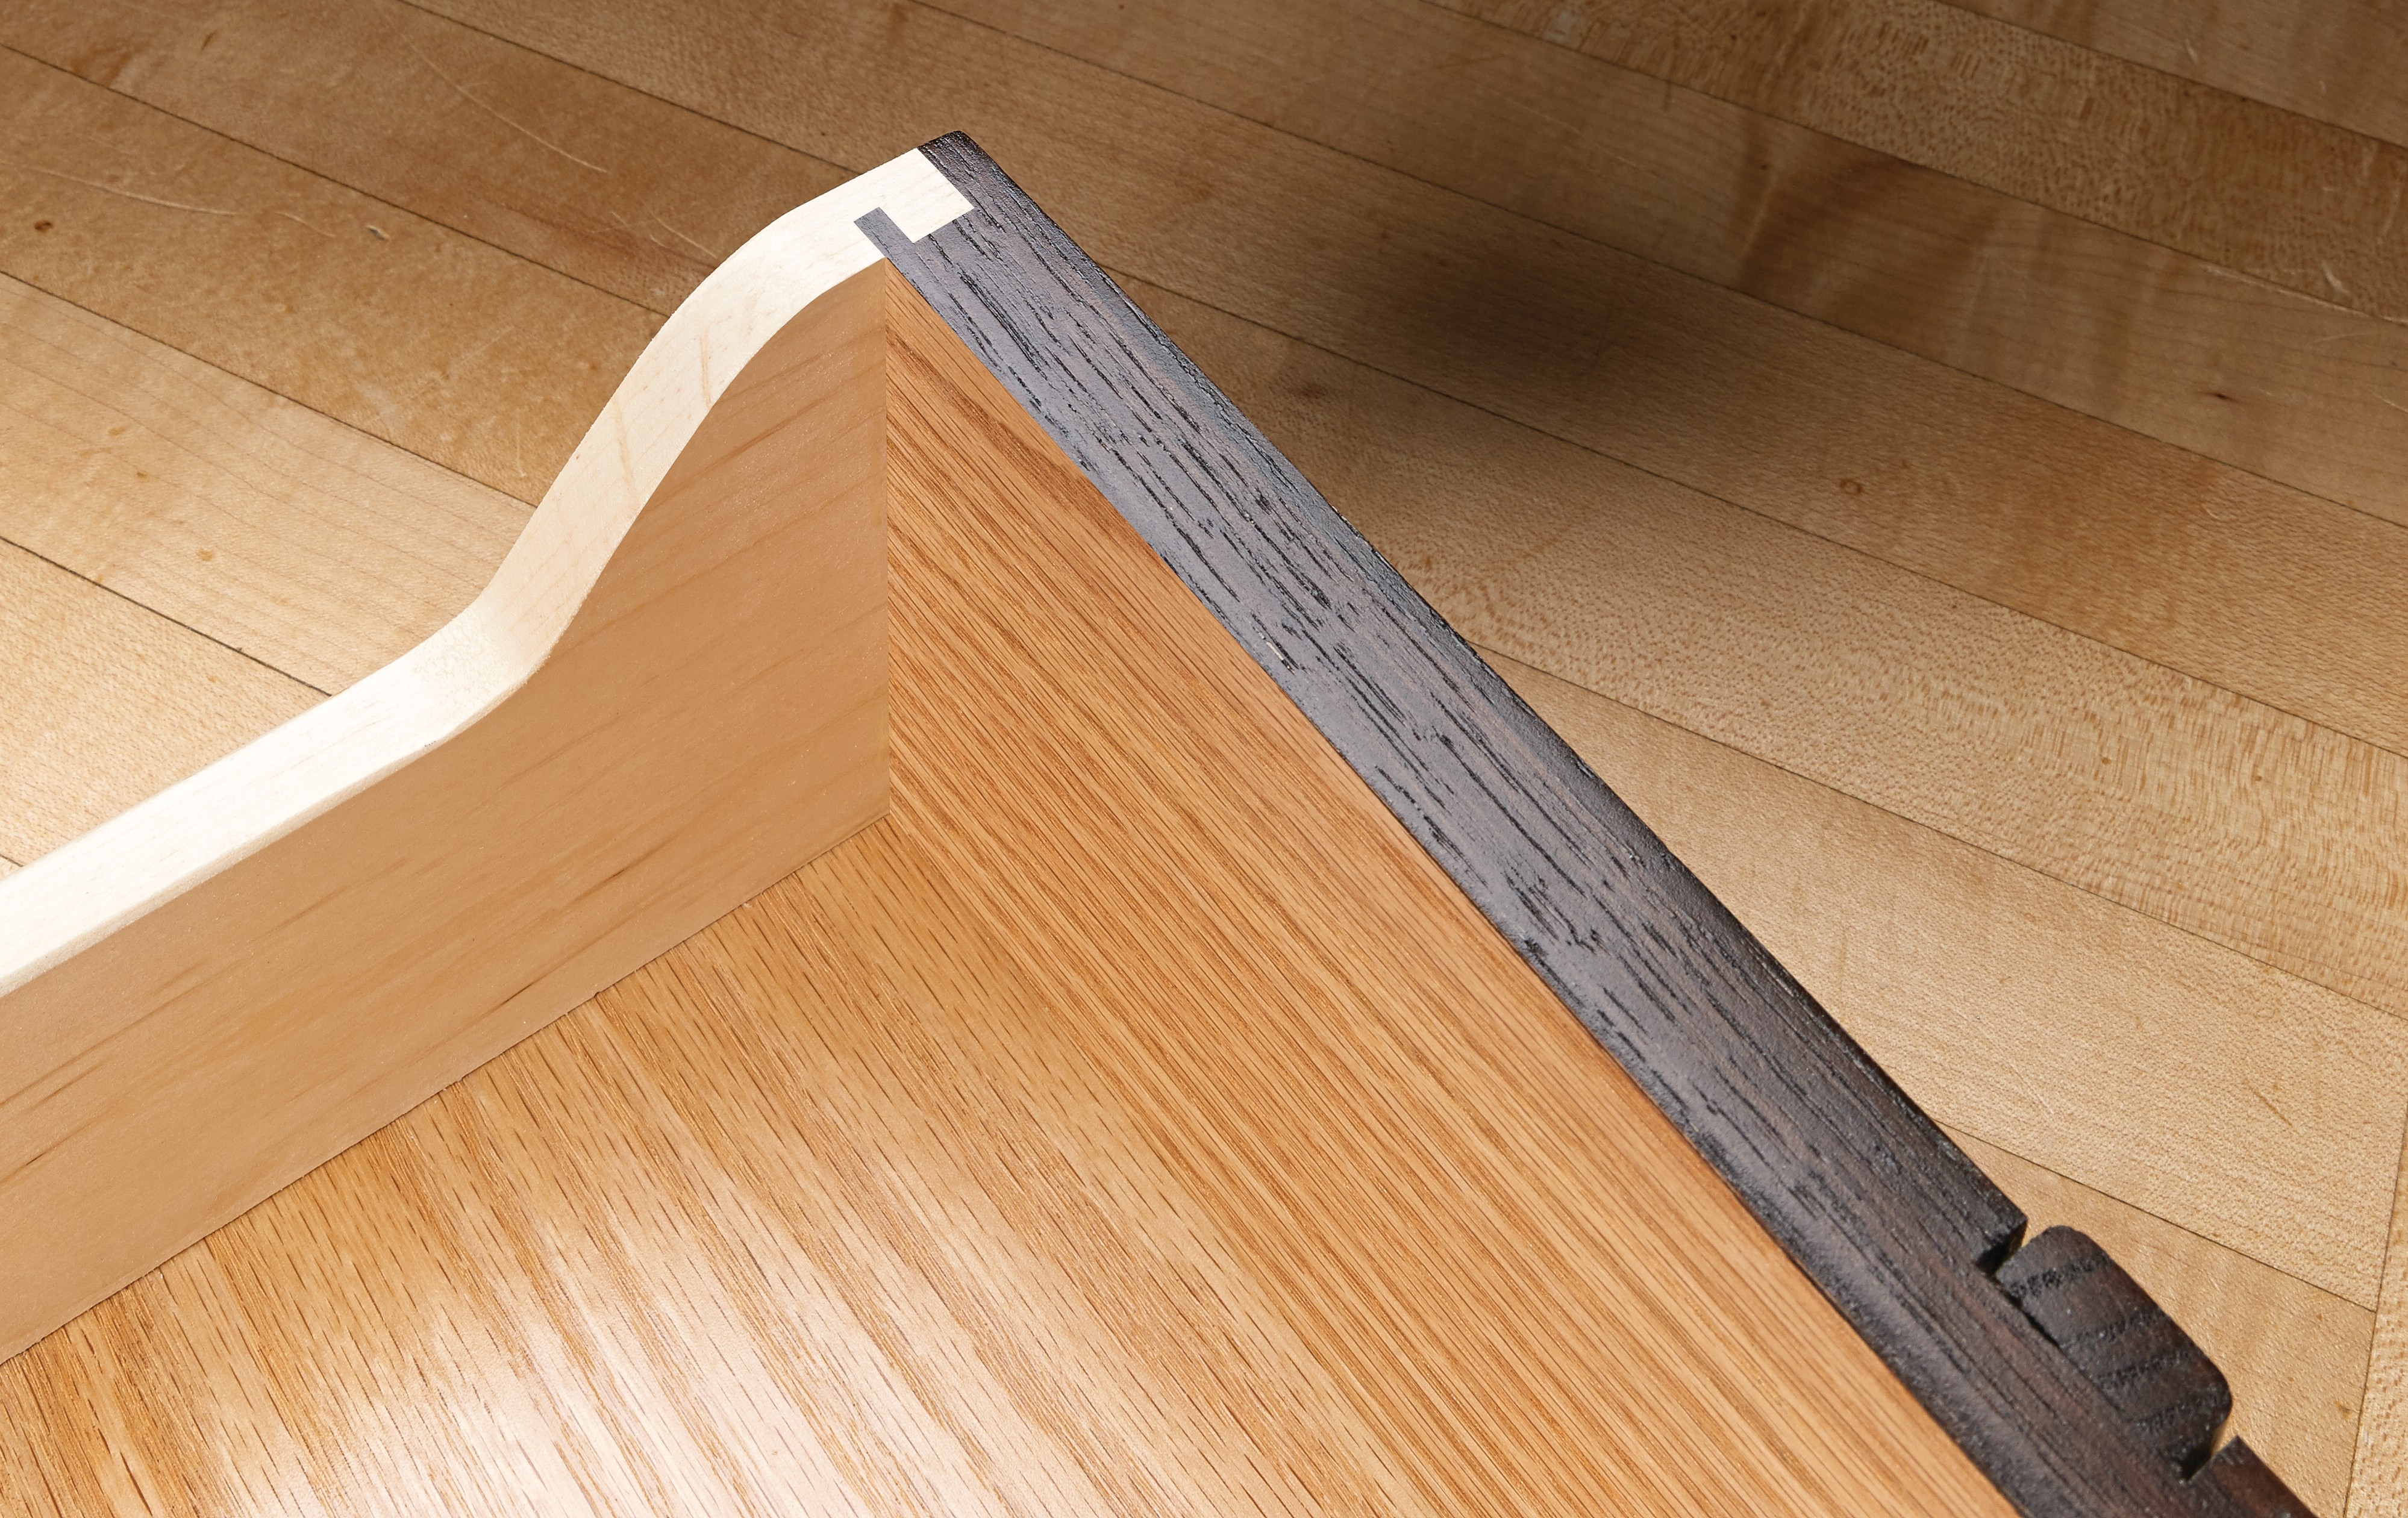
JOINT LAYOUT.
 Above shows a top-down view of a locking rabbet. In this instance, the front piece is 3⁄4" thick while the sides are 1⁄2" thick. You can vary the thicknesses, but there’s two important things to note.
First, the tongue and dado should extend though half the thickness of the side. This will keep the tongue sturdy enough to prevent it from snapping off in the joint when pulled.
Second, no matter how small the drawer, the front needs to be at least 1⁄2" thick. If you go any thinner than that the tongue or lip will be more likely to snap off than create a strong joint.
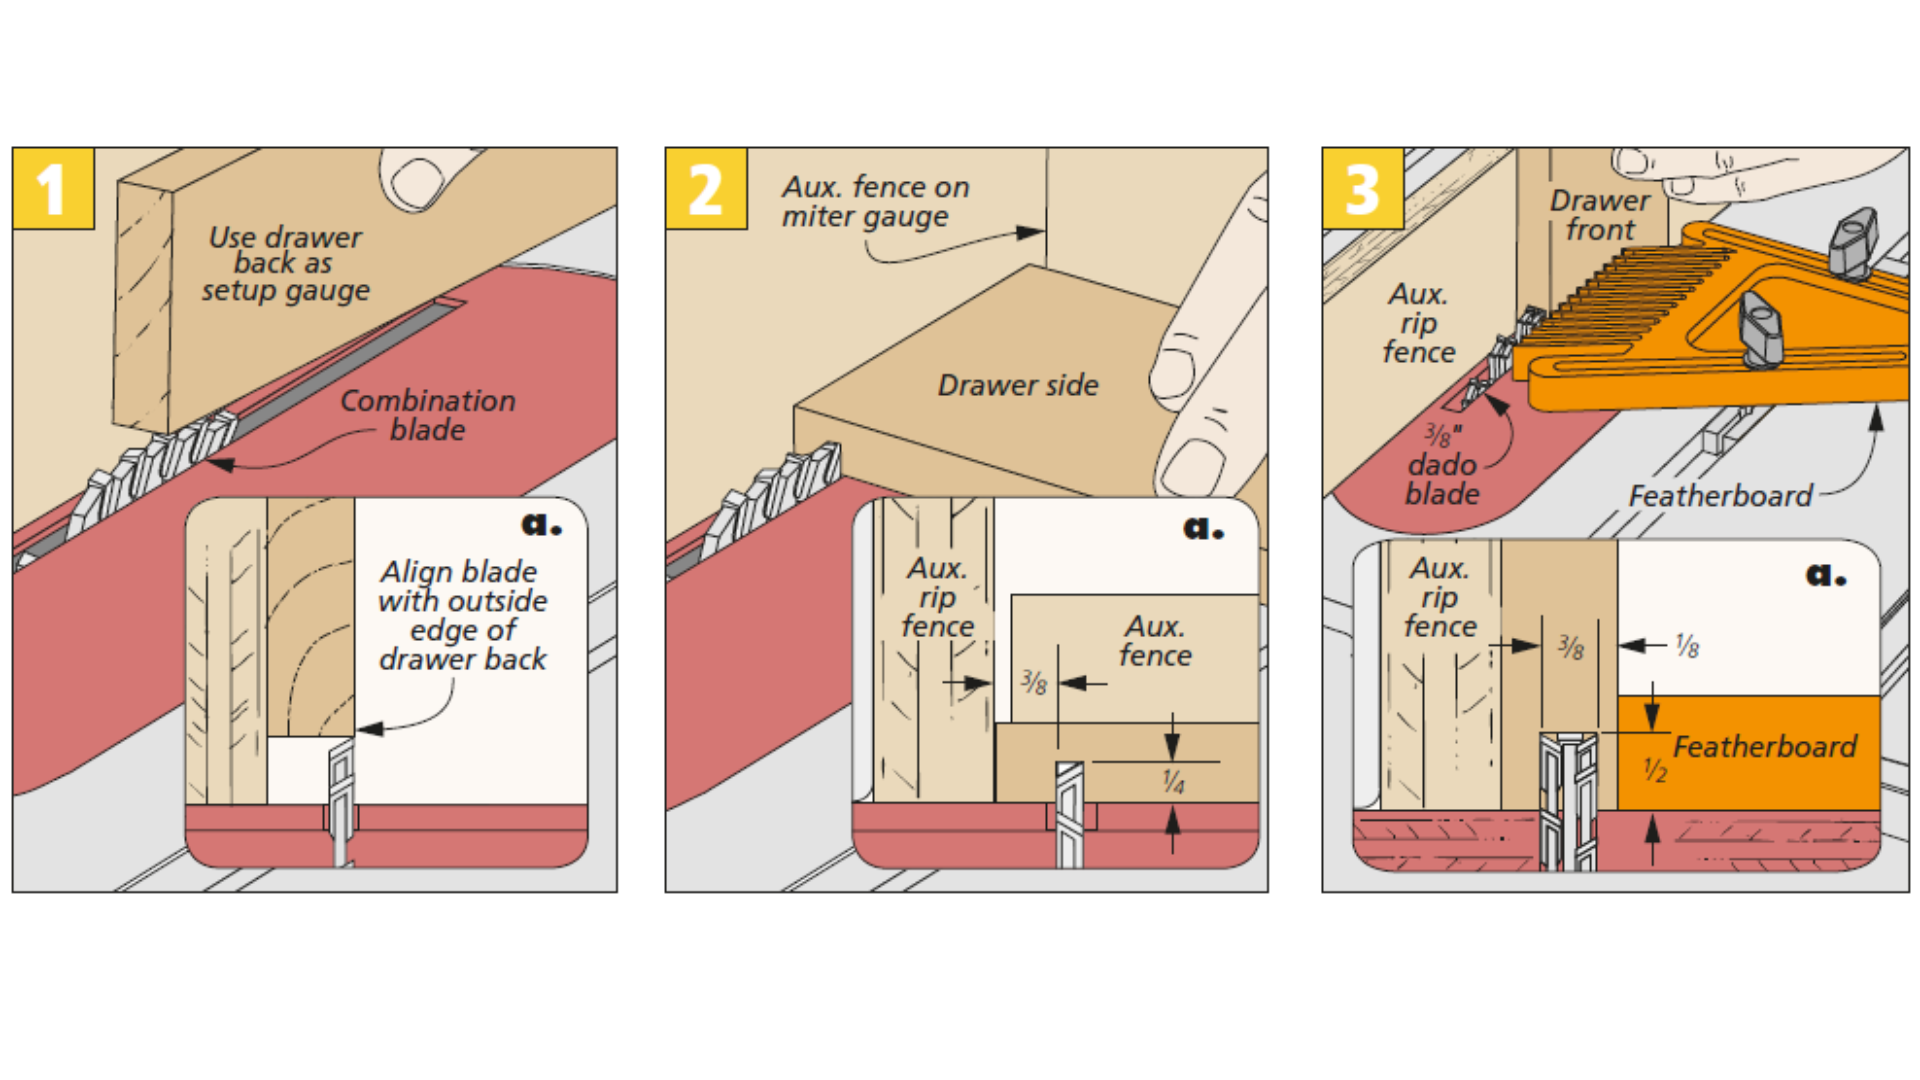
MAKING THE JOINT.
In my opinion, the two best ways to make a locking rabbet joint are either at the table saw or at the router table. Both work well, and the idea is the same, only with a different orientation. On the next page I’ll walk you through my preferred method, which is over at the table saw.
WHAT ABOUT THE BACK?
As I mentioned earlier, the back piece in a drawer isn’t under much stress, so it doesn’t need much in the way of joinery. A simple glued-up rabbet will do the job, but a tongue can add strength.
LOCKING RABBET JOINT
 |
| 


