


DIY Clamp Handle Grip: Make Bar Clamps Easier to Tighten
Getting a firm grip on a bar clamp handle isn't always easy, especially when you're working with several clamps during a large glueup. Small, round handles can be difficult to turn, and dry hands or stiff fingers can make tightening and loosening clamps uncomfortable.
Fortunately, there's a simple woodworking shop upgrade that can make a big difference.
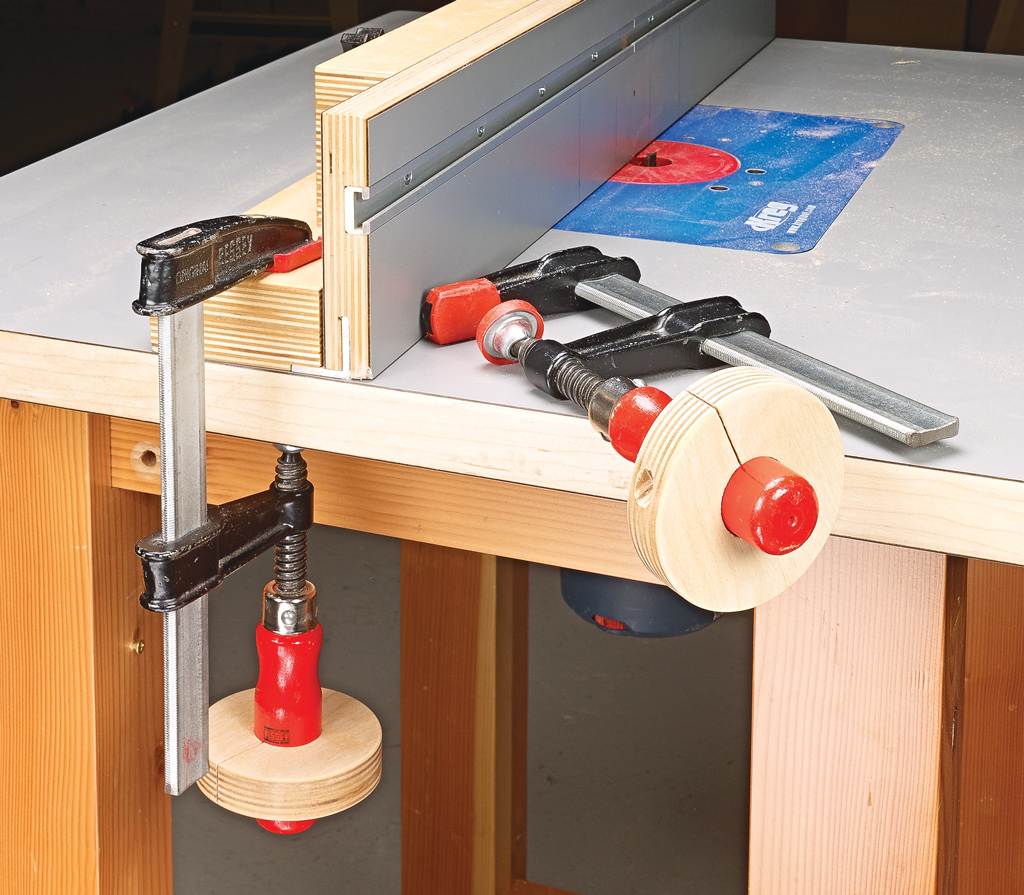
This DIY clamp handle grip is made from a small piece of plywood and fits over the existing handle of a bar clamp. The larger diameter provides a more comfortable gripping surface and additional leverage, making the clamp easier to operate.
A Simple Plywood Grip for Bar Clamps
The idea behind this clamp accessory is straightforward. A plywood wheel slips over the existing clamp handle, creating a larger surface to grasp.
A narrow slot cut into the wheel allows it to flex slightly. Tightening a screw across the slot draws the sides together, securing the wheel firmly to the handle.
The result is a removable clamp handle extension that doesn't require modifying the clamp itself.
It's especially handy when you're working on a project that requires a lot of clamps.
How to Make a DIY Clamp Handle Grip
This shop-made clamp grip requires only a small piece of plywood, a screw, and a few common woodworking tools.
The dimensions can be adjusted to accommodate different clamp handles.
Step 1: Cut the Plywood Blank
For the clamp shown here, start with a 3 1/4" square piece of plywood.
This provides enough material to create the circular grip while leaving room for the clamping screw.
Step 2: Drill the Center Hole
Locate the center of the plywood blank and drill a 1 1/8"-diameter hole using a Forstner bit.
The hole should fit over the existing bar clamp handle.
Since clamp handles vary in size, measure yours before drilling and adjust the hole diameter as needed.
Step 3: Cut the Relief Slot
Next, use the band saw to cut a narrow relief slot from one edge of the plywood blank into the center hole.
This slot allows the plywood wheel to tighten around the clamp handle when the screw is installed.
Step 4: Drill for the Clamping Screw
Drill the pilot hole and counterbored clearance hole for the screw, as shown in detail 'a' of the construction drawing.
The screw spans the relief slot so tightening it draws the two sides of the plywood grip together.
Step 5: Cut and Sand the Wheel
Return to the band saw and cut the outer circumference of the handle grip.
Sand the outside edges and faces smooth, removing any sharp corners that might make the grip uncomfortable to use.

Install the Clamp Handle Extension
With the plywood wheel complete, slide it over the existing clamp handle.
Tighten the screw until the grip is firmly secured and doesn't slip when turned.
The larger wheel provides a more substantial surface to grasp, making it easier to turn the clamp handle without squeezing as tightly.
Avoid overtightening the clamp. The added leverage should make normal clamping pressure easier to apply, not increase it beyond what the clamp or workpiece can safely handle.
A Handy Upgrade for Your Woodworking Clamps
Sometimes the most useful woodworking accessories are also the simplest.
This shop-made plywood clamp handle grip takes very little material and can be customized to fit different bar clamps.
Whether you're assembling a cabinet, gluing up a panel, or working on a project that requires dozens of clamps, the larger handle can make tightening and loosening them more comfortable.
It's a small improvement that makes a frequently used woodworking tool easier to handle.
More Handy Woodworking Tips & Tricks

Looking for more ways to make your time in the shop easier? From clever clamping solutions and shop-made jigs to tool upgrades and simple storage ideas, our collection of woodworking tips and tricks is packed with practical ideas you can put to work right away. Explore more ways to save time, improve accuracy, and get the most from your tools.
READ MORE → Explore More Woodworking Tips & Techniques


