


For all-around durability in a wood finish, varnish is hard to beat. And when you throw in the warm color it imparts to wood plus the fact that it’s pretty user-friendly, you can see why a varnish finish is the top choice for many woodworkers.

Varnish gives you a nice range of application options. You can simply wipe on thinned varnish with a rag or you can even spray it. But when I want all the benefits that varnish has to offer, I apply it the tried-andtrue way — with a brush. Several coats of brushed varnish will produce a smooth, classic look along with all the protection a truly firstrate project deserves. Brushing a top-notch varnish finish isn’t nearly the challenge it’s made out to be. With just a short course on the basics, you’ll be on the road to success. WHICH VARNISH? You’ll find two types of oil-based varnish for interior use — alkyd and [polyurethane](https://www.woodsmith.com/review/best-polyurethane/). The two types have slightly different durability and appearance qualities, but there’s no difference in the way each is applied.
Unless I plan to rub out the finish to a high gloss, I always choose a satin or semi-gloss type. A duller sheen is less likely to show any minor imperfections.
A QUALITY BRUSH. To do the job well, you need the right tool for the job — a good-quality brush. The brush should hold a large amount of finish and then release it evenly onto the surface. A white china bristle brush is your best bet. The soft bristles allow you to lay on a smooth, even film.
CLEAN, CLEANER, CLEANEST. The bane of a varnish finish is dust. It can take an hour or two to dry dust-free and overnight to cure. So any dust that lands on the surface during the initial drying period is trapped and forms a nib or speck. These can be sanded off between coats, but a better solution is prevention.
If possible, do your finishing in a space separate from where you build and sand. This will help minimize dust problems. And be sure to clean the project thoroughly with a tack rag or vacuum before taking it into the finishing area.
GETTING READY. You want to stir the varnish gently and then pour the amount you need into a separate container. If the can of varnish is not fresh, it’s a good idea to strain the varnish to remove any dried bits, globs, or impurities.
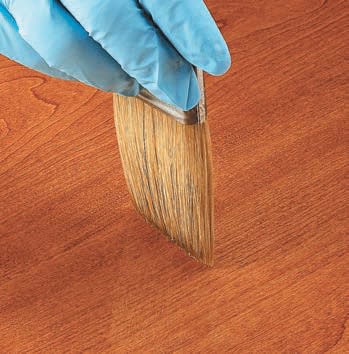
I always start with a light seal coat — a 50/50 dilution of varnish and mineral spirits (photo below). This thin coat will penetrate better, dry faster, and sand easier.

PLANNING. Before getting started, I mentally break down the project into manageable sections. I like to work from the inside out. Or to put it another way, from the least noticeable to the most noticeable areas. Save the best for last.
The project determines how you approach the job. For example, brushing a raised-panel door is different than brushing a flat tabletop. In general, I like to coat details and edges first and then brush the flat surfaces. So when brushing a raised panel door, the order is as follows: first the bevels of the panel, then the raised field, next the edges of the frame, and finally, the surface of the frame. This allows you to make certain the most visible surfaces are brushed out smoothly.
HORIZONTAL. Horizontal surfaces are always easier to brush. Gravity will help level the varnish, without fear of runs. So whenever practical, disassemble any major parts so you can lay them flat.

The box below shows how to lay a smooth film of varnish on a flat tabletop. The surface is always brushed with the grain. One key is to use enough pressure to put a slight bend in the bristles of the brush. The varnish should flow easily off the brush. When the brush starts to drag, stop and reload it.
SMOOTH & EVEN. The trick is to maintain a “wet” edge. Don’t work too far ahead before starting a new brush line. Once a section is covered, use long strokes with the tips of the bristles (called “tipping off”) to even out the coverage and remove brush and lap marks.
Don’t be too concerned about bubbles. They’ll dissipate and level out before the varnish dries.
VERTICAL SURFACES. On surfaces with the grain running vertically, you’ll need to do things differently to avoid runs and drips. The drawings above demonstrate the technique of cross-brushing. Rather than brush up and down along the length of a surface, start by brushing horizontally across the grain from the bottom up. Once the surface is coated, you can tip it off with a bottom-up vertical stroke.

COAT BY COAT. After allowing the seal coat to dry overnight, I sand the surface lightly with 320-grit sandpaper to prepare for the first topcoat. This coat can be applied full strength, but I prefer to dilute the varnish with about 10% mineral spirits. It will brush easier and flow out better. You can sand this first topcoat a bit more aggressively to level any brush marks and remove dust nibs. Then the next coat goes on in the same way.
A sealer and two topcoats followed by a buffing with #0000 steel wool produces a durable film with a beautiful, satin sheen. Not always the quickest finish, but without a doubt, one of the best.
How-To: Brush a Flat Surface
 Start with a short stroke back to the edge. Try not to drag the brush over the edge, causing a run.
 Now overlap the beginning stroke slightly and brush to the other end, reloading with varnish as necessary,
 Finally, tip off the wet varnish by holding the brush almost vertical and using very light pressure.


