



How to Build a Mobile Planer Cart with Storage
A benchtop thickness planer is one of the most useful machines in a woodworking shop. It allows you to mill lumber to precise thicknesses, giving you more control over your projects and the material you use.
But there's one problem with so-called portable planers: They're heavy.
Moving a planer from storage to a workbench every time you need it isn't much fun. And once it's set up, you still need enough room to feed long boards through the machine.
This DIY mobile planer stand solves those problems by giving your thickness planer a dedicated rolling workstation.
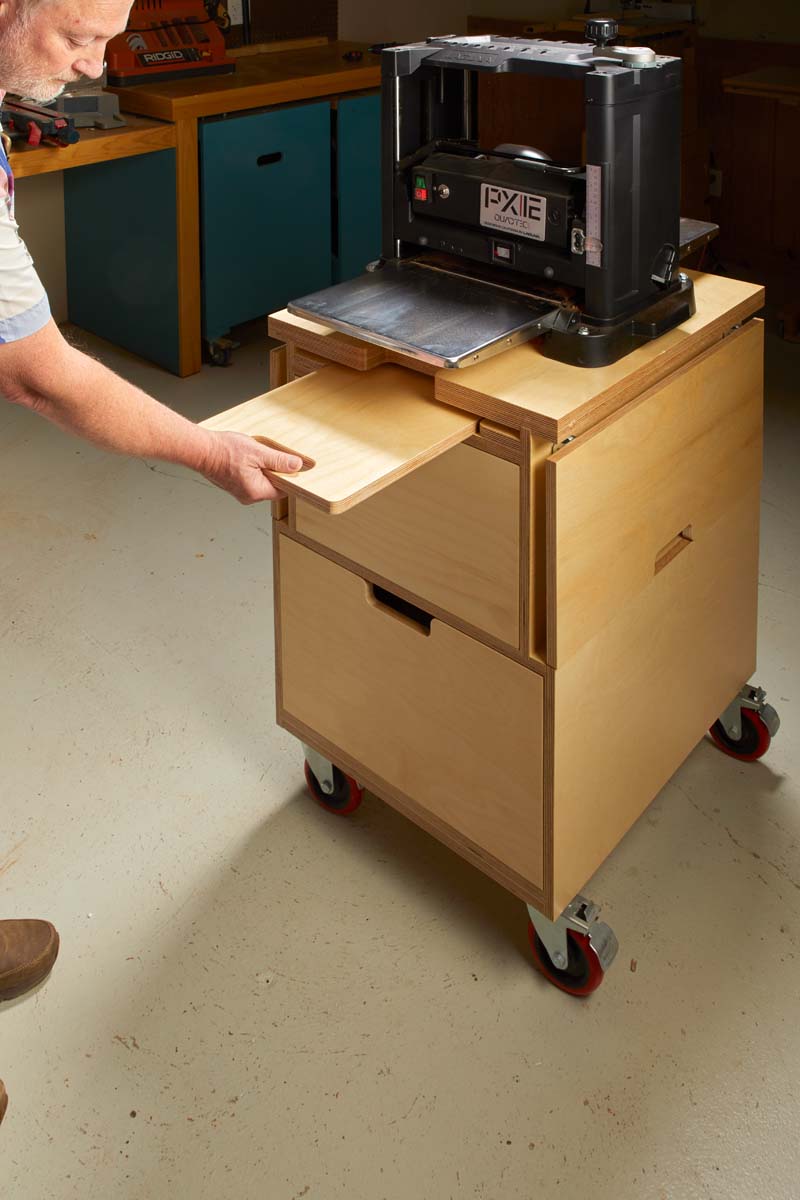
Heavy-duty casters make it easy to move the planer wherever you have room to work. Two deep drawers keep accessories organized, while folding side wings provide additional surface space when needed.
There's even a removable planing sled that stores in a compartment directly beneath the top.
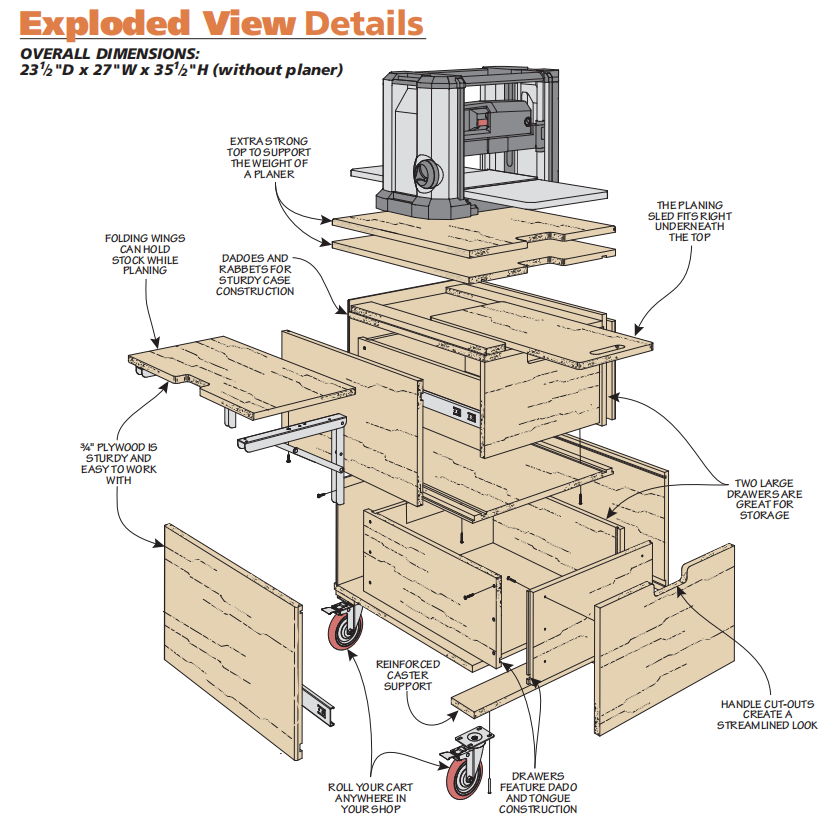
The cart is built primarily from plywood, using rabbets, dadoes, and grooves to create a strong cabinet without complicated construction.
It's a practical shop project that makes your planer easier to use while putting otherwise wasted space to work.
Mobile Planer Stand Features
This cart is designed to make a benchtop planer easier to use and store.
Rather than building a simple rolling platform, the design incorporates several useful features.
Heavy-duty casters. The planer stays on the cart, eliminating the need to lift it onto a bench whenever you need to mill lumber.
Two deep storage drawers. The cabinet provides space for planer accessories, setup tools, and other frequently used shop supplies.
Fold-down side wings. The wings offer additional surface area when you're working and fold against the cabinet when it's time to put the cart away.
Built-in planing sled. A removable sled provides a way to support certain thin or short workpieces when used in accordance with the planer's operating requirements.
Compact plywood construction. The cabinet makes efficient use of the space beneath the planer.
Folding Wings Save Workshop Space
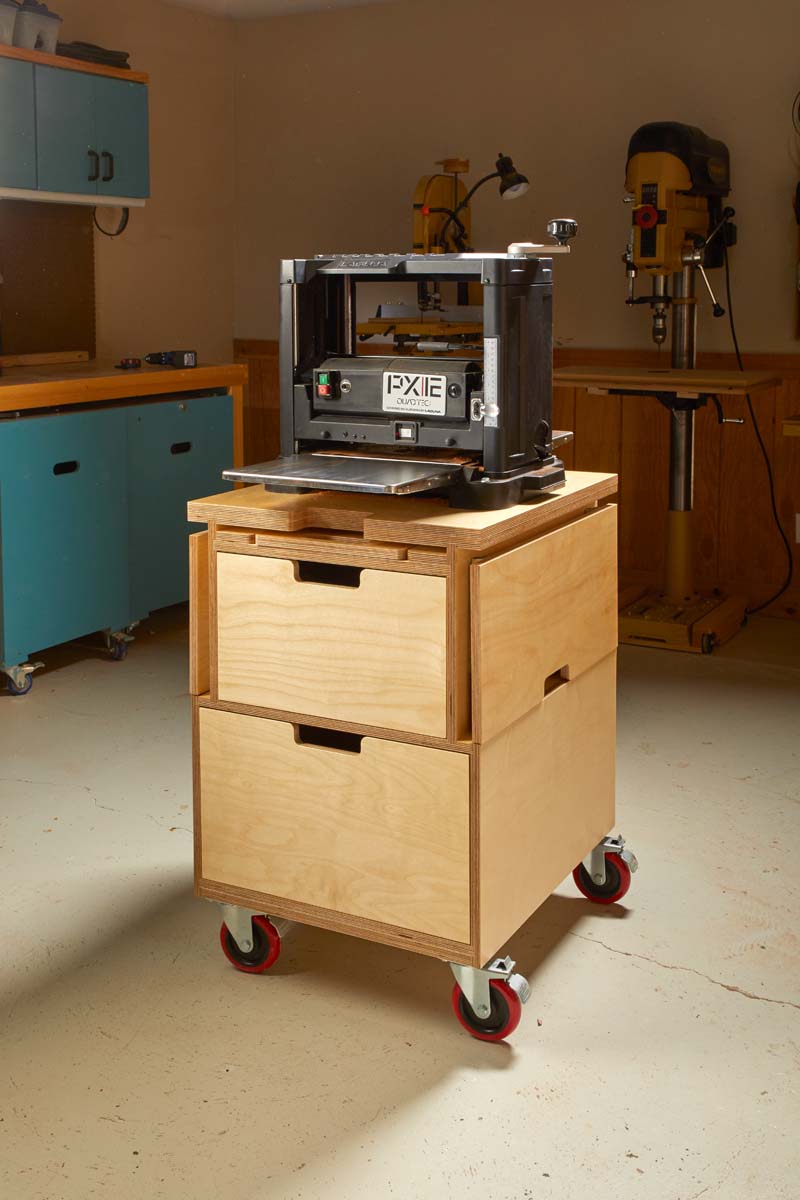
The folding wings are particularly useful in smaller shops.
When raised, they provide convenient surfaces for staging boards and tools during milling.
When you're finished, the wings fold down against the cabinet, reducing the cart's overall footprint.
Storage Drawers Keep Accessories Close
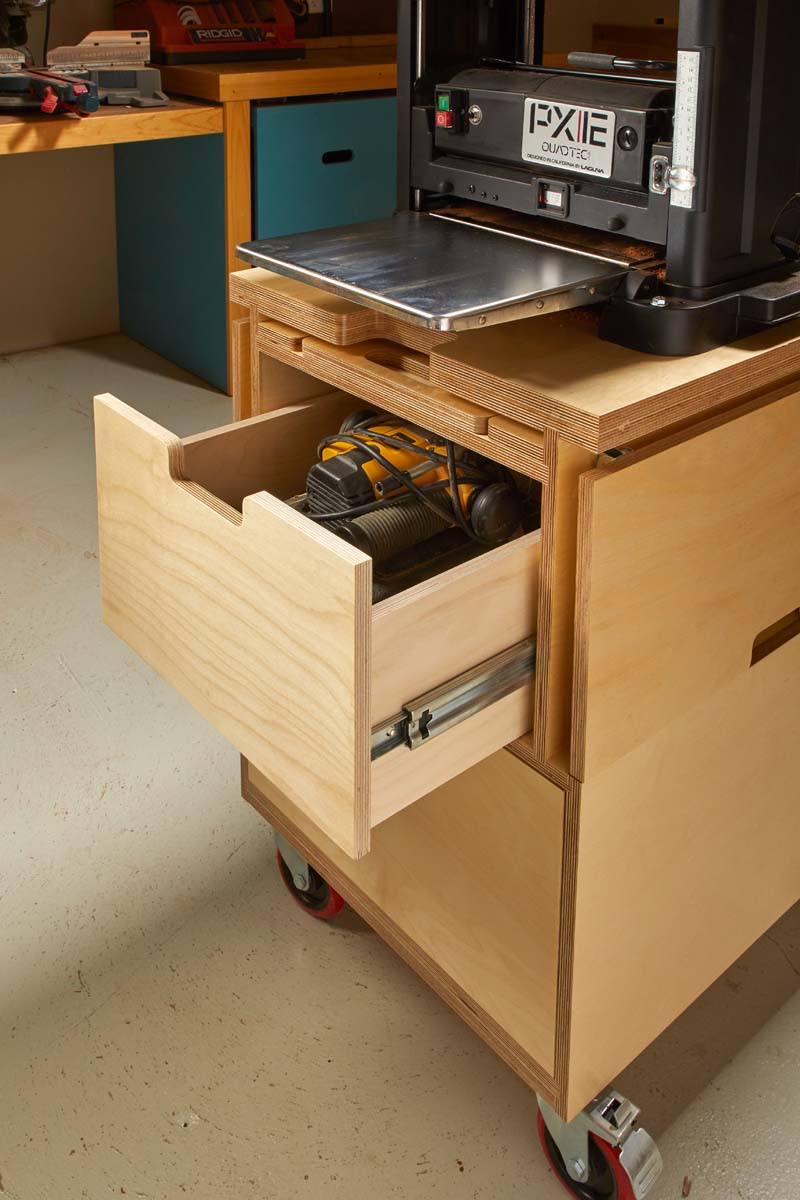
Two large drawers occupy much of the space beneath the planer.
They're deep enough to accommodate a variety of shop supplies, helping keep frequently used accessories organized and close to the machine.
A Planing Sled with Dedicated Storage
The removable sled is another useful feature.
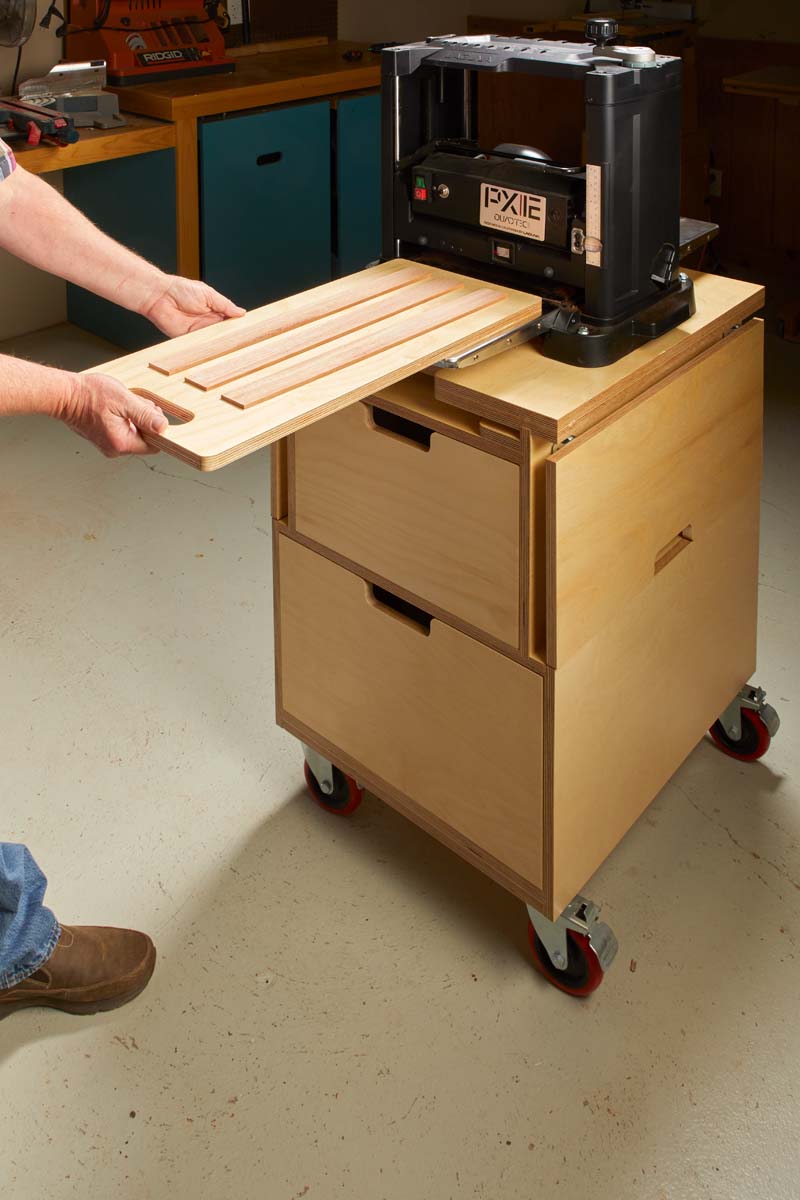
It can support certain workpieces that would otherwise be difficult to feed through the planer.
When it's not needed, the sled slides into a dedicated storage space beneath the top.
Planer Safety: A sled does not automatically make short or thin stock safe to plane. Always follow your planer's minimum workpiece length and thickness requirements, use a suitable carrier and secure workholding method, and keep hands clear of the feed opening. Never run unsupported or inadequately secured stock through the machine.
Step 1: Build the Lower Cabinet
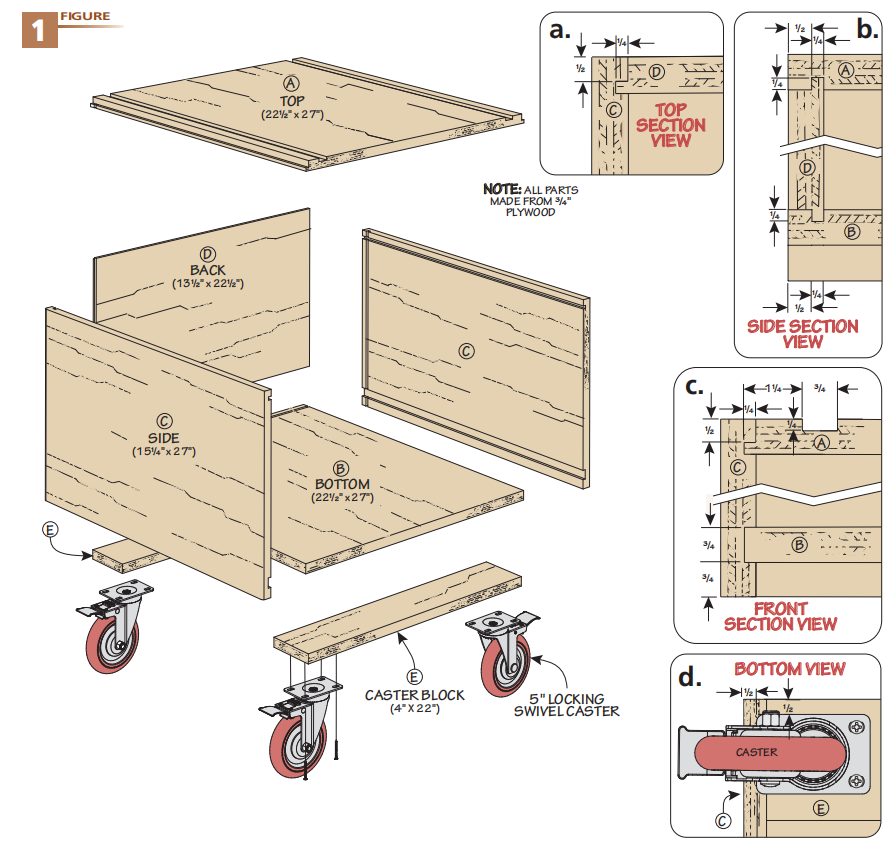
The planer cart begins with a plywood cabinet built in two sections.
The lower case forms the main storage area and supports the weight of the planer and upper cabinet.
The upper case is built separately and added after the lower section is assembled.
This approach keeps the construction manageable and allows you to work through the project in stages.
Cut and Label the Plywood Parts
Start by breaking down the plywood into manageable pieces.
A table saw or track saw works well for this step.
As you cut the parts, label each one clearly.
Many of the panels look similar, and keeping them identified makes it easier to avoid mistakes during joinery and assembly.
Baltic birch plywood is used for the cart shown here.
One important detail is that plywood thicknesses are often slightly less than their nominal dimensions.
Before cutting dadoes and grooves, measure the actual thickness of your material and adjust your cutting setup accordingly.
Cut the Dadoes and Grooves
The lower cabinet relies on interlocking plywood joinery rather than a large number of mechanical fasteners.
Rabbets, dadoes, and grooves provide alignment and glue surface.
Begin by cutting the 1⁄4"-wide dadoes in the top, bottom, and side panels.
These dadoes receive the cabinet back.
Because the dadoes are positioned consistently in all four parts, it's efficient to cut them with the same setup.
A standard table saw blade can be used to make the cuts in two passes.
Set the rip fence to establish one side of the dado, then move it slightly to complete the width.
Make test cuts in scrap plywood until the back panel fits properly.
While the setup is established, cut the grooves near the tops of the side panels.
Cut the Rabbets
Next, cut the rabbets around the edges of the back panel.
A dado blade and sacrificial rip fence make this operation straightforward.
The same setup can be used to cut the rabbets along the outer edges of the cabinet top.
Afterward, remove the sacrificial fence and cut the remaining grooves in the sides and top.
Before assembly, inspect the joinery.
If the dado blade leaves ridges in the bottoms of the cuts, smooth them with a sanding block.
This helps the joints seat fully and provides a consistent glue surface.
Assemble the Lower Case
With the joinery complete, apply glue to the dadoes, rabbets, and grooves.
A slow-setting woodworking glue provides additional working time for aligning the panels.
Clamp the cabinet together and check that the assembly is square.
Once the glue has cured, reinforce the bottom with caster mounting blocks.
These blocks provide a stronger foundation for the casters and help distribute the weight of the planer.
Install Heavy-Duty Casters
A thickness planer adds considerable weight to the cart, so caster selection is important.
Choose casters rated to support the combined weight of the planer, cabinet, stored accessories, and any material resting on the cart.
Larger wheels generally roll more easily over uneven shop floors and small debris.
Locking casters are also a good choice to help keep the cart from moving during use.
Woodsmith Tip: Before installing the casters, verify that the finished cart will be stable with your planer mounted. The cart should resist tipping and remain stationary during operation.
Step 2: Assemble the Upper Cabinet
The upper cabinet sits on the lower case and supports the planer top.
Its construction is similar to the lower section, using dadoes, rabbets, and grooves to position the parts.
Cut the Upper Case Joinery
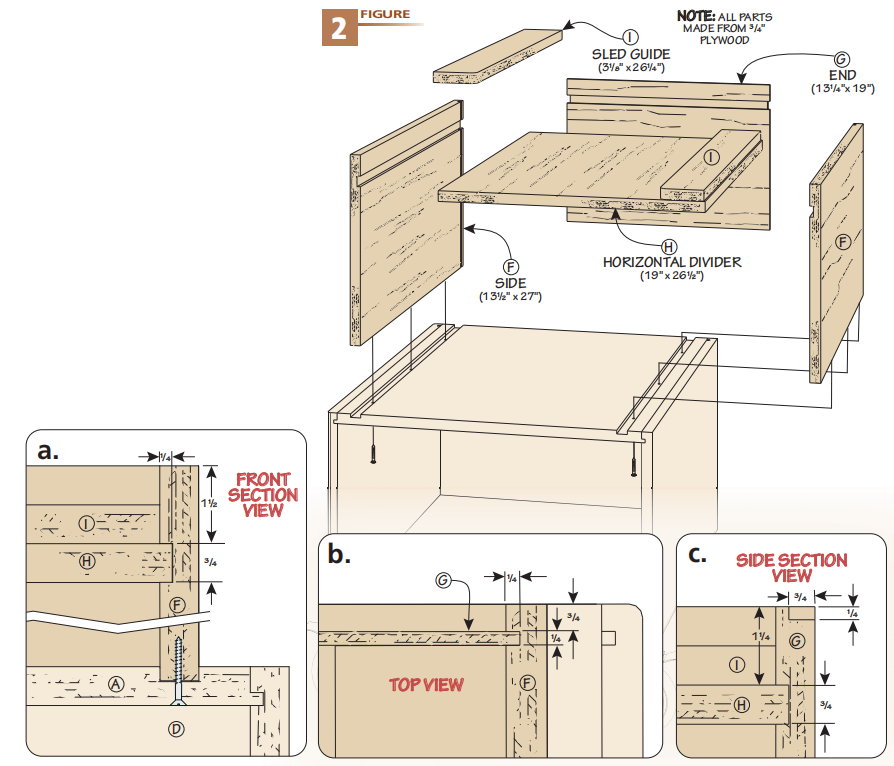
Begin with the narrower 1⁄4" dadoes in the side panels.
Next, use a dado blade and sacrificial fence to cut rabbets along three edges of the end panel.
The bottom edge of this panel rests directly on the lower case.
The side panels also receive grooves positioned 1½" from their top edges.
A matching groove is cut in the end panel, but on the opposite face from its rabbets.
Pay close attention to the orientation of these cuts.
It's easy to place a groove on the wrong face when working with similar-looking plywood panels.
Once the joinery is complete, smooth any ridges left by the dado blade.
Assemble the Upper Case
Start by positioning the upper cabinet sides in the grooves along the top of the lower case.
Apply glue and drive screws upward through the lower case into the side panels.
Leave the screws slightly loose at first.
This provides enough movement to install the remaining parts.
Next, add the end panel with its rabbeted edge facing up.
Spread the side panels slightly to position the horizontal divider.
Clamp the assembly, check for square, and tighten the screws.
Add the Planing Sled Guides
The final detail in the upper cabinet is a pair of guides for the removable planing sled.
These guides define the sled's storage compartment beneath the top.
Cut them to size, then attach them with glue and pin nails.
Check that the opening provides enough clearance for the sled to slide in and out without binding.
Step 3: Build the Storage Drawers
The lower cabinet contains two deep drawers.
These are designed for durability and straightforward construction.
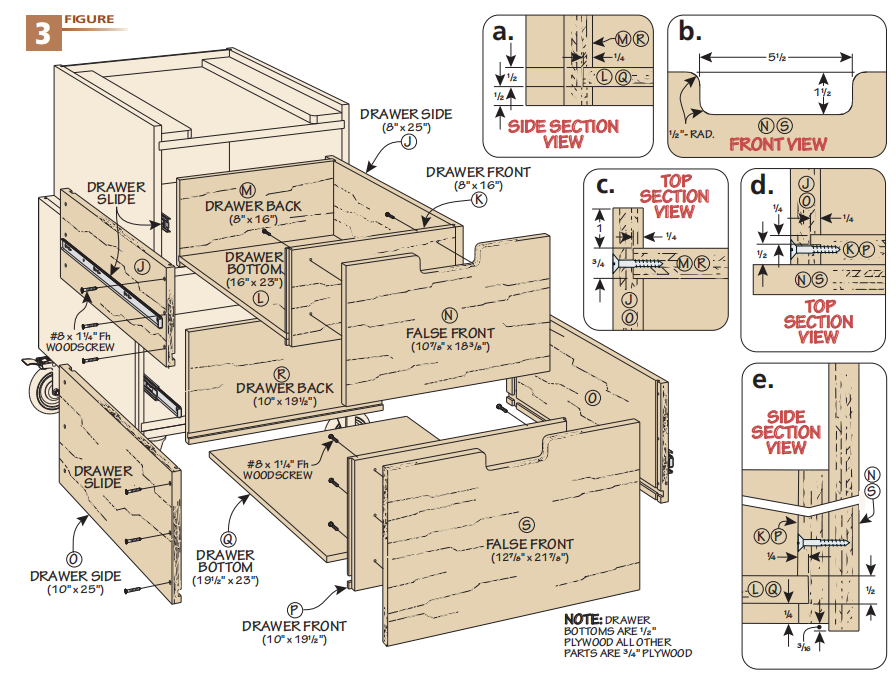
Tongue-and-dado joinery provides strong connections between the drawer parts, while grooves capture the drawer bottoms.
Cut the Drawer Joinery
Start by cutting the drawer fronts, backs, and sides to size.
A narrow dado near the front of each drawer side receives the tongue on the drawer front.
A wider dado toward the rear captures the drawer back.
Next, cut the rabbets that form the tongues on the drawer fronts.
Adjust the dado blade setup to cut the grooves for the drawer bottoms.
Dry-fit the parts before assembly to confirm that the joints seat fully and the drawer box is square.
Assemble the Drawer Boxes
Apply glue to the joints and assemble each drawer.
Install the drawer bottom in its grooves, then secure the assembly with the specified screws.
Check the drawer for square before the glue sets.
A square drawer box is easier to fit and adjust when installing the slides.
Install the Drawer Slides
Spacer blocks simplify the process of mounting drawer slides inside the cabinet.
The spacers position the slides consistently and help keep them level.
Once the cabinet slides are installed, determine the correct location for the mating slide members on the drawer boxes.
Account for both the vertical position and the front-to-back offset.
When attaching the slides, start with screws in the elongated mounting holes.
These allow small adjustments during installation.
After test-fitting the drawers and confirming smooth operation, drive additional screws through the round mounting holes to secure the final position.
Make the False Drawer Fronts
False fronts give the cart a clean appearance and make it easier to achieve even gaps around the drawers.
Because the drawer boxes are already installed, you can position the false fronts independently before fastening them.
The fronts feature integrated handholds, eliminating the need for separate drawer pulls.
Start by drilling the corners of each handhold opening.
Remove most of the waste with a jigsaw.
For a smoother, more consistent shape, finish the openings with a router and template.
A half-template is particularly useful because it can be flipped to shape both sides of the opening.
After routing, ease the edges with sandpaper.
To install a false front, apply double-sided tape to its back.
Position it carefully against the drawer box, checking for an even reveal.
Press it into place, open the drawer, and secure the front with screws driven from inside the drawer box.
Repeat the process for the second drawer.
Step 4: Add the Fold-Down Side Wings
The folding side wings provide additional surface space without permanently increasing the cart's footprint.
They're useful for staging material and accessories during planing operations.
When the planer isn't in use, the wings fold down against the cabinet.
Shape the Handholds
The wings include handhold openings similar to those on the drawer fronts.
Drill the corners, remove the waste with a jigsaw, and use a router template to create smooth edges.
Finish by sanding the openings.
Install the Folding Hardware
Accurate alignment is important so the wings fold smoothly without rubbing against the cabinet.
One approach is to lay the cart on its side during installation.
Attach the folding hardware to the cabinet first, then position the wings.
A thin paper shim between the wing and cabinet can help establish enough clearance for the wing to fold without binding.
Check the movement before tightening all the fasteners.
Woodsmith Tip: The folding wings are convenient staging surfaces, but don't assume they're designed to support the weight of long boards during planing. Use properly positioned infeed and outfeed supports when necessary, and make sure they won't interfere with the planer's feed mechanism.
Step 5: Build the Top and Planing Sled
The final construction stage includes the laminated plywood top and removable planing sled.
The top provides a sturdy mounting surface for the planer and includes an opening that works with the sled storage compartment.
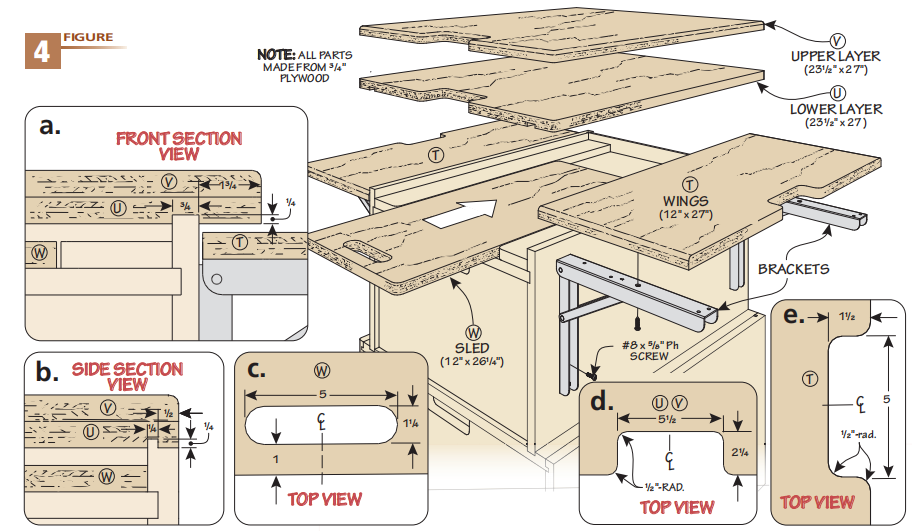
Laminate the Plywood Top
The top consists of two layers of plywood.
The lower layer includes grooves and a dado that interlock with the upper cabinet.
These joints help position the top and strengthen the connection.
A stopped dado provides a cleaner appearance by preventing the joint from showing at the exposed edges.
This can be cut with a handheld router and edge guide.
Once the joinery is complete, glue the upper layer of plywood to the lower layer.
Cut the Top Opening
After laminating the top, lay out the opening.
Drill holes at the corners and remove most of the waste with a jigsaw.
Then use a router and template to clean up the edges.
Because the top is made from two layers of plywood, the opening is deeper than the handholds in the drawer fronts and wings.
Use a suitable template and routing setup for the additional thickness.
Once the opening is complete, glue the top to the upper cabinet.
Make the Removable Planing Sled
The planing sled is the last component to build.
Cut the sled to size according to the construction drawing.
Round the outside corners and cut the handhold.
A simple router template can be used to refine the long edges and create a consistent shape.
Check that the finished sled slides easily into its storage compartment.
The sled should be flat, stable, and compatible with the planer and workpiece dimensions.
When using it, follow the planer's operating instructions and use an appropriate method to prevent the workpiece from shifting.
Finish and Set Up the Mobile Planer Stand
With the construction complete, sand the plywood surfaces and prepare the cart for finishing.
The original project uses two coats of spray lacquer to protect the cabinet and top.
A durable shop finish helps resist dirt, wear, and occasional moisture.
Allow the finish to cure before installing the planer.
Then position the machine on the top and secure it using the manufacturer's recommended mounting locations and fasteners.
Check that the planer is stable and that the cart doesn't rock.
Before operating the machine, lock the casters and confirm that you have adequate clearance for feeding boards through the planer.
For longer stock, position the cart where the workpiece can travel freely through the machine without striking walls, cabinets, or other obstacles.
A Better Home for Your Thickness Planer
A mobile planer stand is one of those shop projects that makes a useful tool even more convenient.
Instead of lifting a heavy planer onto your workbench every time you need it, you can roll the machine into position and get to work.
The folding wings provide extra surface space, the drawers keep accessories organized, and the removable sled stores neatly beneath the top.
With its sturdy plywood construction and efficient use of space, this cart turns a portable thickness planer into a practical milling station for your workshop.
Build Your Own Mobile Planer Cart
Stop lifting your heavy benchtop planer every time you need it. This space-saving mobile planer cart features heavy-duty casters, two spacious storage drawers, fold-down wings, and a built-in planing sled. Get the complete woodworking plans and build a more convenient milling station for your shop.
GET THE MOBILE PLANER CART PLANS → Give Your Thickness Planer a Permanent Home


