How to Build an Executive Desk with Drawers and Storage
A good desk needs to do more than provide a place to work. It should offer plenty of room to spread out, convenient storage for everyday essentials, and a design that looks just as good as it functions.
This executive desk woodworking project delivers all three.
Designed by Woodsmith's Chris Fitch, the desk combines the substantial presence of a traditional executive desk with the lighter appearance of contemporary furniture. The storage cabinets are raised off the floor and supported by tapered legs, creating an open, balanced design.
The clean lines, strong horizontal elements, and warm cherry wood also reflect the influence of Frank Lloyd Wright's Prairie and Usonian furniture.
Despite its impressive size, the desk is built using familiar woodworking techniques. The construction includes tapered legs, reinforced miter joints, a laminated plywood desktop, and practical drawer joinery.
The finished desk provides a spacious work surface, three drawers, and a drop-down storage compartment.
Whether you're furnishing a dedicated home office or creating a workspace in another room, this project offers an attractive combination of craftsmanship and everyday function.
Executive Desk Design: Traditional Presence, Lighter Construction
Traditional pedestal desks often feature large storage cabinets that extend all the way to the floor.
They provide generous storage but can appear heavy and bulky.
Chris took a different approach with this design.
Instead of placing the storage cases directly on the floor, he raised them and positioned them between four tapered legs.
The legs cradle the cabinets, giving the desk a substantial appearance without making it feel overly massive.
This arrangement also creates a pleasing balance between open space and enclosed storage.
Prairie-Style Furniture Details
The design draws inspiration from the furniture associated with architect Frank Lloyd Wright.
Rather than copying specific decorative elements, it incorporates the underlying characteristics of Prairie and Usonian design.
These include clean lines, horizontal surfaces, and simple geometric forms.
Cherry hardwood and plywood provide the warm appearance, while the tapered legs and raised cabinets help keep the overall design visually light.
The result is a desk that looks appropriate in a traditional home office but also fits comfortably into a more contemporary space.
Step 1: Make the Tapered Desk Legs
The four legs are the foundation of the desk.
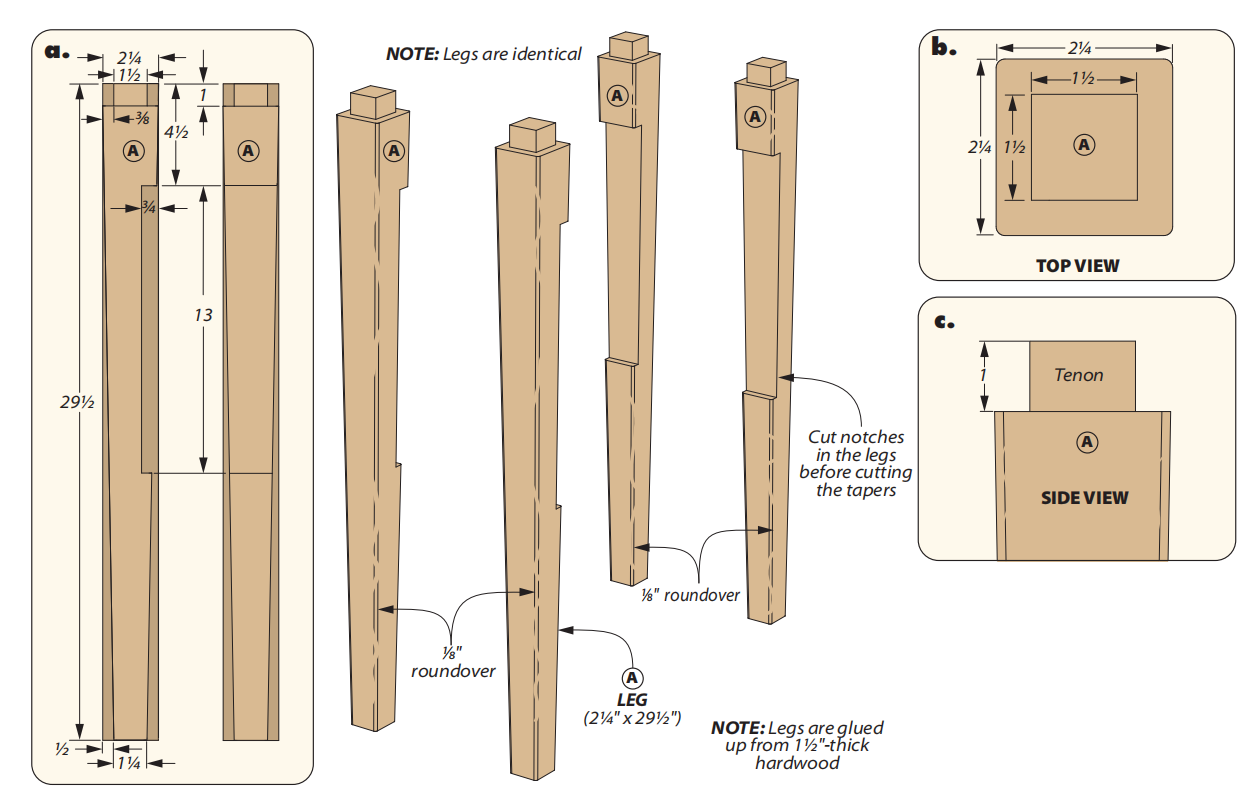
Each leg includes a wide notch that supports one of the storage cases and a tenon at the top that fits into a matching mortise in the desktop.
The lower portion of each leg tapers on all four faces.
Because the notches and tenons require accurate joinery, it's best to complete those operations while the leg blanks are still square.
Prepare the Leg Blanks
Start by selecting straight-grained hardwood for the legs.
The desk shown here is made from cherry.
If you can't find stock thick enough to make the legs from a single piece, glue up the blanks from narrower boards.
A laminated blank can actually provide an advantage.
By carefully arranging the boards, you can achieve straighter, more consistent grain on all four faces.
Once the glue has cured, mill the blanks square and cut them to their required lengths.
Cut the Case-Support Notches
Each leg has a wide notch that receives the storage case.
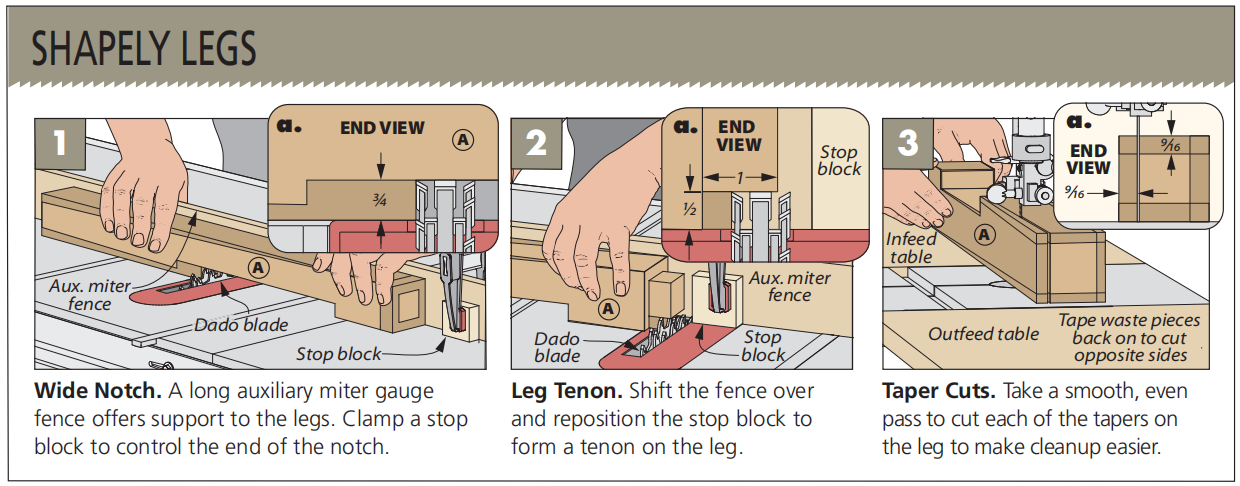
A dado blade at the table saw makes these notches straightforward to cut.
Set the blade to the required depth and make multiple passes to remove the waste.
Use the same setup for all four legs to keep the notches consistent.
The fit is important because the cases help connect and stabilize the leg assemblies.
Cut the Top Tenons
Next, cut the square tenons at the tops of the legs.
These tenons fit into mortises routed into the underside of the desktop.
A dado blade can be used to remove the waste from each face of the leg.
Because the tenons are longer than the width of the dado blade, make two passes on each face.
Check the dimensions carefully before moving on.
The tenons need to fit their mortises accurately when the top is installed.
Shape the Four-Sided Tapers
With the notches and tenons complete, lay out the tapers on all four faces of each leg.
A band saw works well for removing the waste.
After cutting the first two faces, temporarily reattach the waste pieces with masking tape.
This restores support for the workpiece and provides a reference for cutting the remaining two tapers.
Once all four faces are cut, remove the saw marks with a hand plane or edge sander.
The finished legs should have smooth, consistent tapers.
Step 2: Build the Floating Storage Cabinets
The executive desk features two storage cases positioned between the legs.
These cases create the desk's distinctive floating appearance.
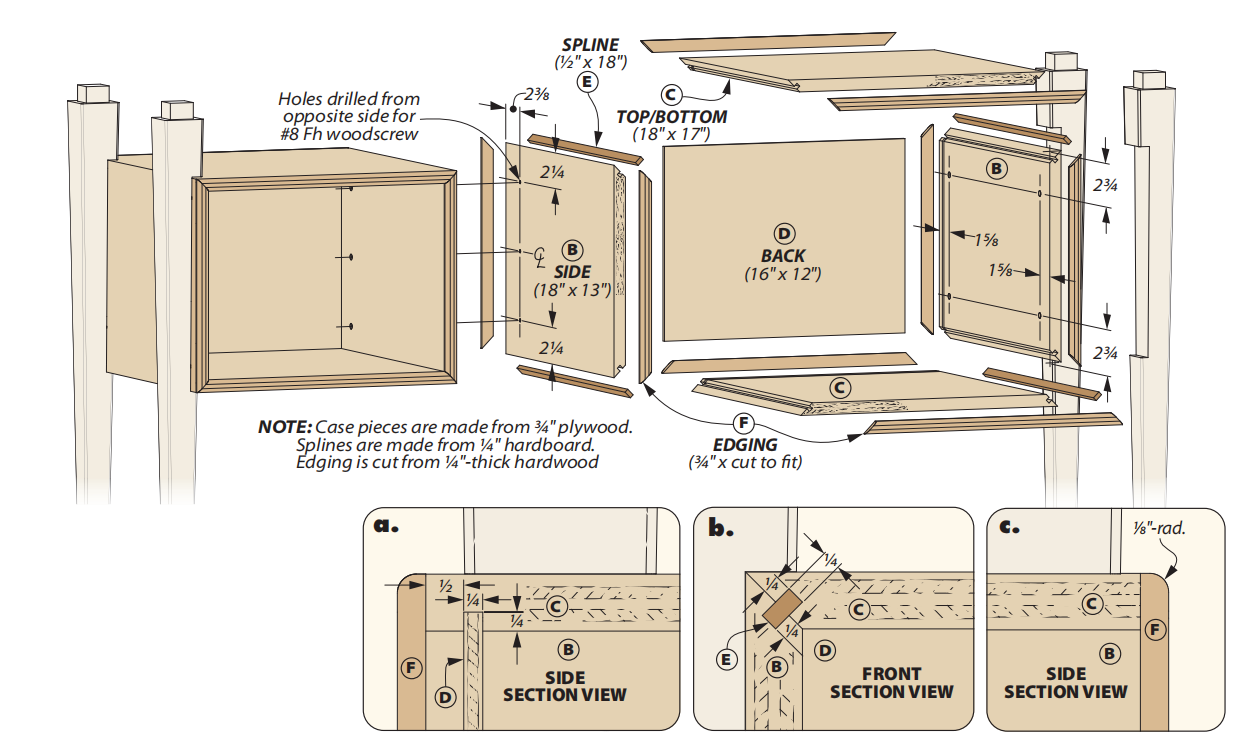
They're made from plywood and assembled using miter joints reinforced with splines.
The splines help align the parts during assembly and strengthen the glued joints.
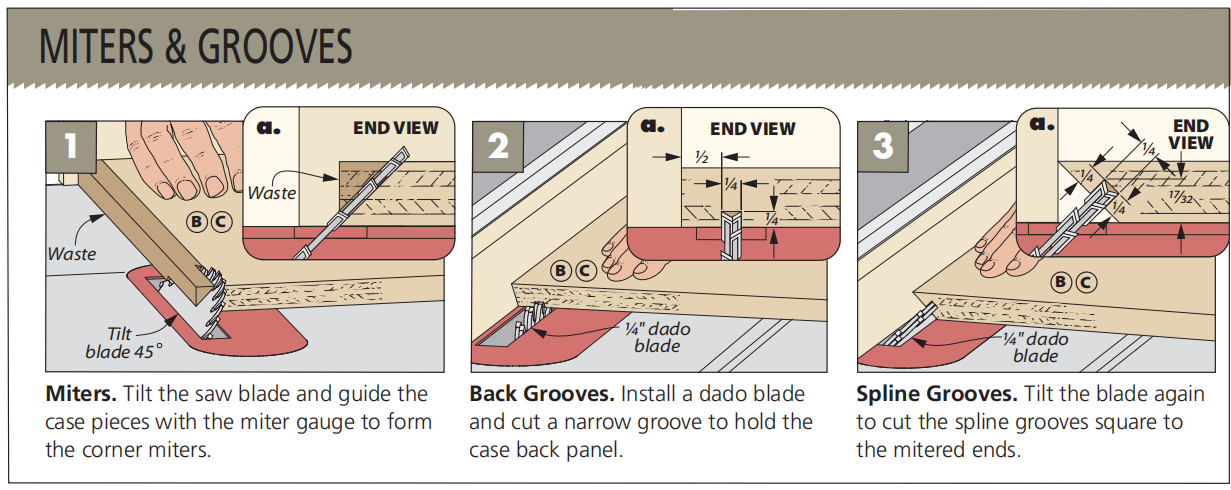
Cut the Case Parts and Miters
Begin by cutting the plywood panels to size.
The case sides need to fit snugly into the notches in the legs.
Once the panels are sized, cut the miters at the table saw.
A careful setup is important here because the miter joints form the corners of the storage cases.
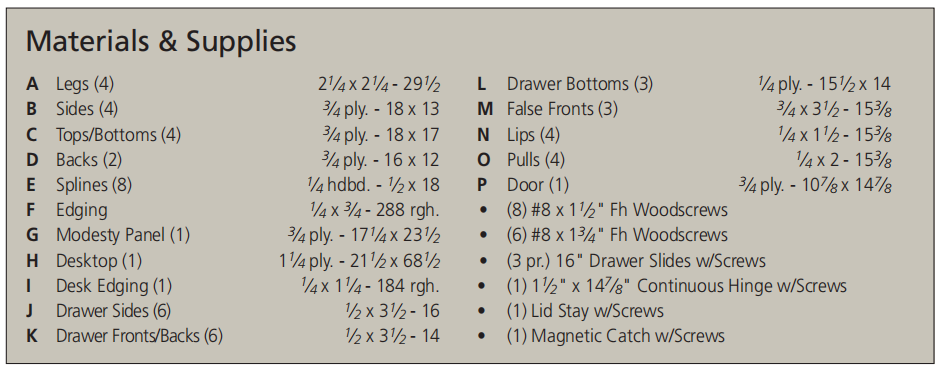
Before assembly, drill the screw holes used to connect the cases to the legs and the modesty panel.
These holes are easier to position while the panels are still separate.
Add Grooves for the Back Panels
Each storage case includes a plywood back.
Cut a groove along the inside faces of the case components to receive the back panel.
The back is rabbeted along its edges so it fits into the narrower grooves.
This arrangement captures the back panel within the case and creates a clean appearance.
Reinforce the Miter Joints with Splines
Miter joints create an attractive, uninterrupted appearance, but they benefit from reinforcement.
To strengthen the corners, cut matching grooves into the mitered edges.
These grooves receive splines that help register the parts during glueup.
The splines also provide additional long-grain glue surface.
Dry-fit the case before applying glue.
Then assemble the parts around the back panel and clamp everything square.
Apply Hardwood Edging
This desk is designed to look good from every side.
That means the backs of the storage cases need the same attention as the fronts.
Apply hardwood edging to the exposed front and back edges of the plywood.
Round the corners as shown in the construction drawings.
The edging conceals the plywood layers and provides a finished appearance, making the desk suitable for placement in the middle of a room rather than only against a wall.
Step 3: Connect the Cases with a Modesty Panel
At this stage, you have two separate leg-and-case assemblies.
The next step is joining them to create a complete desk base.
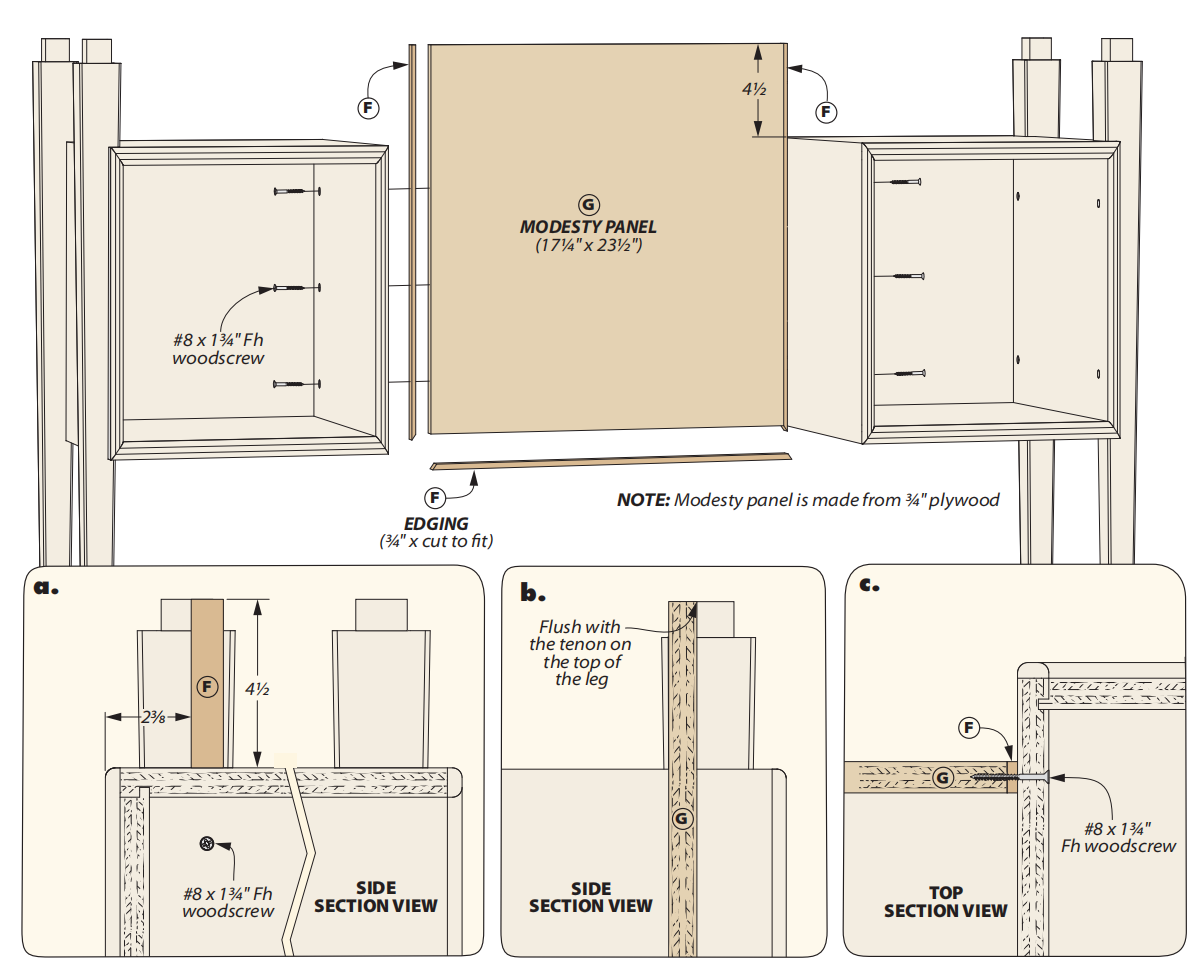
Rather than adding a bulky framework, the design uses a plywood modesty panel.
A modesty panel traditionally closes off the back of a desk, but here it also serves an important structural purpose.
It connects the two storage cases and helps make the base rigid.
Prepare the Panel
Cut the modesty panel to the dimensions shown in the plans.
The face grain should run vertically.
Apply hardwood edging to the sides and lower edge.
Portions of the side edges remain visible in the completed desk, while the lower edge benefits from protection against bumps and wear.
Unlike the rounded edging on the storage cases, the edging on the modesty panel remains square.
Assemble the Desk Base
Place the two leg-and-case assemblies on their backs.
Position the modesty panel between them, using spacers to establish its front-to-back location.
The lower edge of the panel should be flush with the bottoms of the storage cases.
The upper edge should align with the tops of the leg tenons.
Check this alignment with a straightedge.
Once everything is positioned correctly, clamp the assemblies together.
Drill pilot holes through the cases into the panel, then install the connecting screws.
The completed base can now stand on its own.
Step 4: Make the Large Executive Desktop
A spacious desktop is one of the defining features of an executive desk.
But the top needs to be more than wide.
It also needs enough thickness to remain rigid without appearing overly heavy.
For this project, Chris chose a laminated plywood construction.
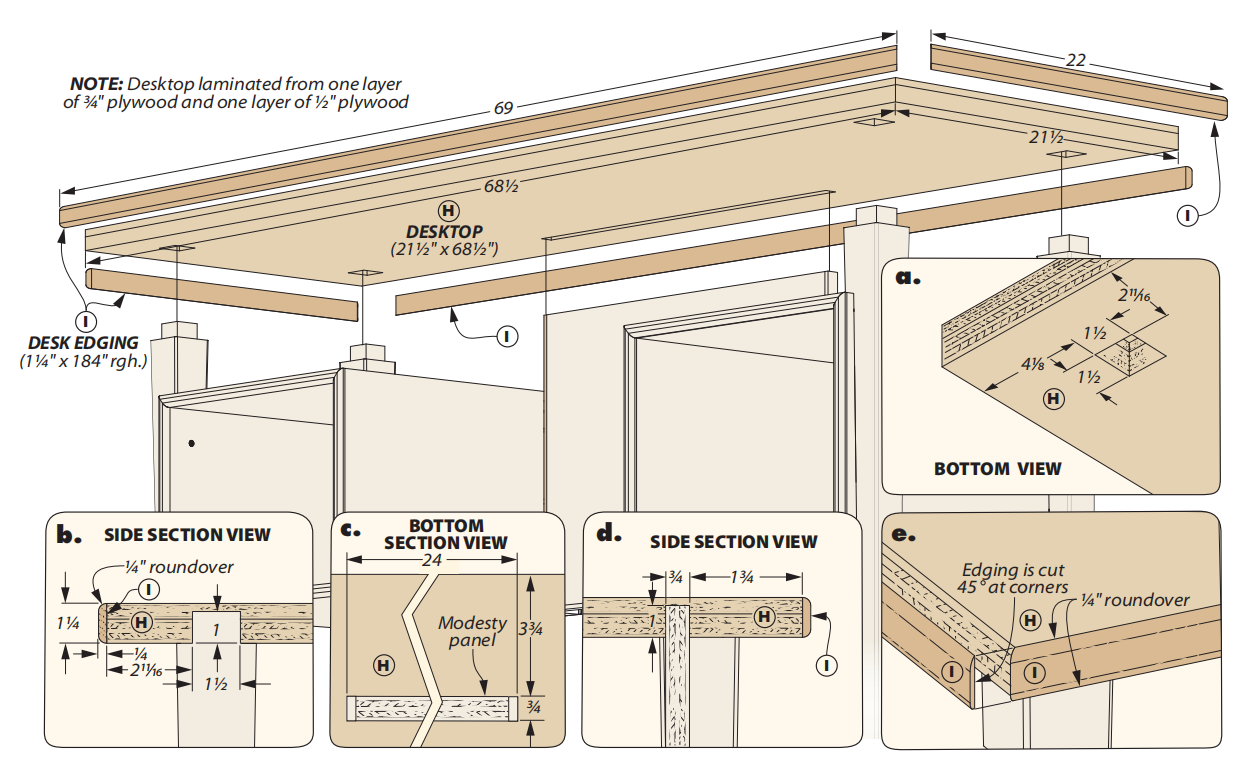
The desktop combines one layer of 3⁄4" plywood with one layer of 1⁄2" plywood, producing a substantial top with good dimensional stability.
Laminate the Plywood Layers
Start by cutting the two plywood panels.
A track saw works well for breaking down large sheets, although a circular saw and straightedge guide can accomplish the same task.
Use a sharp blade suitable for plywood to minimize chipout.
Cut one panel to its final dimensions.
Leave the second panel slightly oversized.
Spread an even coat of glue between the panels and bring them together.
Position the oversized panel so it extends beyond the other layer on all sides.
Place the assembly on a flat surface and apply even pressure with clamps or distributed weights.
Once the glue has cured, use a handheld router and flush-trim bit to trim the oversized layer flush.
Add Hardwood Edging
The plywood desktop is surrounded by hardwood edging.
These strips conceal the plywood layers and give the top the appearance of a solid wood slab.
Miter the edging at the corners for a clean appearance.
After attaching the strips, sand them flush with the plywood surfaces.
Then use a roundover bit to soften the edges.
The result is a sturdy desktop with a comfortable, finished perimeter.
Step 5: Rout the Desktop Mortises and Groove
The connection between the desktop and the base is one of the most interesting parts of this project.
The tenons at the tops of the legs fit into matching mortises in the underside of the top.
The upper edge of the modesty panel also fits into a routed groove.
Together, these details help position the top accurately on the base.
Lay Out the Joinery from the Actual Base
Rather than relying only on measurements, use the completed base to establish the mortise and groove locations.
Position the desktop on the base.
Take time to center it and check that the top is parallel to the modesty panel.
Then trace the outlines of the leg tenons and modesty panel onto the underside of the desktop.
This approach accounts for small variations that may have occurred during construction.
Use Router Templates for Accurate Cuts
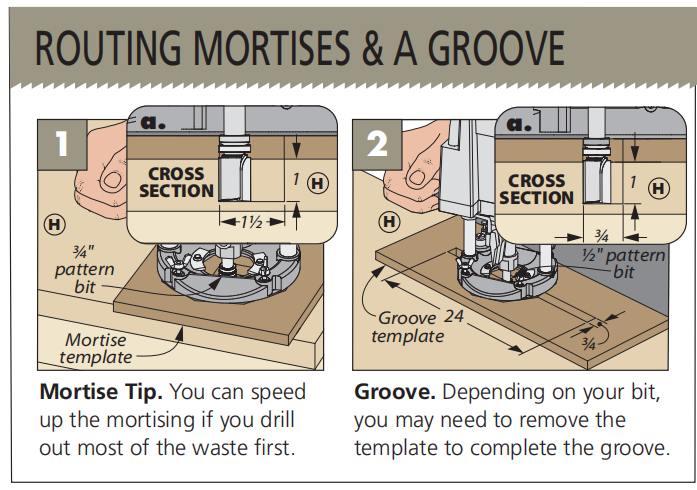
Make two templates from the layout.
One guides the router when cutting the leg mortises.
The other establishes the groove for the modesty panel.
Secure each template to the underside of the desktop with double-sided tape.
Use a plunge router and an appropriate pattern-routing bit to remove the waste.
Make several shallow passes rather than attempting to cut the full depth at once.
This provides better control and reduces stress on the router bit.
Test the fit of the base in the routed openings before final assembly.
Step 6: Build the Executive Desk Drawers
With the main structure complete, it's time to add storage.
The desk shown here has three identical drawers in the left-hand case.
The right-hand case features a drop-down door for larger items.
This arrangement provides a useful mix of storage options, although the design allows you to choose the configuration that best suits your needs.
Cut the Drawer Joinery
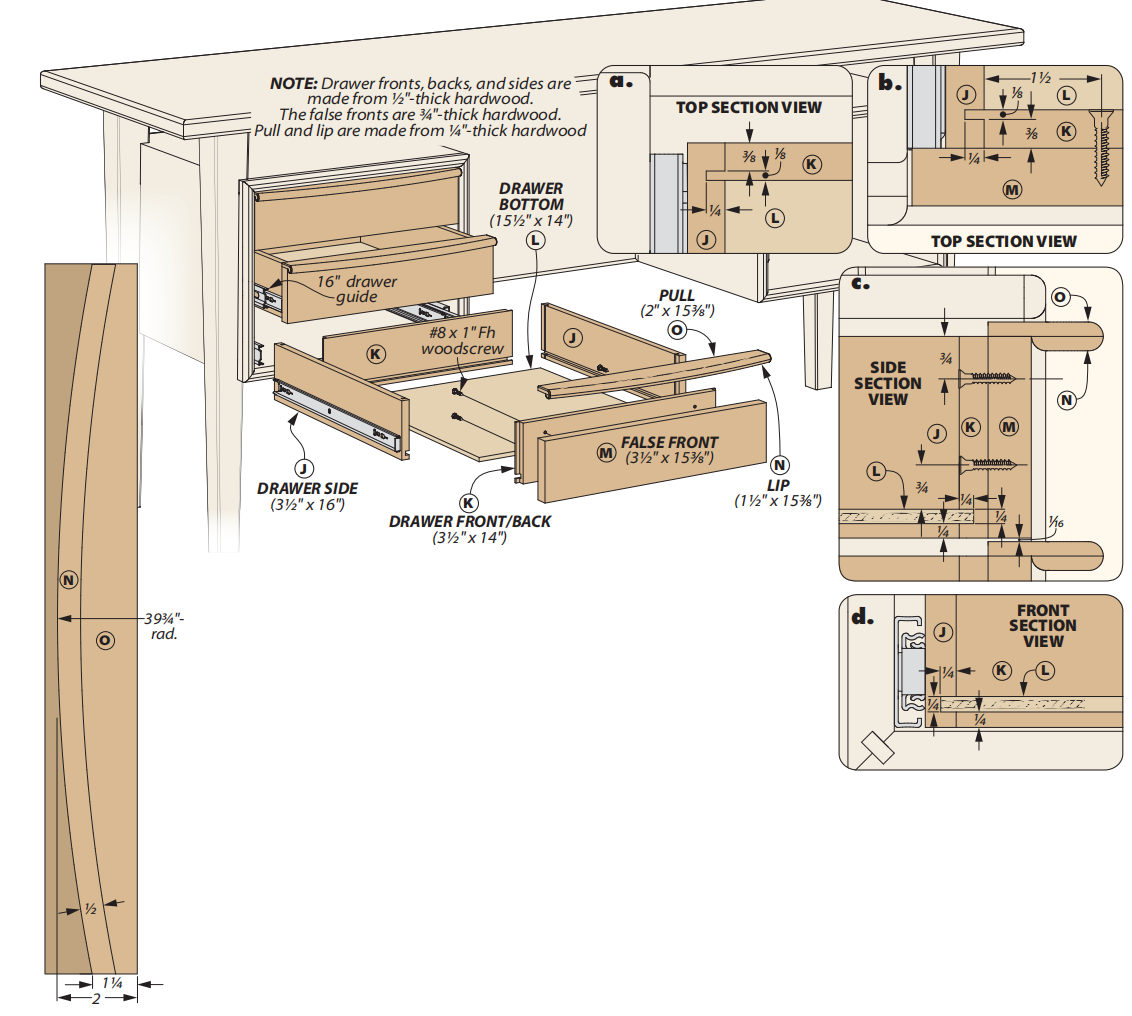
The drawer boxes are made from solid wood, with separate bottom panels.
Tongue-and-dado joinery connects the fronts, backs, and sides.
Begin by cutting dadoes near the ends of the drawer sides.
The distance from the end of each side to the inner edge of the dado matches the thickness of the drawer front or back.
Next, form the matching tongues on the ends of the drawer fronts and backs.
Aim for a snug press fit.
The joint should stay together during a dry assembly without requiring excessive force.
Finally, cut grooves for the drawer bottoms.
Assemble the Drawer Boxes
After completing the joinery, dry-fit each drawer.
Check that the corners close properly and the drawer remains square.
Apply glue to the joints and assemble the drawer box with its bottom panel.
Clamp the assembly as needed and allow the glue to cure.
The drawers operate on full-extension metal slides, providing smooth movement and easy access to the contents.
Make the False Drawer Fronts
False fronts conceal the drawer slides and create a consistent appearance across the desk.
Each false front includes a shop-made wooden pull.
The pulls are shaped to blend with the desk's clean lines rather than drawing attention to separate hardware.
Once the drawer boxes are fitted, the false fronts can be positioned and attached with screws from inside the drawers.
Step 7: Shape the Shop-Made Drawer Pulls
The custom drawer pulls are a small detail that makes a significant difference in the finished desk.
Four identical pulls are needed: three for the drawers and one for the drop-down door.
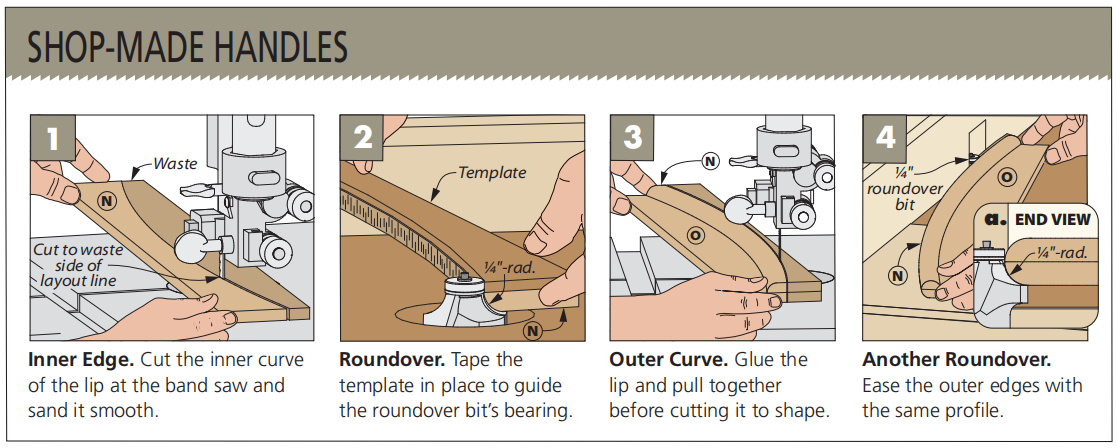
Each pull is made from two shaped wooden components.
Make Templates for the Pulls
Start by making hardboard templates for the two pull components.
The templates make it easier to lay out consistent curves.
Shape the lower lip of the pull first.
For safety and control, begin with an extra-wide blank.
Cut the curve and refine it with a sanding drum, rasp, or file.
Then rout a roundover along the appropriate edge.
Shape the Main Pull
Glue the shaped lower lip to the larger pull blank.
After the glue cures, lay out the outer curve.
Cut the waste away at the band saw.
Use an edge sander or sanding block to refine the shape.
Finally, rout a roundover along the front edge.
A router table fence helps guide the workpiece during this operation.
If the bit leaves a small ridge after the second pass, blend it away with a sanding block.
Attach the Pulls
Glue the completed pulls to the tops of the false drawer fronts.
Once the glue has cured, attach the false fronts to the drawer boxes.
The finished pulls provide a comfortable grip while maintaining the desk's understated appearance.
Step 8: Build the Drop-Down Storage Door
The right-hand storage case features a drop-down door.
This compartment is useful for larger office supplies or other items you want close at hand but out of sight.
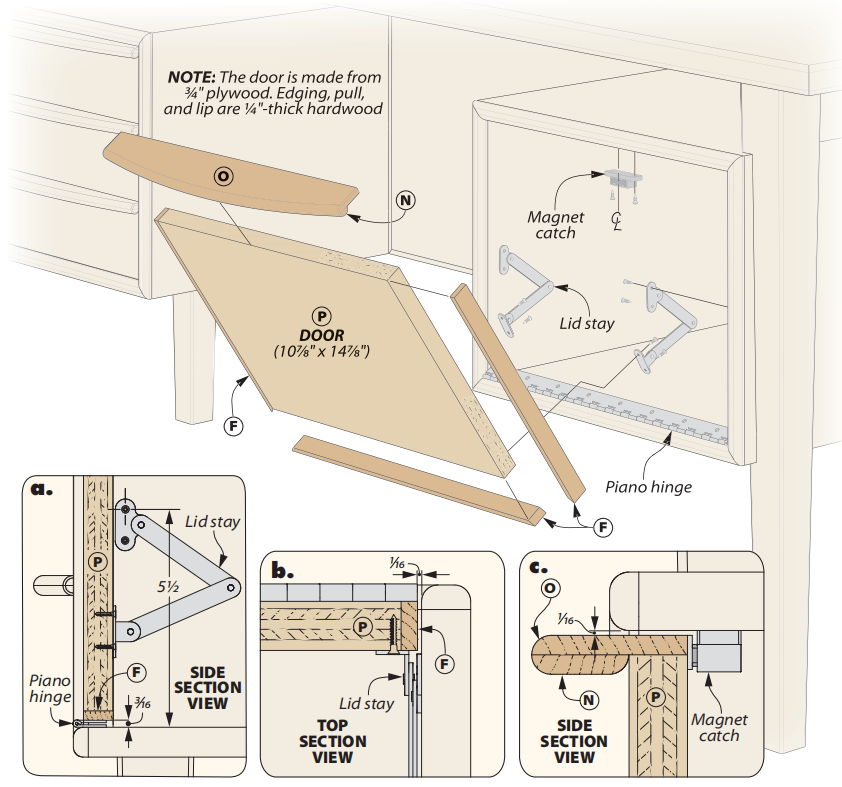
The door is made from plywood and finished with hardwood edging.
Prepare the Door Panel
Cut the plywood door to size.
Apply hardwood edging to three sides.
The upper edge receives the remaining shop-made wooden pull.
This keeps the appearance consistent with the three drawers on the opposite side.
Install the Hinge and Door Stays
The door pivots on a continuous hinge installed along its lower edge.
This allows the door to swing downward, leaving the storage compartment open and accessible.
A pair of door stays supports the panel when it's open.
The stays are positioned to hold the door in a horizontal position.
A magnetic catch keeps the door closed when it's not in use.
Before final installation, check the door's movement and verify that the hardware operates smoothly.
Sanding and Finishing the Executive Desk
With the construction complete, the desk is ready for surface preparation and finishing.
The cherry hardwood and plywood provide a warm, natural appearance that works well with the clean lines of the design.
Begin by inspecting the desk for any remaining glue residue.
Repair small dents or blemishes, then sand the surfaces evenly.
Pay particular attention to the hardwood edging, tapered legs, and custom drawer pulls.
These details should feel smooth and comfortable to the touch.
After sanding, remove the dust with a shop vacuum and a clean cloth.
Choose a finish that provides suitable protection for a frequently used desktop.
A clear protective finish is a good option for highlighting the natural color and grain of the cherry.
Allow the finish to cure according to the manufacturer's instructions before assembling the desk in its final location.
Because the completed desk is substantial, plan on having help when moving it into position.
A Custom Executive Desk for Your Home Office
This executive desk combines the generous work surface and convenient storage of traditional office furniture with a lighter, more refined appearance.
The tapered legs support two raised storage cases, creating a distinctive floating design.
Three drawers keep smaller items organized, while the drop-down compartment accommodates larger supplies.
The laminated plywood top provides a spacious work area, and the custom wooden pulls tie the design together.
Best of all, the project offers an opportunity to practice several useful woodworking techniques, including tapered-leg construction, reinforced miter joints, router-cut mortises, and drawer joinery.
The result is a substantial piece of furniture that's equally suited to a dedicated home office or a workspace within another room.