


How to Use Files and Rasps for Woodworking
Mention woodworking hand tools and finely crafted planes, chisels, and dovetail saws probably come to mind. But some of the hand tools I rely on most aren't nearly as glamorous.
A small set of files and rasps can handle an impressive range of shaping jobs. They're ideal for removing saw marks, rounding edges, refining curves, and working in places where a plane or power tool simply won't fit.
A custom wooden saw handle is a perfect example. After cutting the handle to rough shape, I can use a progression of rasps and files to quickly transform rough-cut edges into smooth, comfortable curves.
The key is knowing the difference between the tools — and using them in the right order.
What's the Difference Between a File and a Rasp?
Files and rasps may look similar, but their cutting surfaces work differently.
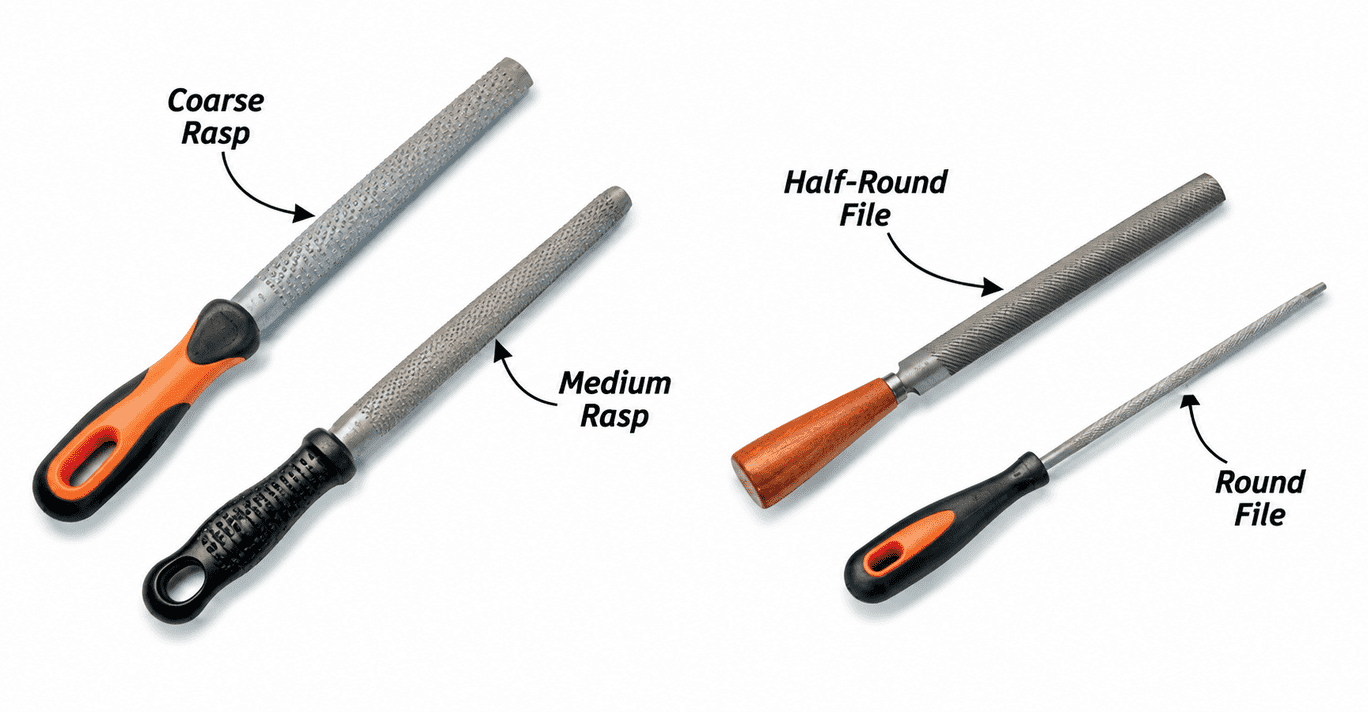
A rasp has individual teeth punched or formed into its surface. Those teeth bite aggressively into wood, making a rasp well suited to removing material and establishing a shape.
A file has rows of linear cutting teeth running diagonally across its surface. Files cut more smoothly and are useful for refining the surface left behind by a rasp.
That's why having both is worthwhile.
For shaping wood efficiently, I like to work from coarse to fine:
Coarse rasp → Medium rasp → File → Sandpaper
Each tool removes the marks left by the previous one while bringing the workpiece closer to its final shape.
Start with a Coarse Wood Rasp
There's no advantage in spending extra time slowly removing wood with a fine tool when a coarse one can establish the shape much faster.
After cutting out the saw handle, there are two main jobs to tackle: remove the saw marks and shape the edges into a comfortable grip.
That's where the coarse rasp comes in.

A coarse rasp removes wood quickly, so concentrate first on establishing the overall profile rather than creating a perfectly smooth surface.
The rasp shown here has a half-round profile. One side is flat and the other curved, giving you two useful shaping surfaces in a single tool.
Use Two Hands for Better Control
Grip the handle with one hand and place your other hand near the tip of the rasp.
Using both hands gives you much better control over where and how aggressively the tool cuts.
Make long, deliberate strokes that use as much of the rasp's cutting surface as practical. A few slow practice strokes can help you get a feel for the motion before you start removing wood aggressively.
Woodsmith Tip: Don't Worry About the Rough Surface. A coarse rasp is supposed to leave noticeable tooth marks. At this stage, concentrate on getting the shape right. The next tools in the sequence will take care of the surface.
Refine the Shape with a Medium Rasp
Once the rough profile is established, switch to a finer rasp.

The medium rasp removes the deep furrows left by the coarse tool while allowing you to refine the curves.
You can also begin blending adjoining surfaces and making smaller adjustments to the shape.
Continue using long strokes. Rather than concentrating repeatedly on one small area, work along the edge and watch how the entire curve develops.
Once the tooth marks are relatively uniform, it's time to move to a file.
Smooth Rasp Marks with a Half-Round File
A half-round file follows the same basic flat-and-curved profile as the rasps, but its finer cutting surface leaves a much smoother result.
Use the flat side on flatter or gently convex areas and the rounded side on inside curves.
At this stage, you're no longer trying to dramatically change the shape. Instead, the file removes the coarse texture left by the rasp and refines the transitions between surfaces.
A good rule throughout the process is simple: don't move to the next tool until the marks from the previous tool have been replaced by a consistent new surface.
That makes it much easier to know when each step is complete.
Use a Round File for Tight Curves
Some curves are simply too tight for the rounded side of a half-round file.
That's where a round file earns its place in the basic kit.

Its smaller diameter allows it to reach into tight inside curves and other confined areas. You may not use a round file over the entire project, but for shaping details like those on a saw handle, it can reach areas the larger tools can't.
Once the file work is complete, you can move on to sandpaper for the final smoothing.
Four Useful Files and Rasps for Woodworking
You can find rasps and files in a huge assortment of shapes and cutting grades, but the saw-handle example shows how much work can be accomplished with just four:
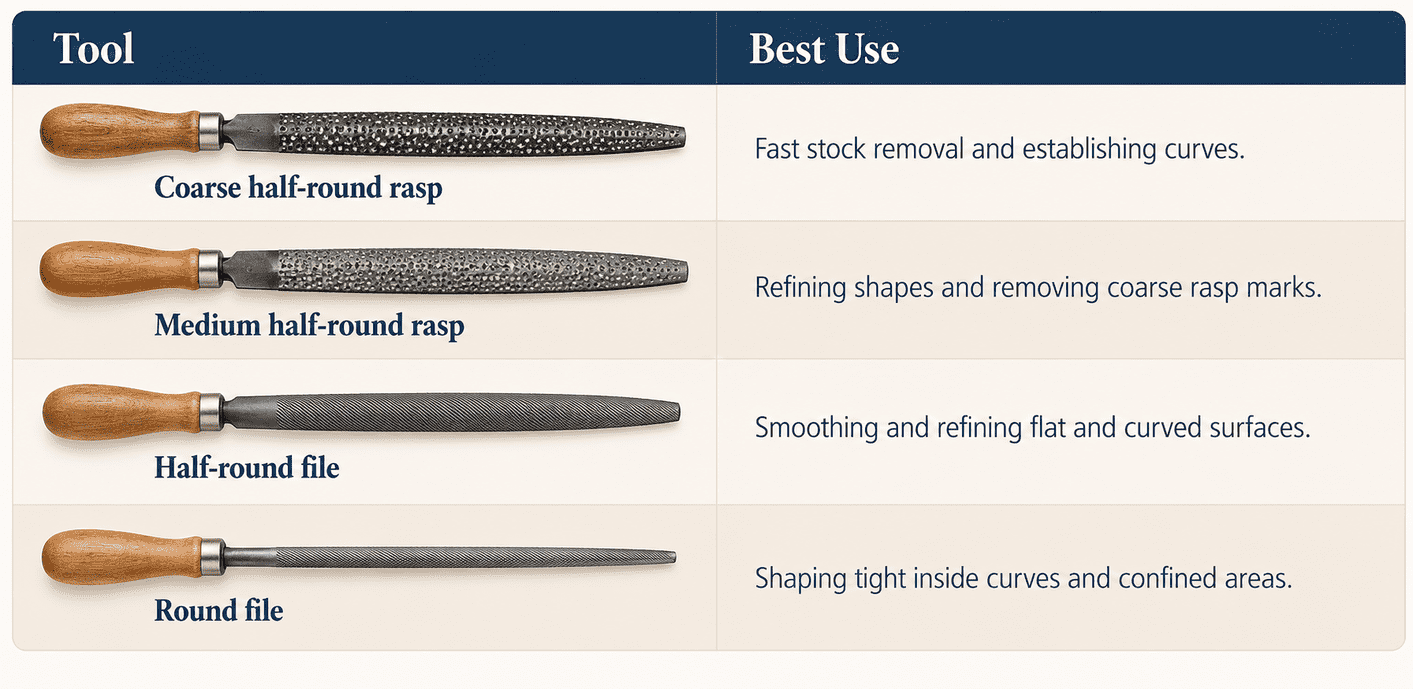
For general-purpose woodworking, this small collection covers a surprising number of shaping jobs.
Keep Files and Rasps Clean
As you work, wood fibers and dust can pack into the cutting surfaces of files and rasps. That reduces their effectiveness.
A file card is designed to clean them.

The file card shown here has fiber bristles on one side and wire bristles on the other. Periodically cleaning the cutting surfaces keeps the teeth exposed and ready to cut.
It's a simple bit of maintenance that helps your tools work more efficiently.
Use Rifflers for Detailed Shaping
Standard files and rasps work well on broad curves, but some projects include transitions and recesses that are difficult to reach.
For those areas, rifflers provide a more specialized solution.

Rifflers are small shaping tools with cutting surfaces at their ends. Depending on the tool, those surfaces may have rasp or file teeth and come in a variety of profiles, including flat, round, triangular, and square cross sections.
Their curved shapes allow them to reach into confined areas and work around complex contours.
Blending Curves with a Riffler

Rifflers are particularly useful when two shaped surfaces meet.
Instead of trying to force a larger rasp or file into the area, use the smaller riffler to ease the transition and blend the curves together.
They're not a replacement for the basic rasp-and-file set. Think of them as detail tools for places the larger tools can't reach.

A Simple Progression for Shaping Wood by Hand
The most important lesson isn't owning dozens of different rasps and files. It's learning to match the aggressiveness of the tool to the stage of the job.
Start with the coarsest tool that can efficiently establish the shape. Then progressively refine the surface:
- Coarse rasp — establish the shape
- Medium rasp — refine the curves
- File — remove rasp marks and smooth the profile
- Round file or riffler — refine tight areas and transitions
- Sandpaper — prepare the surface for finishing
Trying to skip the coarse tools usually means doing more work than necessary. And jumping directly from a very coarse rasp to sandpaper leaves you sanding deep scratches that a finer rasp or file could remove much faster.
Shape Wood Without a Power Tool
Files and rasps are simple tools, but that's part of their appeal. There's no setup, jig, or machine required. Pick up the appropriate tool and start shaping.
More importantly, they put the final shape directly under your control. That's especially useful for handles, curved furniture parts, sculpted edges, and other details where comfort and appearance matter as much as precise dimensions.
A coarse rasp, medium rasp, half-round file, and round file make an excellent basic set. Add a few rifflers when your projects call for finer detail work, and you'll have a versatile shaping kit that deserves a permanent place near the workbench.
Build Your Hand-Tool Skills
Files and rasps are just part of a useful hand-tool kit. Learn how to choose, sharpen, set up, and use woodworking hand tools for more accurate and enjoyable work at the bench.
EXPLORE WOODWORKING HAND-TOOL TECHNIQUES → Hand Tool Techniques & Tips


