


How to Make Finger Joints with a Router Jig
There are plenty of ways to cut finger joints, but this is one of my favorites. The jig is simple to build, easy to set up, and produces consistent results.
What really sets it apart is the way it creates the two mating halves of the joint.
One part is routed from one side of the jig. Then you turn the jig around and rout the mating part from the opposite side. There's no need to reposition the keys or fine-tune the setup between the two operations.
Even better, you aren't limited to evenly spaced fingers. Change the arrangement of the keys and you can create irregular or variable-width patterns that turn a basic finger joint into a decorative design feature.
GET THE STEP-BY-STEP PLANS → Build the Router Finger Joint Jig
How the Finger Joint Jig Works
The structure of the jig starts with a thick plywood beam mounted on a base. The base extends beyond each end of the beam, providing room to clamp the jig securely to a worksurface.
A stop at one end establishes a consistent reference point for the workpieces.
Both faces of the beam are covered with replaceable hardboard backers. These support the workpiece during routing and help prevent tearout.
The clever part is on top.
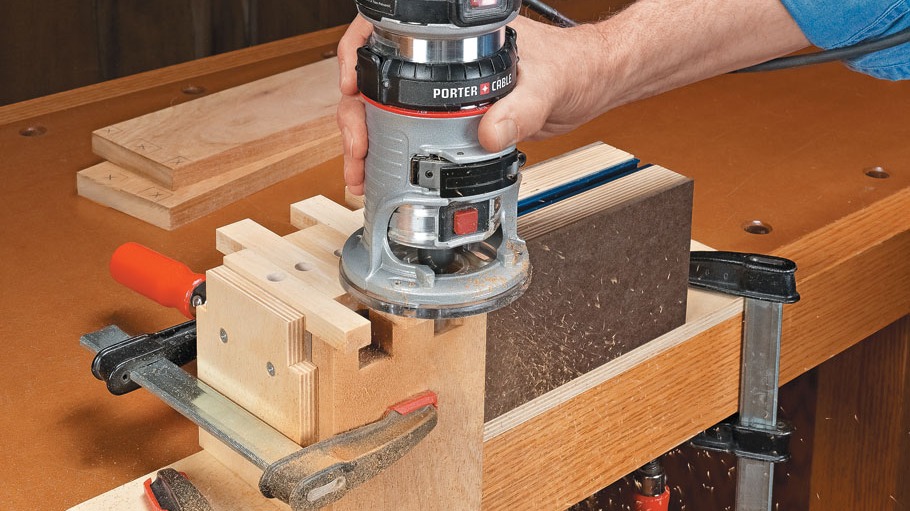
A length of T-track holds a series of removable keys. Short screws and square nuts secure the keys in position, allowing you to rearrange them for different finger-joint patterns.
The Keys Create the Finger Joint Pattern
Unlike a conventional box joint jig, the keys aren't simply indexing one cut after another. A bearing-guided pattern bit follows the shape created by the keys.

The length and arrangement of the keys establish the finger pattern. As the router follows the template, the bearing rides against the keys and stops against the end of the opposing key, preventing the cutter from routing into the jig beam.
Here's what makes the system so useful: each key helps define both halves of the joint. Turn the jig around and the pattern reverses, producing the mating half.
That also means the keys don't all have to be the same width. You can arrange different sizes to create irregular and variable-spaced fingers.
WOODSMITH TIP: Keep Extra Keys Handy.

The plans provide several useful key sizes, but there's no reason to stop there. Make extra keys as different projects require them and keep the keys, screws, and nuts together near the jig.
Set Up the Finger Joint Pattern
Start by deciding how you want the fingers to look.
Slide the first key into the T-track and position it snugly against the end stop. Tighten it with an Allen wrench.

Add the remaining keys one at a time, alternating their direction.
Position each key snugly against the previous one, but don't jam them together. Once it's properly positioned, tighten it in place.
At the opposite end, add one final key to support the router as you finish the cut. A somewhat wider key works well here because its primary job is providing a stable surface for the router.
Prepare and Mark the Workpieces
Arrange the project parts in their final orientation before routing.
The workpiece width should match the key arrangement or be just slightly wider.
Next, establish a consistent reference edge on every part. A triangle drawn across the assembled parts makes it easy to keep track of their orientation.
Then draw or scribe a baseline around the ends.
The baseline establishes the length of the fingers. You can set up the joint so the fingers finish flush with the mating surface or intentionally leave them slightly proud for a different look.
The important thing is consistency.
Use the same edge of every workpiece as the reference against the jig's stop. When the mating parts come together, their edges will align.
Clamp the Workpiece Securely
Place the first workpiece against the jig with its reference edge against the end stop.
For a narrow part, a single clamp may be enough. Wider parts can be secured with two clamps. At this point, the keys determine the finger pattern, the stop controls the position of the workpiece, and the hardboard backer supports the cut.
You're ready to rout.
Choose the Right Pattern Bit
The jig relies on a bearing-guided pattern bit, and the bit has to satisfy two conditions.
First, set the cutting depth so the end of the bit corresponds with the baseline you established on the workpiece. For a flush joint, that means matching the finger length to the thickness of the mating part.
Second, the bit's bearing must fully engage the jig keys while the cutting edge reaches all of the joint surfaces that need to be routed.
Because workpiece thickness varies from project to project, one pattern bit may not cover every situation.
Keeping pattern bits with several cutting lengths and diameters expands the range of stock you can use with the jig.
Rout the First Half of the Finger Joint
With the workpiece clamped securely, start routing from left to right.
Before routing to full depth, make a light skim cut across the face of the workpiece. This helps reduce tearout.
Then follow the pattern created by the keys.
Keep the router controlled and make sure the bearing follows each key, including contacting the end of the key at the back of each cut.
After routing one end, flip the workpiece end for end and rout the opposite end, keeping the same reference edge against the stop.
Repeat the process for all similar project parts.
Turn the Jig Around for the Mating Joint
Now comes the best part. You don't move the keys. Instead, turn the entire jig around.

Clamp the adjacent mating workpiece in position with the same reference edge against the stop.
The routing process is the same, but because you're working from the opposite side of the key arrangement, the template creates the negative of the first pattern.
Where the first workpiece has a finger, the mating part has a matching opening.
Once routing is complete, test-fit the two parts.
No repositioning the keys. No recalculating the spacing. No separate setup for the mating pattern.
Replace the Hardboard Backers as Needed
The hardboard backers are sacrificial.
Every new key arrangement cuts into the backer as you rout the pattern. Eventually, you'll run out of clean material.
Before replacing a backer, flip or reposition it to expose a fresh edge when possible.
Then make a few extras and keep them with the jig. They're simple parts, and having replacements ready means a worn backer won't interrupt a project.
Customize the Jig for Your Projects
The basic design doesn't require much modification, but there are two easy ways to tailor it to your woodworking.
The first is simply to make more keys.
Different key widths and arrangements let you create new finger-joint patterns without rebuilding the jig. That's especially useful if you want something more decorative than a traditional evenly spaced joint.
The second option is to build a wider version of the jig for larger case parts. A larger jig will naturally be more cumbersome, so there's a tradeoff between capacity and convenience.
For boxes, clocks, and similar projects, the standard-size jig offers plenty of versatility.

Finger Joints Without the Fussy Setup
What makes this jig work so well isn't complexity. It's the opposite.
The keys create the pattern. The pattern bit follows the keys. And turning the jig around automatically creates the complementary half of the joint.
That means there's no adjustment between mating parts.
Once you've established a key arrangement you like, you can use it to produce snug-fitting finger joints with consistent results — whether you want a traditional pattern or something a little more eye-catching.
Make Fast, Repeatable Finger Joints with Your Router
Build this versatile Finger Joint Jig and you can create both halves of a matching joint without resetting the jig between cuts. Rearrange the removable keys to change the pattern, use different key widths for decorative joints, and put the jig to work on boxes, clocks, and other small projects.
The downloadable woodworking plan gives you the details you need to build the jig and start creating your own finger-joint patterns.
GET THE STEP-BY-STEP PLANS → Build the Router Finger Joint Jig


