


There are plenty of ways to cut tenons for traditional mortise-and-tenon joinery. But when I need to make a batch of identical tenons with smooth cheeks and crisp, square shoulders, one of my favorite methods is using a stacked dado blade on the table saw.
The advantage is repeatability. Once you've dialed in the blade height and fence position, you can cut matching tenons on multiple workpieces without measuring and laying out every joint individually. The process is straightforward: Use the dado blade to remove material from both faces of the workpiece, then cut the edge shoulders to establish the final tenon width.
The key is getting the setup right before making the final cuts. Here's the method I use to produce consistent, snug-fitting tenons with a table saw and stacked dado blade.

Why Use a Stacked Dado Blade for Cutting Tenons?
A stacked dado blade removes a wide strip of material in each pass, making it an efficient way to form the cheeks of a tenon. Compared with using a standard table saw blade, a dado stack can remove the waste in fewer passes. A quality carbide-tooth dado blade also leaves a relatively smooth surface, reducing the amount of cleanup needed before assembly.

This technique works especially well when making multiple identical parts, such as table aprons, chair rails, or cabinet frame components.
The basic setup uses a stacked dado blade to remove the waste, a miter gauge with an auxiliary fence to support the workpiece and reduce tearout, and a rip fence to establish the tenon length. The workpiece is held flat against the miter gauge fence while cutting the cheeks. After both faces are complete, the workpiece is held on edge to cut the remaining shoulders.
Once the setup is dialed in, the process goes quickly.
Step 1: Prepare the Workpieces for Accurate Tenons
Before setting up the table saw, make sure all the workpieces are properly sized. Consistent stock preparation is the foundation of accurate mortise-and-tenon joinery. If the boards vary in thickness, the same blade-height setting will produce tenons of different thicknesses.
Start by planing the workpieces to a uniform thickness. Then check that the edges are straight and parallel and that the ends are cut square.
This is especially important when cutting tenons on both ends of a rail or apron. Any variation in the stock can affect the final fit and shoulder-to-shoulder length. Taking the time to prepare the material now will make the table saw setup much easier.
Step 2: Set Up the Table Saw and Dado Blade
For this method, I prefer a quality carbide-tooth dado stack set to a width of approximately 5/8" to 3/4". A relatively wide stack allows you to cut short tenons in a single pass or remove the waste from longer tenons with just a few passes. Fewer passes generally mean smoother tenon cheeks and a more efficient cutting process.
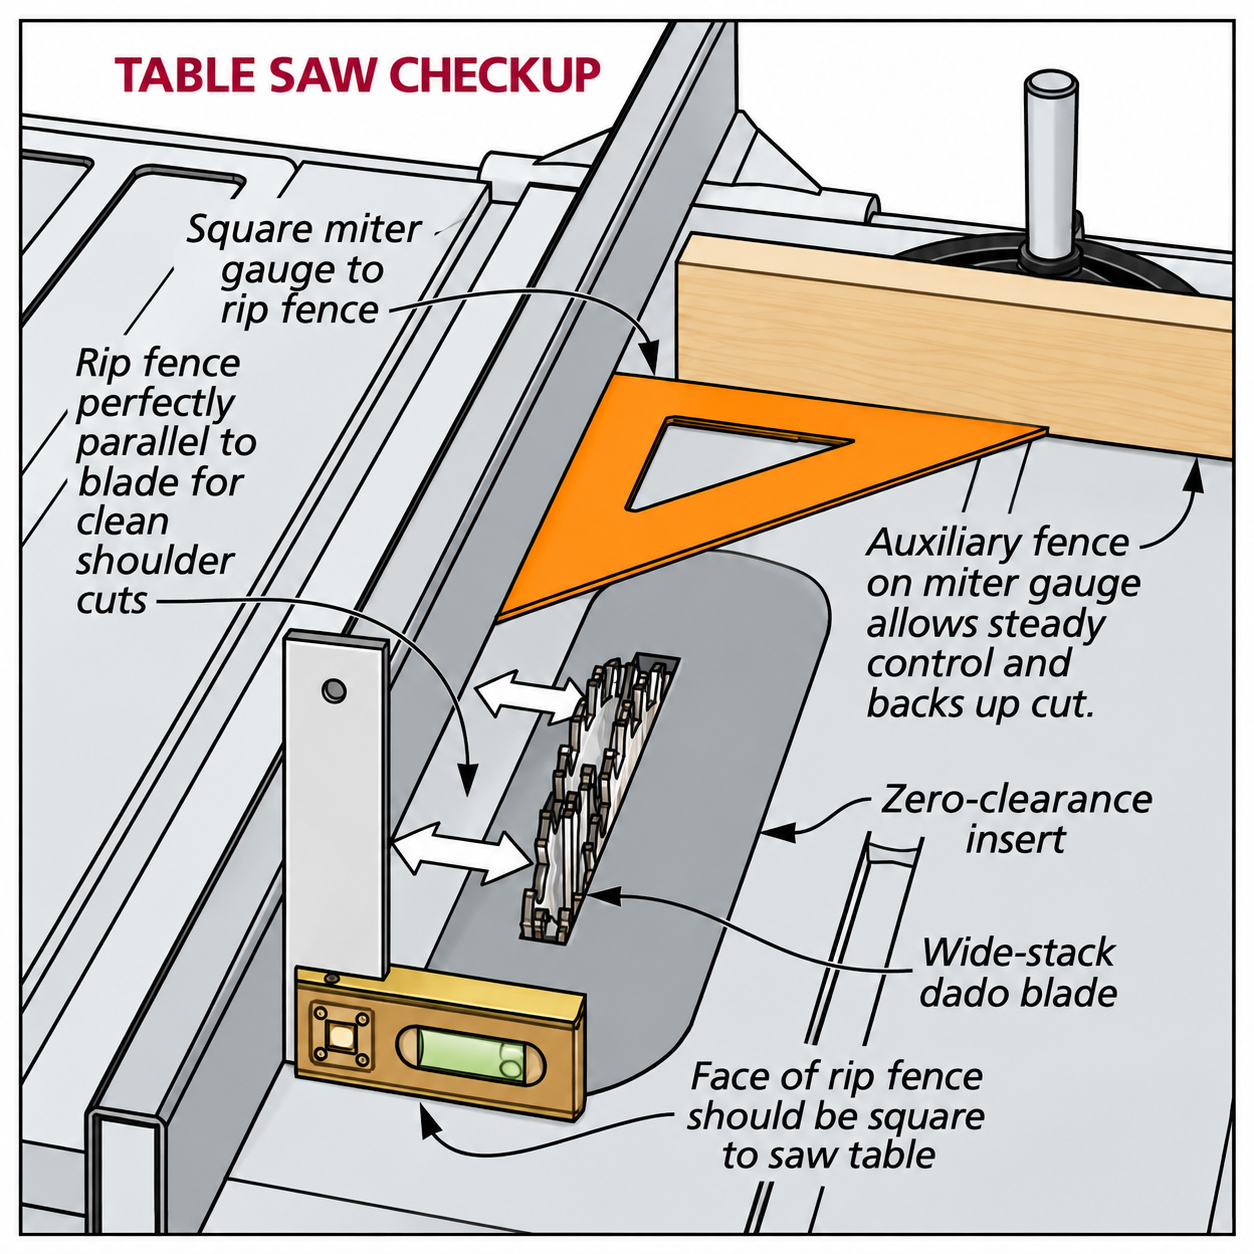
A zero-clearance insert around the dado blade also helps support the workpiece and reduce tearout at the shoulders. Make sure the insert is designed for your saw and the width of the dado stack.
Add an Auxiliary Fence to the Miter Gauge
The miter gauge and rip fence serve as guides when making the cuts, so it's important that both are ready for the task. Start by attaching a straight, sturdy auxiliary fence to the miter gauge. It should be long enough to provide a steady bearing surface for the workpiece and extend into or slightly past the blade.
The auxiliary fence backs up the cut as the dado blade exits the workpiece, helping prevent tearout and produce cleaner shoulders. It also provides a consistent reference surface when cutting multiple parts.
Position the Rip Fence
The rip fence establishes the distance from the end of the workpiece to the tenon shoulder. For short tenons of approximately 3/4" or less, I use an auxiliary rip fence and carefully raise the dado blade into it to create the necessary clearance. For longer tenons that require multiple passes, an auxiliary fence generally isn't necessary.
Whichever arrangement you use, make sure the workpiece is fully supported and that the setup doesn't trap the stock or loose waste between the blade and fence. Use a compatible dado insert and appropriate workholding.
Check the Saw's Alignment
Before making any cuts, take a few minutes to check the saw's alignment. The rip fence should be parallel to the blade, and its face should be square to the table. The miter gauge also needs to be set accurately to 90°.
This is particularly important for the shoulders. If the miter gauge is out of square, the resulting tenon shoulders won't be perpendicular to the workpiece. A quick alignment check now can prevent a lot of frustration when fitting the finished joints.
Step 3: Set the Dado Blade Height for a Snug Tenon Fit
Once the saw is ready, the first adjustment is the dado blade height. This determines how much material is removed from each face of the workpiece and establishes the final tenon thickness. Rather than relying entirely on measurements, I prefer to dial in the setting with a test cut.
Using a combination square or rule, set the blade slightly lower than the estimated final height. Then make a pair of shallow cuts across the end of a test workpiece, removing material from both faces to create a short stub tenon.
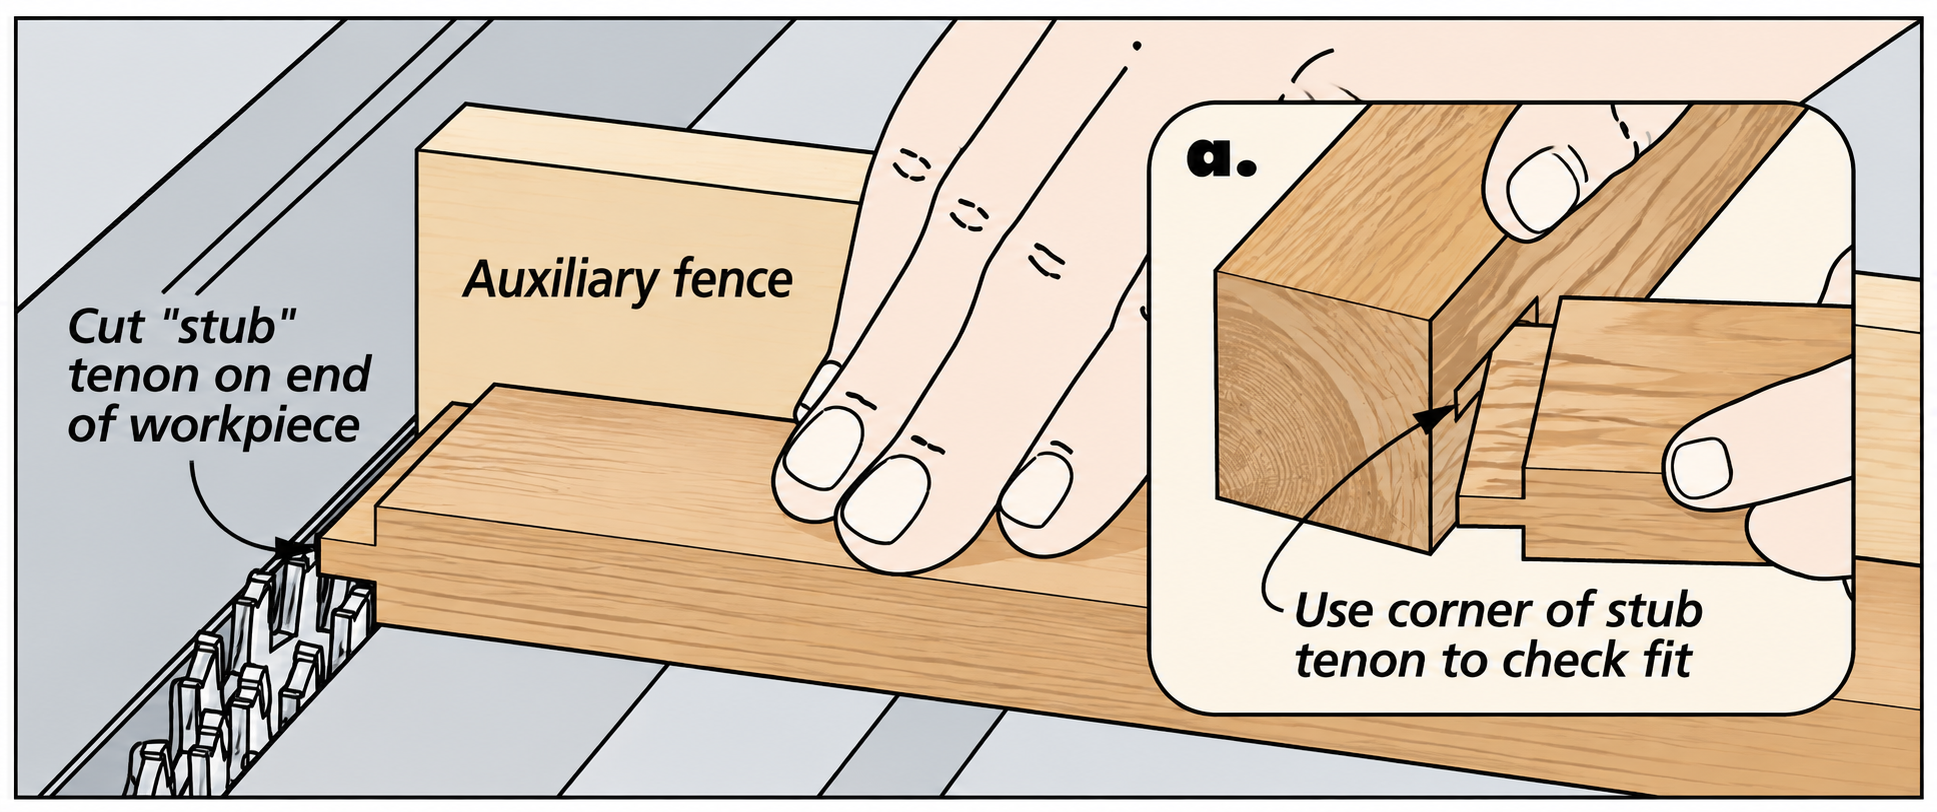
Test the stub tenon in the matching mortise. If it's too thick, raise the blade slightly and repeat the cuts. Continue making small adjustments until the tenon slides into the mortise with a snug fit.
This cut-and-test approach accounts for small variations in stock thickness and eliminates the need to calculate a precise blade-height setting. Once you've established the correct height, leave it unchanged while cutting the cheeks on the remaining workpieces.
Step 4: Adjust the Rip Fence to Set the Tenon Length
With the tenon thickness established, the next step is positioning the rip fence to control the tenon length. The goal isn't simply to cut a tenon to a specific length. You also want the correct shoulder-to-shoulder distance between the tenons on opposite ends of a workpiece. This dimension determines how accurately the parts fit together during assembly.
I like to start conservatively, positioning the fence to produce a tenon that's slightly shorter than the final dimension. Using a test piece, make several passes to remove the waste, working back toward the shoulder. For the final pass, the end of the tenon bears against the fence in the intended setup.
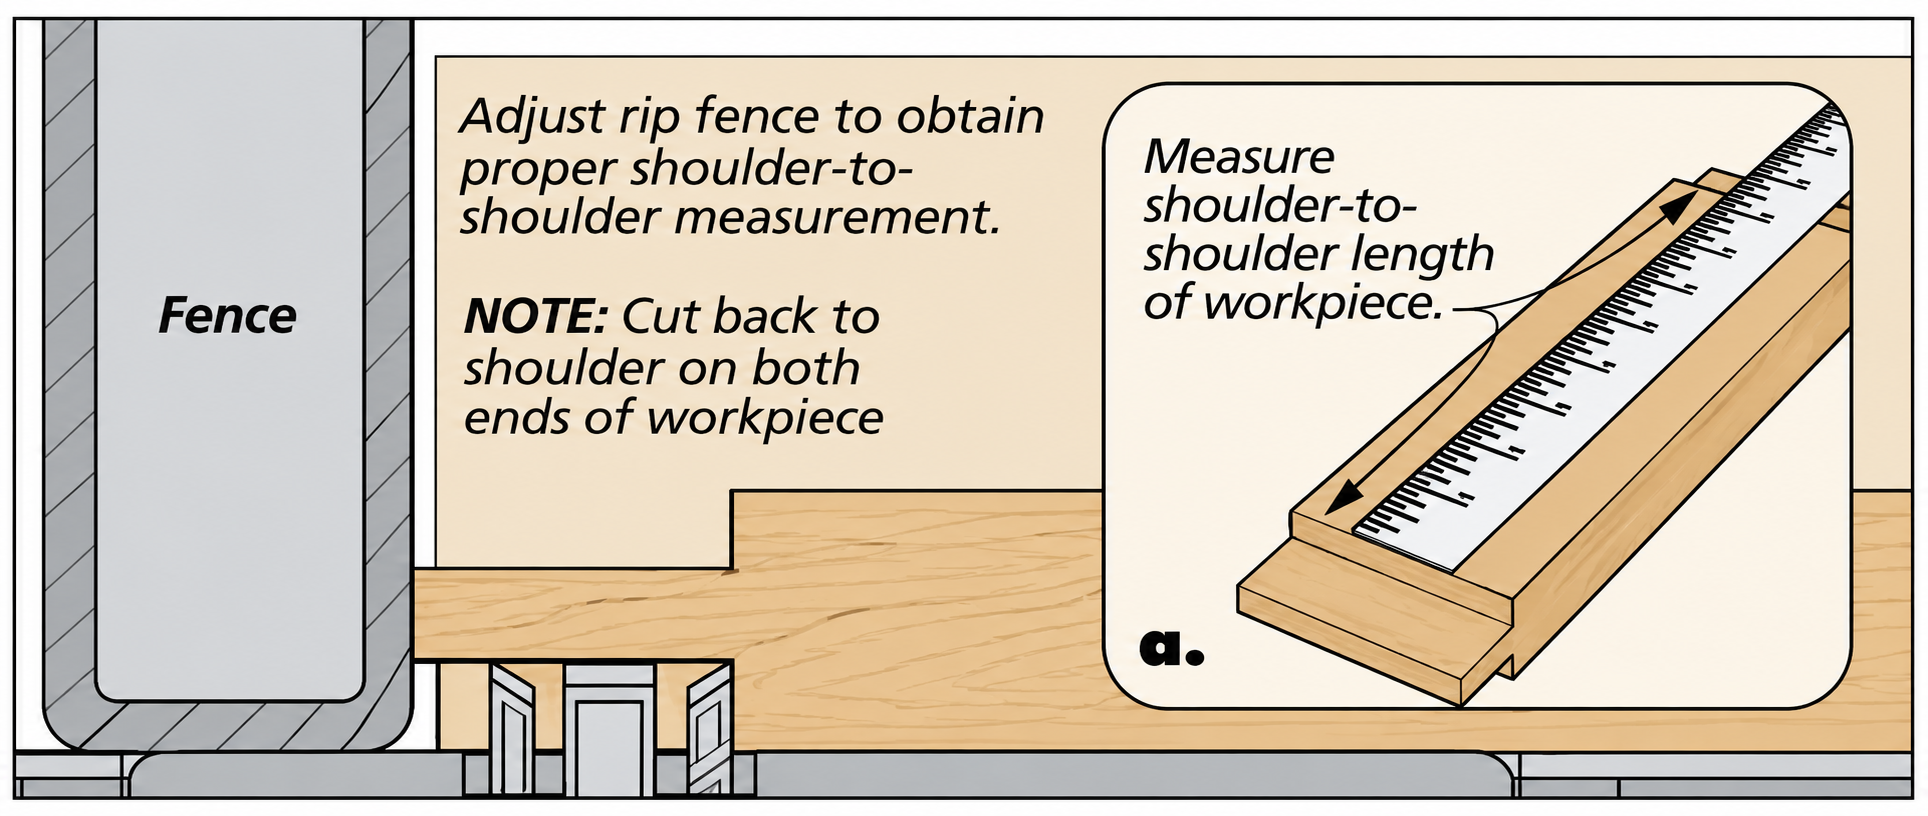
Next, turn the workpiece end for end and cut the tenon on the opposite end. Use a rule or tape measure to check the distance between the two shoulders. If the dimension isn't quite right, make a small adjustment to the fence and repeat the test.
Once the shoulder-to-shoulder measurement is correct, lock the fence in position. You can now use the same setup to cut matching tenons on the remaining workpieces.
Step 5: Cut the Tenon Cheeks
With the blade height and fence position established, cutting the remaining tenon cheeks becomes a repeatable process. Start at the end of the workpiece and make successive passes toward the shoulder, removing the waste a little at a time.
Keep the workpiece firmly against the auxiliary miter gauge fence and maintain consistent downward pressure throughout each cut. This helps produce tenons of uniform thickness. Once the first cheek is complete, flip the workpiece over and repeat the process on the opposite face.
Using the same blade-height setting for both sides produces a tenon centered on the workpiece, assuming the stock is uniform in thickness. Try to remove the waste in as few passes as practical. A wider dado stack helps produce smoother cheeks while reducing cutting time.
For a batch of identical workpieces, complete all the cheek cuts using the same setup before moving on to the edge shoulders.
Step 6: Cut the Edge Shoulders to Finish the Tenon
If the joint requires a four-shouldered tenon, the final step is removing material from the top and bottom edges. The difference is that the workpiece is now held on edge against the auxiliary miter gauge fence.
You'll usually need to readjust the dado blade height to establish the final tenon width. As before, use a test cut to dial in the setting. Check the fit against the mortise and make small adjustments until the tenon fits correctly.
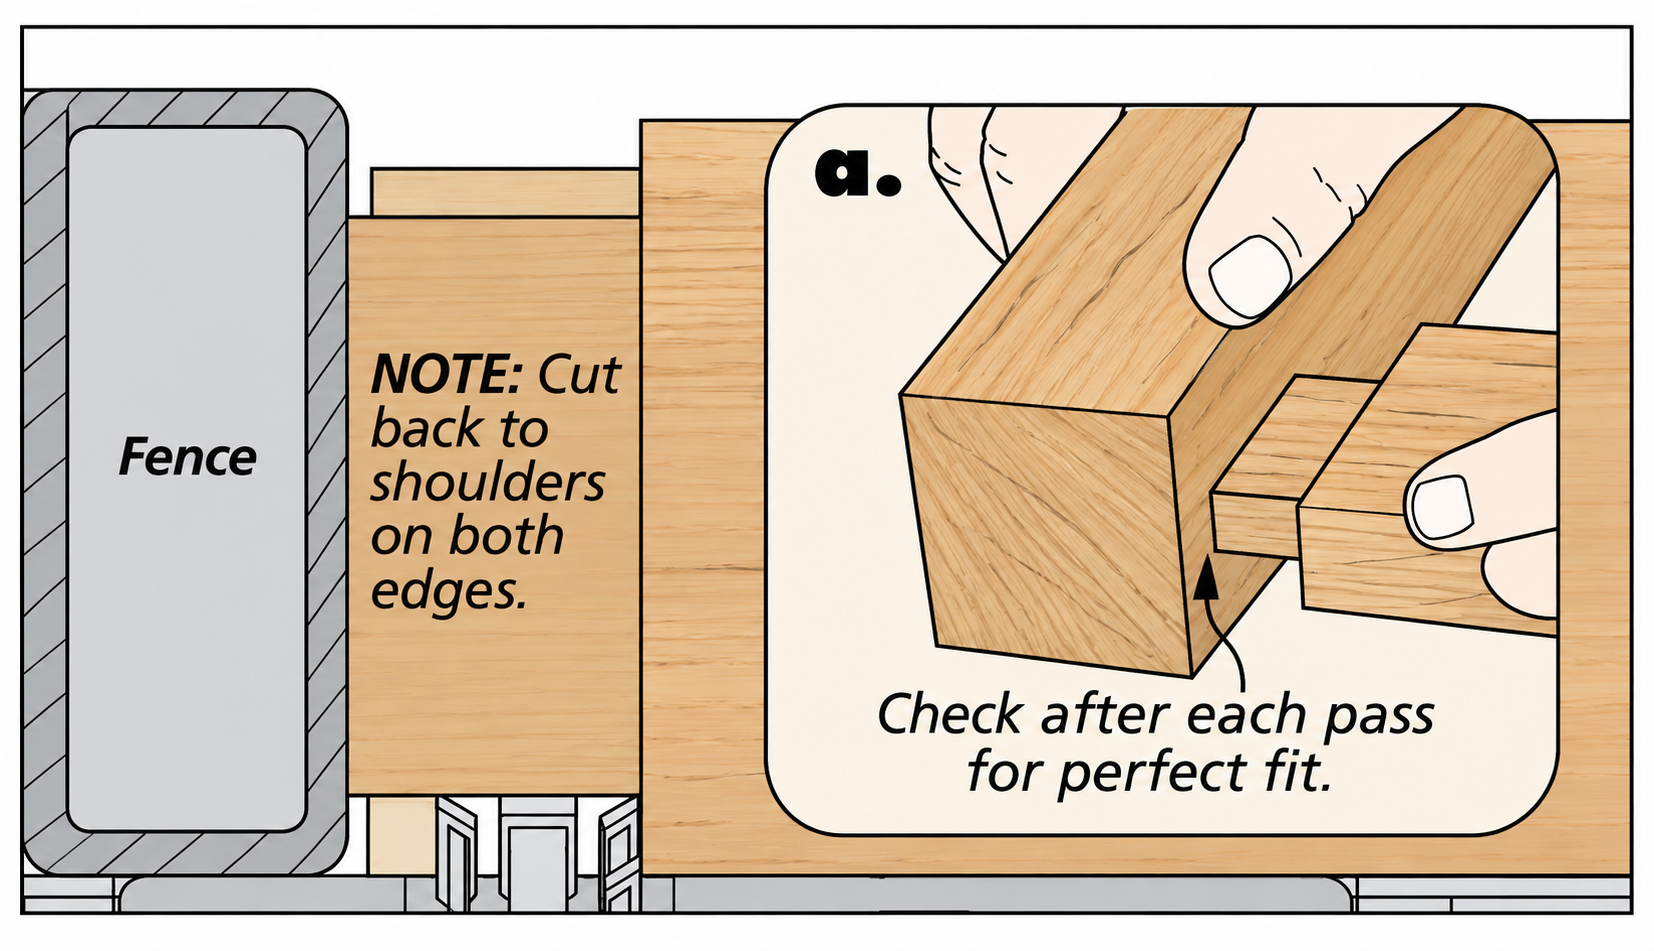
Once the blade height is established, cut the remaining edge shoulders. Work from the end of the tenon toward the shoulder, taking care not to cut into the previously formed long shoulders.
To avoid accidentally scoring the long shoulders, I use only light pressure against the fence during the final cut. Another option is to leave a small amount of waste near the shoulder and remove it with a sharp chisel. This extra step can help you achieve a clean, crisp shoulder without damaging the finished surface.

Tips for Cutting Consistent, Accurate Table Saw Tenons
The real advantage of this dado blade method is that you can dial in the setup once and produce an entire batch of matching tenons. The most important details are starting with uniform stock, using a sharp dado blade, and making test cuts before committing to the final workpieces.
Pay particular attention to the blade height and fence position. The blade height establishes the tenon thickness and its fit in the mortise, while the fence controls the shoulder-to-shoulder length. Once those two adjustments are correct, avoid changing the setup until you've completed the corresponding cuts on every workpiece.
It's also worth testing the first completed tenon in its matching mortise before cutting the entire batch. A small adjustment at this stage is much easier than correcting a dozen joints later.
With the setup complete, you can produce accurately sized tenons with relatively little additional adjustment. From the initial setup to the finished tenons, the entire process can take less than half an hour, depending on the number of parts and the complexity of the joints.
More Ways to Cut Mortise-and-Tenon Joints
A stacked dado blade is an efficient option for cutting multiple identical tenons, but it's not the only technique available. Different projects may call for a standard table saw blade, a tenoning jig, or another approach.
For a comparison of different techniques, check out our related Woodsmith article on four ways to cut table saw tenons.
And if you're working on the matching mortises, our Mortise in a Minute video demonstrates how to cut clean, square mortises using a hollow chisel mortiser.
Whether you're building a table, cabinet, or another furniture project, taking the time to establish a repeatable setup is the key to accurate mortise-and-tenon joinery.


