

How to Glue Up Thin Wood Panels Without Warping
Gluing boards together to create a wider panel is a fundamental woodworking skill. But when you're working with thin stock, the process can become a little more challenging.
Boards that are 1/2" thick or less tend to flex under clamping pressure. Tighten the clamps too much, and the panel can bow or cup. Individual boards may also shift up or down along the glue joints, leaving uneven surfaces that require extra sanding or planing.
That's especially frustrating when you're making thin panels for frame-and-panel doors, headboards, or other furniture projects. Removing too much material to flatten the panel can leave it undersized for the grooves it needs to fit into.
Fortunately, a couple of simple techniques can help you keep thin panels flat and the glue joints aligned.
In the video, Woodsmith's Phil Huber demonstrates two approaches: using plastic shims with conventional clamps and building a simple assembly board that uses wedges to apply pressure.
Why Thin Wood Panels Are Difficult to Glue Up
When gluing thicker boards into a panel, the stock is usually rigid enough to resist bending under normal clamping pressure.
Thin boards behave differently.
Because they're more flexible, even moderate pressure can cause the panel to buckle between clamps.
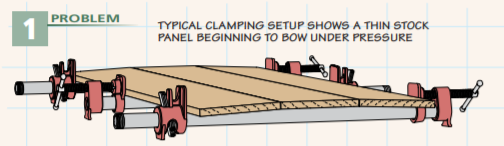
This can create several problems:
- Bowing: The panel bends along its length or width.
- Cupping: The panel develops a curved surface instead of remaining flat.
- Misaligned joints: Adjacent boards shift above or below one another.
- Excessive cleanup: Sanding or planing the panel flat can remove too much material.
The goal is to apply enough pressure to close the glue joints without forcing the boards out of alignment.
These two techniques make that easier.
Method 1: Use Plastic Shims and Alternating Clamps
For longer, thin panels, Phil uses conventional bar clamps along with inexpensive plastic shims.
The shims support the boards at the glue joints and help keep the surfaces aligned while the clamps are tightened.
Start Clamping at One End
When gluing thicker stock, it's common to begin tightening clamps near the center of the panel and work toward the ends.
With thin stock, Phil takes a different approach.
He starts at one end of the panel and works progressively toward the other.
This makes it easier to bring the boards into alignment as the clamps are added.
Thin boards often dip or twist slightly along their length. By working from one end, you can take advantage of their flexibility to bring the adjoining surfaces flush before tightening the next clamp.
Add Plastic Shims Under the Glue Joints
Place the boards on the first bar clamp.
Before tightening it, slip plastic shims between the clamp bar and the underside of the panel at the glue joints.
These shims provide support directly beneath the joints, helping keep the boards level.
Plastic shims are particularly convenient because wood glue doesn't readily bond to them. After the glue dries, the shims can be removed without much difficulty.
Position the shims where they're needed to support the adjoining boards.
Alternate Clamps Above and Below the Panel
With the first clamp positioned beneath the panel, snug it just enough to hold the boards together.
Then position the next clamp above the panel.
Again, add plastic shims at the glue joints to help maintain alignment.
Continue alternating clamps above and below the panel as you work toward the opposite end.
This arrangement helps balance the clamping pressure and reduces the tendency for the panel to bow.
Tighten the Clamps Gradually
One of the advantages of thin stock is that the boards can flex slightly as you adjust them.
As each clamp is added, use light hand pressure to bring the adjoining surfaces flush.
Then snug the clamp just enough to hold the alignment.
Avoid applying full clamping pressure immediately.
Once all the clamps are in place and the joints are aligned, go back along the panel and tighten them slightly to close the glue joints.
The result is a flatter panel that requires less sanding or planing after the glue dries.
Best for: Longer thin panels where individual boards need careful alignment along the glue joints.
Method 2: Make a Simple Assembly Board for Thin Panels
Sometimes the easiest way to glue up a thin panel is to skip conventional clamps altogether.
Phil's second technique uses a shop-made assembly board that holds the workpieces flat while wedges apply clamping pressure.
The setup is simple, inexpensive, and particularly useful for working with thin stock.
Start With a Flat Melamine-Covered Board
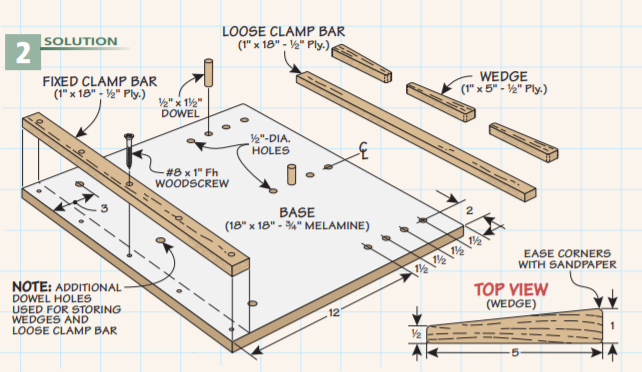
The foundation of the jig is a piece of melamine-covered particleboard.
Particleboard provides a flat, stable surface, while the melamine coating makes glue cleanup easier.
Dried glue can be removed from the surface with a carbide scraper.
The board also includes three rows of holes for positioning dowels and a fixed cleat attached along one edge with screws.
The cleat provides a solid reference surface for the panel during glue-up.
Arrange the Boards and Apply Glue
Start by placing the boards on the melamine surface with their edges aligned.
Position the assembly against the fixed cleat.
Apply glue to the mating edges and bring the boards together.
Because the pieces rest directly on the flat assembly board, it's easier to keep the surfaces aligned throughout the glue-up.
Add the Pressure Bar and Dowels
Next, position a plywood pressure bar along the outside edge of the panel, opposite the fixed cleat.
Insert dowels into the holes in the assembly board.
The rows of holes provide different positions for the dowels, allowing the jig to accommodate panels of different widths.
The pressure bar distributes clamping force along the edge of the panel rather than concentrating it at individual clamp locations.
Use Wedges to Apply Clamping Pressure
The final components are three wooden wedges.
Place the wedges between the dowels and the plywood pressure bar.
Push the wedges into position by hand, then use a mallet to tap them farther into place.
As the wedges advance, they press against the pressure bar, which pushes the boards together against the fixed cleat.
You can adjust the pressure at different locations by tapping the individual wedges.
The result is broad, even clamping pressure across the panel.
Keep Very Thin Boards From Bowing
Even with the assembly board, very thin pieces can sometimes bow upward as pressure is applied.
Fortunately, the solution is simple.
Place a little weight on the panel to keep it flat against the melamine surface.
Phil uses a hand plane for this purpose.
Before setting the plane on the panel, he applies masking tape to the sole to protect it from glue.
The added weight keeps the boards flat while the wedges hold the glue joints together.
Move the Assembly Board Out of the Way
Another advantage of this setup is that the entire assembly remains supported on the board.
Once the wedges are tightened and the panel is secure, you can move the assembly board off the workbench.
This frees up valuable bench space so you can continue working on other parts of the project while the glue dries.
Best for: Thin panels that benefit from full surface support and evenly distributed clamping pressure.
Tips for Getting Flat Wood Panel Glue-Ups
Regardless of which method you use, a few basic practices will improve your results.
- Start with straight, well-fitted edges. Clamping pressure shouldn't be used to force poorly fitted joints together.
- Dry-fit the assembly. Check the board alignment and clamping setup before applying glue.
- Use moderate clamping pressure. Too much pressure can cause thin boards to buckle.
- Check the joints as you go. Make sure adjacent boards remain flush before tightening each clamp.
- Support the panel. Shims or a flat assembly surface help prevent unwanted movement.
- Avoid excessive cleanup. Keeping the panel flat during glue-up reduces the amount of sanding and planing needed afterward.
Better Glue-Ups Start With Better Clamping
Gluing up thin wood panels doesn't have to be difficult.
The key is controlling the clamping pressure while keeping the individual boards aligned.
For longer panels, plastic shims and alternating clamps help keep the joints flush as you work from one end to the other.
For thin panels that need additional support, a simple melamine assembly board and a set of wedges provide an effective alternative to conventional clamps.
Both techniques can help you produce flatter, smoother panels right from the start, saving time and reducing the amount of cleanup required after the glue dries.
7 Specialty Woodworking Clamps for Tricky Glue-Ups

Sometimes standard bar clamps aren't the best solution. Discover seven specialty clamps that make difficult assemblies, mitered joints, and unusual workholding tasks easier.
READ MORE ➜ Explore Specialty Woodworking Clamps