If you use several blades on your table saw, there's a good chance you've accumulated a collection of throat plate inserts to go along with them.
I generally make—or buy—a zero-clearance insert to match each table saw blade. Over time, that means quite a few inserts to keep track of.
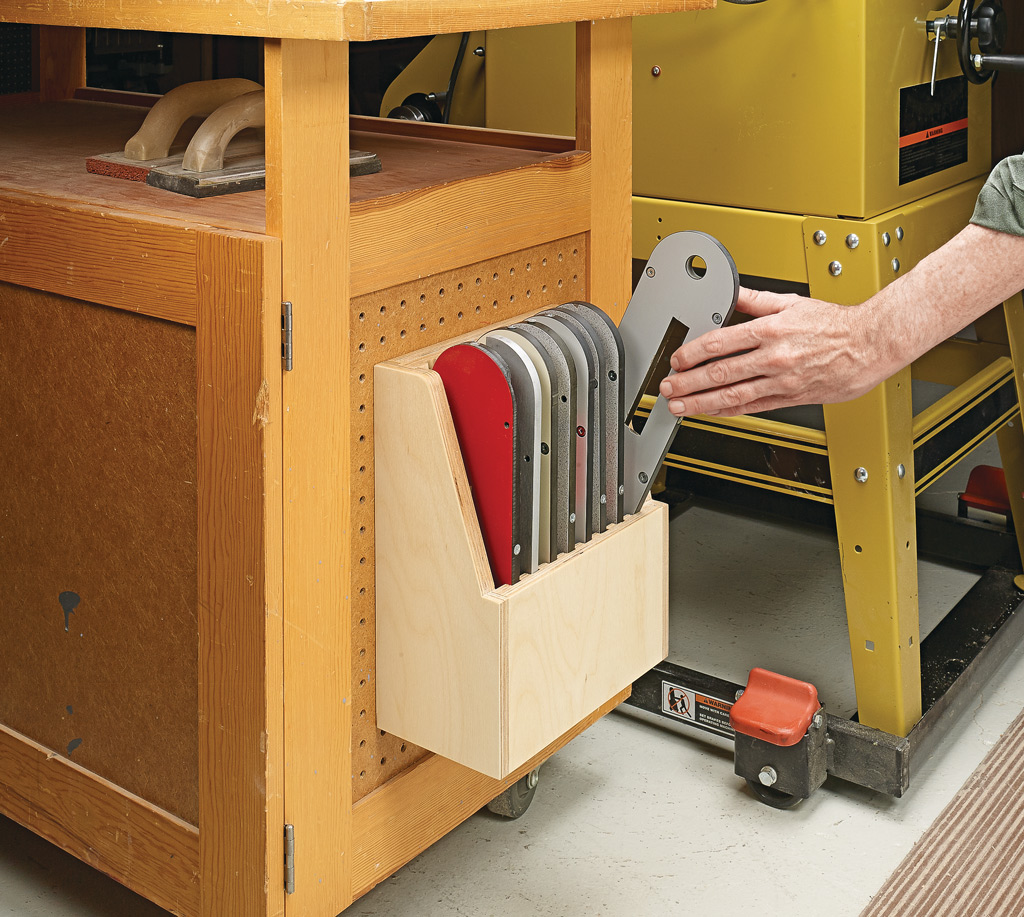
Rather than stacking them on a shelf or tossing them into a drawer, I built this simple table saw insert storage caddy. Individual grooves keep the inserts separated and upright, and the entire organizer can be mounted on pegboard near the saw.
Why Store Table Saw Inserts Separately?
A zero-clearance insert is most useful when it's matched to a particular table saw setup. Once you start using different blades and cutting configurations, however, keeping track of the corresponding inserts becomes part of the challenge.
This caddy gives each insert its own slot.
That keeps the collection organized and makes it easy to scan the rack and grab the insert you need rather than sorting through a stack.
Cut the Insert Grooves in One Blank
The front, bottom, and back of the caddy all contain a series of matching grooves. There's an easy way to make sure those grooves line up perfectly.

Instead of cutting the grooves separately in three finished parts, start with one oversized piece. Lay out and cut all of the grooves across this single blank first. Then cut the blank into the front, bottom, and back pieces.
Since all three parts were grooved at the same time, the slots automatically align when the caddy is assembled.
Woodsmith Tip: Match the Grooves to Your Inserts. Before cutting all the grooves, test your setup on a piece of scrap using one of your table saw inserts. You want enough clearance that an insert slides in and out easily without making the slots unnecessarily loose.
Add Clearance for Pegboard Mounting
The caddy is designed to mount to a pegboard panel, so the back needs a little extra clearance.
Chamfer the upper back edges as shown in the drawing. This provides the necessary room for installing the completed organizer on the pegboard.

This keeps the insert collection close to the table saw while taking advantage of wall space rather than a shelf, cabinet, or drawer.
Assemble the Storage Caddy
Before assembly, cut 3⁄4"-wide rabbets in the front, sides, and back as shown in the construction details.
Then assemble the parts with glue.
Because the insert grooves were cut into the oversized blank before the front, bottom, and back were separated, the completed caddy forms a series of continuous slots. Each insert drops into its own compartment and stays upright.
Keep Table Saw Accessories Easy to Find
This caddy solves a small problem, but it's the kind of shop organization project that can save time every time you change a table saw setup.
Instead of keeping zero-clearance inserts stacked together, each one gets a dedicated slot. Mount the caddy near your table saw and the appropriate insert is easy to identify and grab when you change blades.
It's also an easy project to customize. If you've only got a handful of inserts, make a shorter caddy. If your collection is already substantial, add more slots.
Either way, you'll know exactly where your table saw inserts are the next time you need one.
Put Your Pegboard to Better Use
Pegboard can hold a lot more than conventional hooks. Shop-made racks and holders can organize everything from table saw accessories to chisels, router bits, wrenches, and clamps.
EXPLORE CUSTOM PEGBOARD TOOL HOLDERS → Custom Pegboard Tool Holders That Save Wall Space