There's a lot of attention paid to drawer joinery. Dovetails, rabbets, tongue-and-dado joints, and locking rabbets all have their place. But even perfectly cut joints won't guarantee a good drawer.
A drawer box also needs to be square, flat, and consistent in size. And that's where seemingly minor errors can cause trouble.
A twisted side, two parts that are slightly different lengths, or a bottom that's too tight can pull an otherwise accurate drawer out of shape. The trick is knowing where those problems originate and checking for them before the glue dries.

Problem #1: The Drawer Parts Aren't Flat
A flat drawer starts with flat material.
It's tempting to assume a slightly bowed or twisted board will straighten itself once the drawer is assembled and clamped. Don't count on it. Forcing a troublesome piece into position during glue-up can introduce stress into the completed drawer.

Start by selecting the straightest, flattest stock you can find. With solid lumber, joint one face flat and then plane the pieces to a uniform thickness.
If you're using plywood, start with a flat, good-quality panel. Baltic birch plywood is a good choice for drawer construction because of its stable, multi-ply construction.
Don't Expect the Clamps to Fix It
Clamps should bring well-fitted joints together. They shouldn't be used to force badly warped drawer parts into submission.
If a part rocks or twists noticeably before assembly, correct the problem or replace the piece before moving ahead.
Problem #2: Matching Parts Don't Match
One of the easiest ways to build a drawer that's out of square is to make opposing parts slightly different sizes.
The two drawer sides need to match. So do the front and back.
The simplest solution is to machine matching parts as a group.

If several pieces need to be the same width, rip them all with the same table saw setup. Don't reset the fence between pieces.
Length is even more critical. Instead of measuring and marking each part individually, use a stop block when crosscutting the pieces to length. A scrap clamped to an auxiliary miter gauge fence is all you need.
Cut both sides with the same setup. Then reposition the stop and cut the front and back.
WOODSMITH TIP: Match the Parts, Not the Pencil Marks. For a square drawer box, it's especially important that opposing parts match each other. Cutting them from a common setup eliminates the small measuring and marking differences that can creep in when each piece is sized separately.
Problem #3: The Drawer Bottom Is Too Tight
The drawer bottom seems like a passive part of the assembly, but a poor fit can cause problems throughout the box.
Start with consistent grooves.
Cut all the drawer-bottom grooves using the same table saw setup. This ensures that the bottom sits at the same height in the front, back, and sides.

The bottom should fit snugly in the grooves, but it shouldn't require force to assemble.
There's another dimension that's easy to overlook. The bottom of the panel shouldn't bottom out tightly in its grooves. For the plywood drawer bottoms shown here, allowing about 1⁄32" of clearance gives the assembly a little breathing room.
If the bottom is oversized, it can prevent the joints from closing completely or push the drawer box out of square.
WOODSMITH TIP: The Bottom Shouldn't Determine the Box Size During assembly, the drawer joints should pull completely together without the bottom interfering. If the joints won't close during a dry-fit, check the bottom before reaching for a bigger clamp.
Problem #4: The Drawer Racks During Glue-Up
Even accurately machined parts can shift while you're tightening the clamps.
That's why it's important to check the drawer for square after it's assembled and clamped, while you can still make adjustments.
One of the easiest checks is to measure diagonally from one corner of the drawer to the opposite corner. Then measure the other diagonal.
If the two measurements are equal, the drawer is square. If they aren't, the box is racked.
With the glue still wet, you can gently shift the assembly diagonally until the measurements match. Then check it again after making any final clamp adjustments.
Tightening a clamp can sometimes move a box that was square only moments earlier.

Problem #5: The Drawer Is Square — But It's Twisted
Here's a problem that's easy to miss: square and flat aren't the same thing.
A drawer can measure square from corner to corner and still have one corner sitting higher than the others.
That twist can cause trouble when you fit the drawer into the case or install drawer slides. Fortunately, there's a very simple test.
Place the clamped drawer on a known-flat surface. A table saw top works well, or you can use a flat piece of MDF on your workbench.
Press gently on the corners. The drawer should sit solidly without rocking.
If one corner lifts, the box has some twist. Adjust the clamps and assembly while the glue is still wet, then check it again.
Square and Flat Aren't the Same Thing
This distinction is worth remembering whenever you assemble a drawer—or any rectangular case.
Checking for square tells you whether the corners form an accurate rectangle.
Checking for flatness tells you whether all four corners lie in the same plane.
You need both.
A drawer that's flat but racked won't fit its opening correctly. A drawer that's square but twisted can rock or bind.
That's why I make both checks before considering a drawer glue-up complete.
Before the Glue Dries: Check the Drawer Box
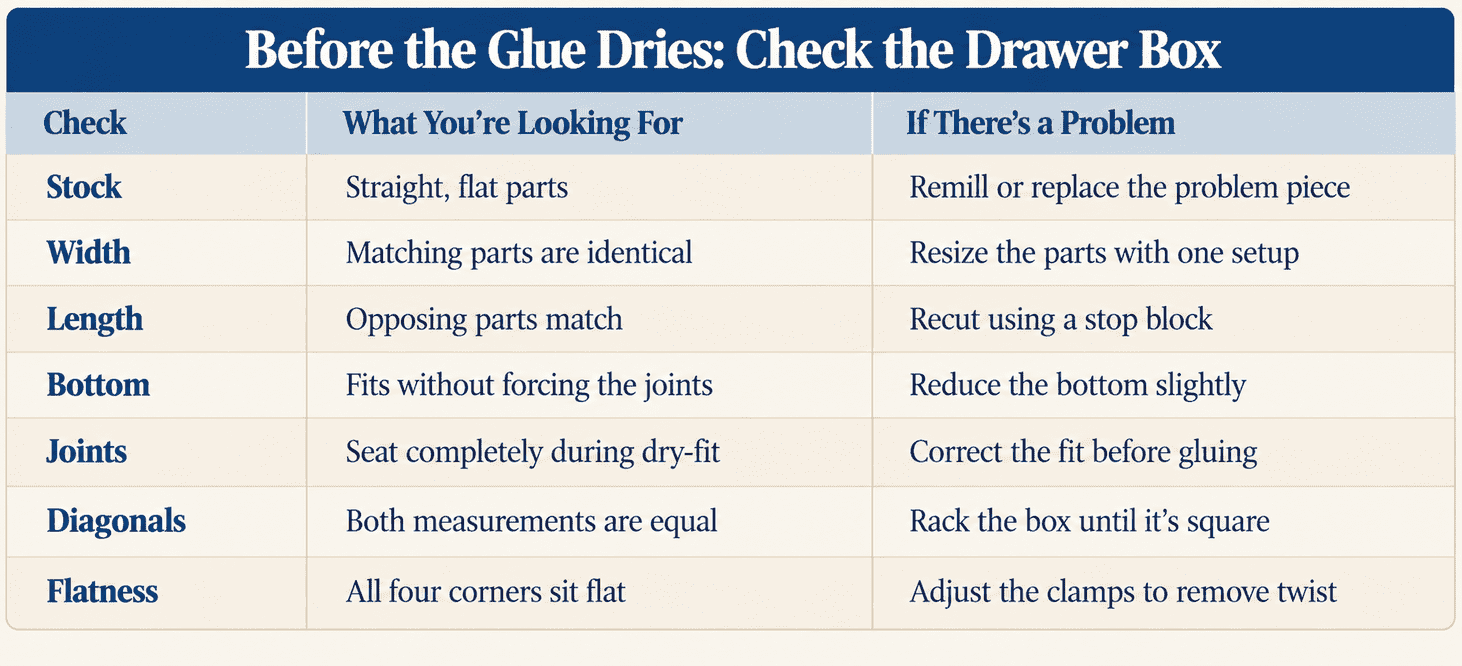
Catch Drawer Problems Before They Become Permanent
The best time to fix a drawer that's out of square isn't when you're installing it in the cabinet. It's while you're building it.
Start with flat material. Machine matching parts with the same setups. Make sure the drawer bottom isn't fighting the assembly. Then check both the diagonals and the flatness of the box before the glue has a chance to set.
These checks only take a few minutes, but they can save a lot of fitting and frustration later. A drawer that's square and flat from the beginning is much easier to fit—and much more likely to stay smooth-working for years.
How to Build Drawers Better
Want to go back to the complete drawer-building process? Our 8 drawer-building tips cover the fundamentals from selecting and milling your stock through cutting parts, fitting the bottom, and completing the final assembly.
LEARN HOW TO BUILD BETTER DRAWERS → 8 Tips for Square, Accurate Drawers