



Dovetail Router Bit Angles: How to Choose the Right One
Dovetail joints are known for their strength and distinctive appearance. But one detail that can have a significant effect on the finished joint is the angle of the tails.
A steep dovetail angle creates a more pronounced wedge shape, while a shallower angle produces a subtler appearance that's often associated with traditional hand-cut dovetails.
When cutting dovetails by hand, you can choose the slope that best suits the project. But when using a router and dovetail jig, your options may be more limited.
That's because the dovetail router bit angle must match the jig's template and cutting system to produce a properly fitting joint.
Understanding how dovetail angles work, and how they relate to traditional dovetail slope ratios, will help you choose the correct bit and get the appearance you want.
Why Does the Dovetail Angle Matter?
The angle of a dovetail determines the slope of the tails and the shape of the matching pins.
This angled profile creates the mechanical interlock that makes dovetail joinery so effective.
When the joint is assembled, the wedge-shaped tails resist being pulled apart from the pins.
The slope also affects the appearance of the finished joint.
A shallow angle produces relatively straight-sided tails, while a steeper angle creates a more pronounced wedge.
Neither appearance is automatically better. The right choice depends on the type of joint, the wood being used, and the style of the project.
However, the angle becomes especially important when using a dovetail jig because the bit and template must work together.
Traditional Dovetail Angles and Slope Ratios
Before modern measuring tools and router jigs became common, woodworkers typically laid out dovetails using slope ratios rather than measuring angles in degrees.
A slope ratio describes how far the dovetail line moves sideways over a given vertical distance.
For example, a 1:6 dovetail slope means the line moves one unit sideways for every six units of vertical rise.
This approach makes dovetail layout straightforward using a marking gauge, square, and bevel gauge.

Common Dovetail Slope Ratios
Traditional dovetail layouts often use the following slopes:
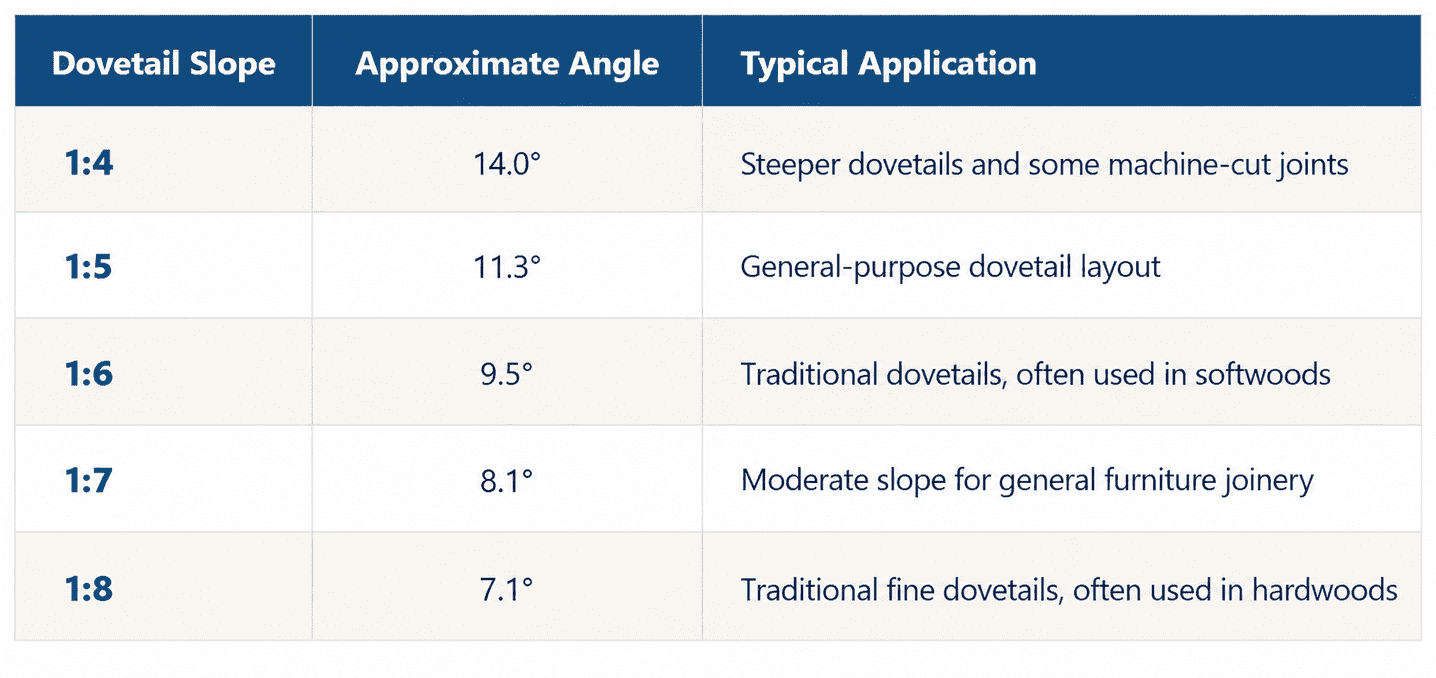
These angles are measured from a line perpendicular to the shoulder of the joint.
The ratios are guidelines rather than strict rules. Wood species, joint proportions, and the desired appearance all influence the best choice.
Why Traditional Dovetails Often Have Shallower Angles
Many traditional hand-cut dovetails use relatively shallow slopes.
A 1:8 slope, for example, produces a restrained appearance with tails that aren't dramatically wider at the base.
This look is often associated with fine hardwood furniture and traditional cabinetmaking.
Steeper slopes can provide a more pronounced mechanical interlock, but they also create sharper short-grain areas at the narrow ends of the pins.
For this reason, the steepest possible angle isn't necessarily the best choice for every project.
Why Dovetail Jigs Require Specific Router Bit Angles
When cutting dovetails with a router jig, the angle of the bit is usually determined by the jig's design.
Many dovetail jigs use a template that guides the router along a fixed path.
The dovetail bit cuts the angled tails or sockets, while the matching pins are produced using the corresponding template and cutting setup.
For the parts to fit correctly, the geometry of the bit must match the jig's requirements.
Using a bit with the wrong angle can result in joints that are too loose, too tight, or impossible to assemble properly.
The Traditional 14° Dovetail Router Bit
Many early dovetail jigs were designed to cut evenly spaced half-blind dovetails.
These jigs often used a 14° dovetail router bit.
The relatively steep angle creates a pronounced dovetail shape and a strong mechanical connection.
However, the evenly spaced pins and tails, combined with the steep angle, produce a recognizable machine-cut appearance.
There's nothing wrong with that look, especially for drawer construction where consistent results are important.
But woodworkers looking for the appearance of traditional hand-cut dovetails may prefer a shallower slope.
How Modern Dovetail Jigs Changed the Appearance of the Joint
Early dovetail jigs were generally limited to equally spaced pins and tails.
This made them efficient for cutting multiple drawers, but it also limited the appearance of the finished joinery.
As dovetail jigs became more sophisticated, manufacturers developed systems that allowed woodworkers to vary the spacing and proportions of the pins and tails.
This made it possible to create joints that looked less uniform.
However, changing the spacing doesn't necessarily change the angle of the tails.
A jig using a 14° dovetail bit will still produce a relatively steep dovetail profile, even when the spacing is varied.
Dovetail Bits with Traditional Slope Ratios
Some dovetail systems allow the use of bits with shallower angles that more closely resemble traditional hand-cut dovetails.
For this reason, you may encounter dovetail router bits labeled with a slope ratio, such as 1:6 or 1:8, rather than simply an angle in degrees.
These designations describe the same basic geometry.
A 1:8 dovetail slope, for example, corresponds to an angle of approximately 7.1°.

The important point is that a bit labeled with a traditional slope ratio isn't automatically interchangeable with the bit supplied for your dovetail jig.
Always check the jig manufacturer's specifications.
How to Choose the Correct Dovetail Router Bit
Before purchasing a dovetail router bit, consider how you plan to use it.
Match the Bit to Your Dovetail Jig
If you're using a commercial dovetail jig, start with the manufacturer's recommended bit.
Check the required angle, cutting diameter, and cutting length.
Some jigs also require a specific guide bushing.
All these dimensions can affect the finished joint.
Don't assume that two dovetail bits with the same angle will work interchangeably. Differences in diameter or cutting geometry may prevent the joint from fitting correctly.
Consider the Appearance of the Joint
If your jig supports multiple dovetail bit angles, consider the style of the project.
A steeper angle creates a more pronounced dovetail profile.
A shallower angle can produce a more traditional appearance, particularly when combined with varied pin and tail spacing.
For exposed joinery, this difference can become an important design detail.
Use a Quality Carbide-Tipped Bit
A sharp dovetail router bit produces cleaner cuts and helps reduce burning and tearout.
A quality carbide-tipped bit is a good choice for repeated use.
Keep the cutting edges clean, inspect the bit for damage, and replace it when necessary.
Because dovetail joints depend on accurate cutting geometry, maintaining the bit's original dimensions is important.
Can You Use a Different Angle Dovetail Bit in Your Jig?
In most cases, you should use the angle specified by the dovetail jig manufacturer.
A different angle changes the geometry of the joint.
Even if the router bit fits through the template, it may not produce mating pins and tails that fit correctly.
Some adjustable dovetail systems are designed to accommodate different bit angles, but they require the appropriate setup and compatible accessories.
Woodsmith Tip: Before changing dovetail bits, check the jig's instructions for the required bit angle, diameter, and guide bushing. Matching the angle alone isn't enough to guarantee a proper fit.
Choosing Between Hand-Cut and Router-Cut Dovetails
Both methods can produce strong, attractive dovetail joints.
Hand-cut dovetails provide greater freedom in choosing the angle, spacing, and proportions of the pins and tails.
You can adjust the layout to suit the wood species and the appearance of the project.
Router-cut dovetails offer speed and consistency, particularly when making several drawers with matching joints.
The trade-off is that the jig usually determines the available bit angles and joint configurations.
Neither method is inherently superior.
The best choice depends on the project, the tools available, and the amount of time you want to spend cutting the joinery.
Get the Right Dovetail Angle for Your Project
Dovetail angles influence both the appearance and the mechanical characteristics of the finished joint.
Traditional hand-cut dovetails often use slope ratios such as 1:6 or 1:8, while many router dovetail jigs use bits with fixed angles, including the familiar 14° profile.
If you're cutting dovetails by hand, you can choose the slope that best complements the project.
When using a router jig, however, compatibility comes first.
Choose the bit specified for your jig, make test cuts to verify the fit, and use the available adjustments to produce clean, accurate joints.
Understanding these details will help you get better results from your dovetail joinery, whether you're building drawers, cabinets, or fine furniture.
How to Set Up a Dovetail Jig for Half-Blind Dovetails
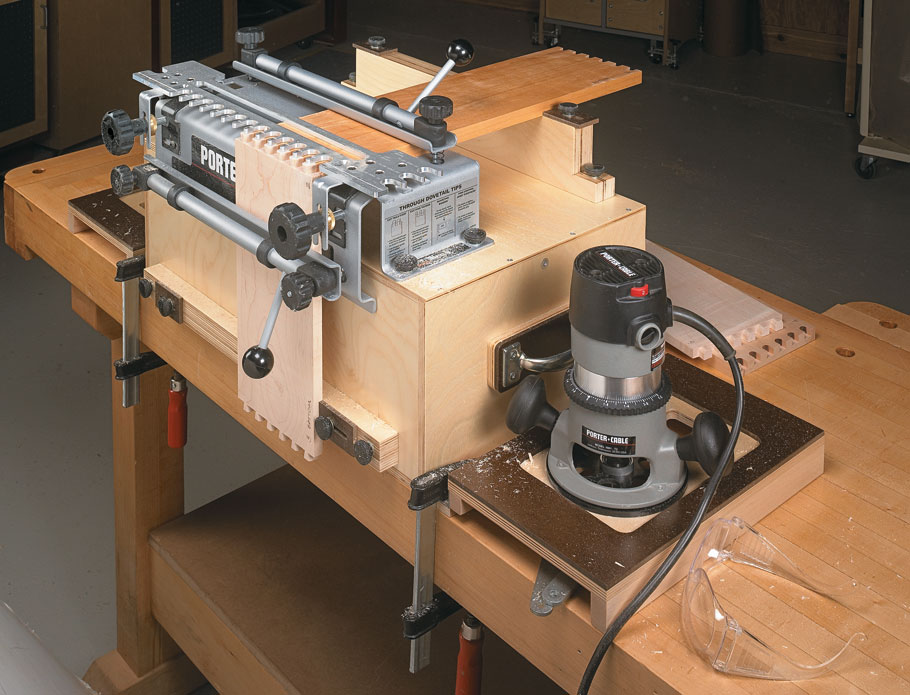
Choosing the right dovetail bit is only the beginning. Learn how to adjust router bit depth, center the guide bushing, improve clamping, and prevent tearout for accurate half-blind dovetails every time.
LEARN DOVETAIL JIG SETUP → Get Clean Cuts and Perfect-Fitting Joints


