

Wall space is valuable in a small woodworking shop. A conventional sheet of pegboard makes good use of it, but you're still limited to storing tools on a single flat surface.
This modular pegboard storage system takes the idea a step further.
Instead of one sheet attached to the wall, the system uses a series of double-sided pegboard panels that swing like doors. Tools can be stored on both faces, allowing you to fit considerably more storage into the same section of wall.
Better yet, the individual panels aren't permanently fixed in position. A simple system of metal pins and tracks allows each panel to be added, removed, or repositioned as your storage needs change.
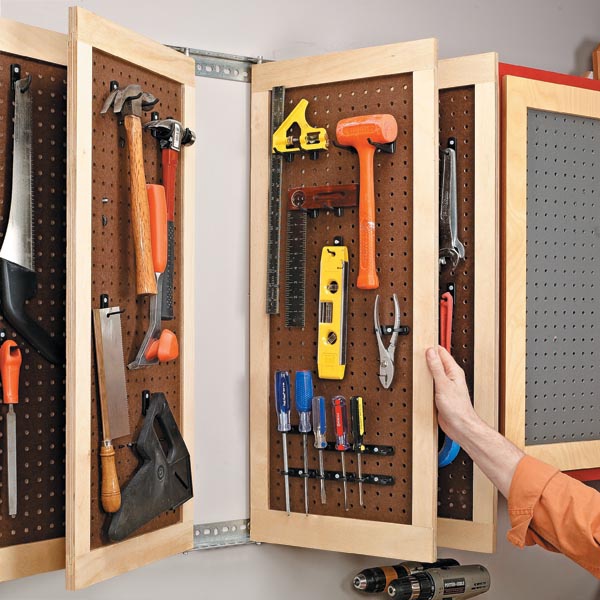
Double-Sided Pegboard Makes Better Use of Wall Space
The basic idea is simple: turn pegboard perpendicular to the wall instead of mounting it flat against it.
Each storage panel consists of a wooden frame surrounding a piece of pegboard. Since both faces of the pegboard remain accessible, tools can be stored on both sides of every panel.
Several panels can then occupy the wall space that would otherwise hold a single conventional pegboard surface.
And because the panels swing, you can simply flip through them to find the tool you need.
Build the Pegboard Panels
The individual storage panels use straightforward frame-and-panel construction.
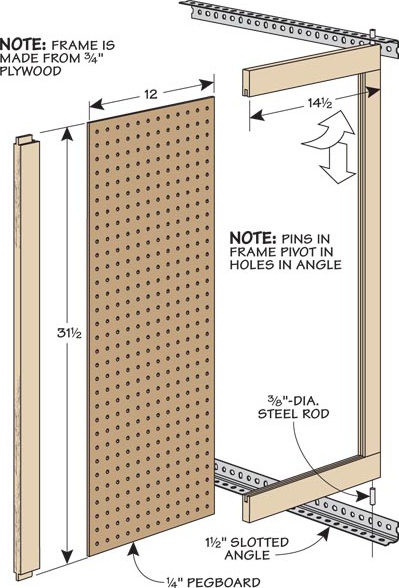
The pegboard is captured within the wooden frame, creating a rigid panel that can support hooks and tools on both faces.
At the top and bottom of each frame is a short metal pin. These pins serve as pivots, allowing the panel to swing back and forth.
The pins also connect each panel to the wall-mounted tracks.
Metal rod and angle stock for the system can be found at a hardware store, making this a relatively inexpensive way to create a custom storage system without specialized hardware.
Make the Wall-Mounted Tracks
A pair of horizontal metal tracks supports the panels—one above and one below.
The pivot pins at the top and bottom of each pegboard panel fit into these tracks. Instead of establishing one permanent hinge location, the tracks allow you to position the panels where they're most useful.
That gives the system one of its biggest advantages: it's modular.
If you add another panel later, you don't need to redesign the entire storage system. Add the new panel to the existing tracks.
Likewise, panels can be removed or repositioned as your tool collection changes.
Install and Remove the Panels
There's no complicated hinge hardware involved.
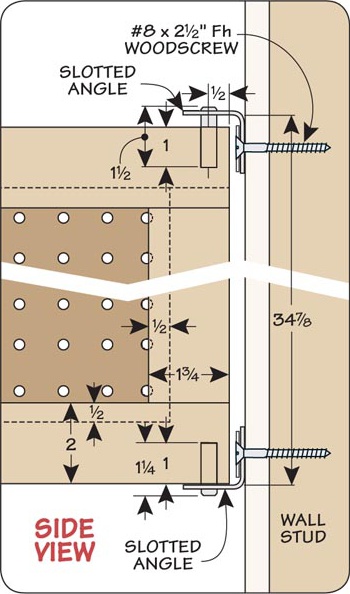
To install a panel, hold it at an angle and slip the top pivot pin into the upper track first. Then position the bottom of the panel so its lower pin drops into the bottom track.
Once both pins are seated, the panel can pivot freely.
Reverse the process whenever you want to remove one.
This makes it easy to build the system a few panels at a time instead of having to determine exactly how much storage you'll need before you start.
Woodsmith Tip: Plan for Swing Clearance. Before mounting the tracks, check the space in front of the proposed location. The panels need enough room to swing freely without hitting a workbench, cabinet, machine, or tools stored on an adjacent panel.
Organize Both Sides of Each Panel
Heavy-duty pegboard hooks that lock or anchor in place are especially useful here. Because the panels move, you don't want hooks lifting out of the pegboard every time you remove a tool or swing a panel.
How you arrange the tools is up to you, but grouping similar tools can make the system easier to navigate. One panel might hold measuring and layout tools, for example, while another could be dedicated to saws or other hand tools.
Since each panel has two usable faces, related groups of tools can be stored together without consuming large sections of wall.
Woodsmith Tip: Watch the Weight. There's an advantage to spreading heavier tools among several panels rather than concentrating all of them on one. Whatever arrangement you choose, make sure the tracks, panel frames, pivot pins, and wall fasteners are appropriate for the load they'll carry.
Expand the System as Your Tool Collection Grows
One of the most useful features of this design is that you don't have to build the entire storage system at once.
Start with a few panels. If your tool collection grows, make another frame-and-pegboard panel and add it to the tracks.
If your shop layout changes, individual panels can be removed or rearranged without rebuilding the whole rack.
That flexibility makes the design particularly well suited to a small shop, where storage needs and available space tend to change over time.
Get More Storage from Limited Wall Space
This project takes two of pegboard's best features—low cost and flexible tool placement—and combines them with a space-saving modular design.
Instead of covering a wall with a single sheet of pegboard, the swinging panels provide usable storage on both sides. The metal tracks allow those panels to be repositioned, removed, or added whenever necessary.
For a shop where wall space is limited, it's a simple way to squeeze significantly more tool storage into the space you already have.
Another Way to Maximize Pegboard Space
Swing-out panels aren't the only way to get more storage from a small wall. A 3-D pegboard rack uses angled panels to add over 40% more pegboard surface area without increasing the width of the storage area.
BUILD THE 3-D PEGBOARD RACK → Build a 3-D Pegboard Rack for More Wall Storage