


How to Cut Perfect Miter Joints on a Table Saw
Tight-fitting miter joints are essential when building wooden boxes, frames, and other woodworking projects. Even a small difference in the length of the parts can leave gaps at the corners or prevent the assembly from coming together square.
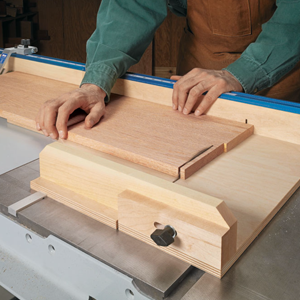
The secret to accurate table saw miters is cutting each piece to exactly the same length. With an auxiliary miter gauge fence and a simple stop block, you can make consistent, repeatable bevel cuts without measuring and marking every workpiece.
Start by Cutting the First Bevel
Begin with your project parts cut slightly longer than their finished dimensions. This leaves enough material to trim both ends accurately.
With the table saw blade already adjusted to 45°, lower it to the appropriate cutting height.
Using the miter gauge and auxiliary fence to support the workpiece, cut a bevel on one end of each piece.
Repeat the process until every workpiece has its first bevel cut.
Use a Stop Block for Identical Lengths
Once the first bevels are complete, the next step is cutting the parts to their final length.
For a square box, all four sides need to be exactly the same length. Measuring and marking each piece individually can introduce small differences that affect the fit of the finished joints.
Instead, attach a stop block to the auxiliary miter gauge fence.
Turn each workpiece around and position the previously cut bevel against the stop block. This establishes a consistent reference for the second cut.
With the workpiece held securely against the fence, make the second bevel cut.
Repeat the process for the remaining pieces without changing the stop block position.
Get Tight-Fitting Miters Every Time
Using a stop block eliminates the need to measure each piece separately. Since every workpiece references the same stop, the finished parts will be identical in length.
Before assembling the box, dry-fit the pieces to check the joints and confirm that the corners come together tightly.
This simple table saw technique is useful for building mitered boxes and other projects where matching lengths and accurate 45° bevels are essential.
With a properly adjusted blade, an auxiliary fence, and a stop block, cutting precise miter joints becomes a straightforward, repeatable process.
More Table Saw Tips & Techniques
Get more from the most versatile tool in your workshop. From cutting accurate miters and perfect-fitting joinery to building useful jigs and improving your cutting techniques, we've gathered some of our favorite table saw tips to help you work smarter. Explore practical techniques and clever setups that make your table saw safer, more accurate, and more efficient for projects of all shapes and sizes.
READ MORE → Explore More Table Saw Tips & Techniques


