


A miter joint looks simple: Cut two pieces at 45° and put them together to form a 90° corner. But anyone who's built a picture frame or mitered box knows that getting a tight-fitting miter joint takes a little more care.
The secret starts with an accurately set up table saw and miter gauge. From there, workpiece orientation, support, cutting sequence, and consistent part lengths all contribute to a clean joint.
Here are the table saw setup and cutting techniques that can help you get tighter, cleaner miters.

Start by Tuning Up the Table Saw
Before adjusting the miter gauge to 45°, make sure the saw itself is cutting accurately.
There are several settings that can change over time from vibration, sawdust buildup, wear, or adjustment. For accurate miter cuts, check the blade alignment, blade angle, miter gauge fit, and miter gauge head before getting started.
RELATED ARTICLE: Table Saw Maintenance: Cleaning, Lubrication & Rust Removal
RELATED ARTICLE: How to Choose the Right Table Saw Blade
Check the Blade Alignment
The saw blade should be parallel with the miter gauge slots. A blade that's out of alignment can leave burned or uneven edges and make accurate joinery more difficult.
Because the adjustment procedure varies by table saw, refer to your owner's manual when checking and correcting blade alignment.
Make Sure the Blade Is Square to the Table
Next, check that the blade is exactly 90° to the saw table.
Don't rely solely on the saw's 90° stop. It can shift out of adjustment.

A useful test is to crosscut a piece of scrap, flip one of the cut pieces over, and bring the cut ends together. If there's a gap, make a small adjustment and repeat the test until the two surfaces meet tightly.
Tune Up the Miter Gauge
The miter gauge is your primary reference for a face miter, so any looseness or error here will show up in the finished joint.
The gauge bar should travel smoothly through the table saw slot without excessive side-to-side play. If there's noticeable movement, address that before trying to dial in an accurate 45° setting.

Woodsmith Tip: If you notice any play in the gauge, there's a quick way to fix this. Take a look at the drawing for more information. After you've determined that the gauge moves smoothly, you can add an auxiliary fence to the gauge.
RELATED ARTICLE: How to Make Accurate Crosscuts on a Table Saw
Add an Auxiliary Miter Gauge Fence
One of the easiest upgrades is an auxiliary fence.
A straight, flat piece of plywood attached to the miter gauge provides better support for the workpiece and helps reduce tearout where the blade exits the cut.
A strip of self-adhesive sandpaper on the face of the auxiliary fence can also help keep the workpiece from creeping sideways as you push it through the blade.
[INTERNAL LINK: This is an ideal place to link to How to Make Accurate Crosscuts on a Table Saw, where we discuss auxiliary miter gauge fences in more detail.]
Set the Miter Gauge in the Right Direction
Before dialing in an exact 45° angle, pay attention to which direction you angle the miter gauge. It can make a noticeable difference in the quality of the cut.
Wood fibers tend to be better supported when the blade cuts with the grain and exits along the long point of the miter. Orienting the workpiece this way helps produce a cleaner edge with less chance of splintering at the tip.
Turn the miter gauge the opposite direction and the blade cuts against the grain. As the blade reaches the outside edge, the short grain at the tip of the miter has little support. Those fibers can break away, leaving a ragged edge or noticeable tearout.
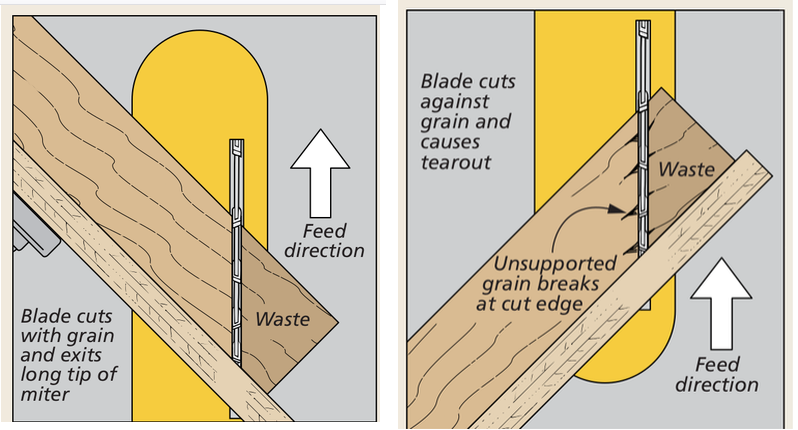
This is a small setup detail, but it can make the difference between a crisp miter straight from the saw and one that needs cleanup.

Woodsmith Tip: Before cutting your project parts, look at the grain direction and think about where the blade will exit the workpiece. Whenever possible, arrange the cut so the blade exits at the long point of the miter rather than through unsupported short grain.
Set the Miter Gauge to an Accurate 45°
Don't automatically assume the 45° detent on your miter gauge is exact.

Woodsmith Tip: Use the head of a combination square to verify the setting rather than relying solely on the gauge markings or detent.
Then make a test cut.
Check Two Miters Together
Testing a single 45° cut doesn't tell you everything you need to know.
Instead, bring two test miters together to create a 90° corner. Check the completed corner with a square. If the joint doesn't form a true 90°, go back and fine-tune the miter gauge setting.

Woodsmith Tip: Don't chase a tiny gap by sanding individual miters if the real problem is the saw setup. Correct the setup first so subsequent parts come off the saw accurately.
Face Miters vs. End Miters
There are two common types of miters covered by this technique, and they're cut differently. A face miter, or frame miter, is the familiar angled corner used for a picture frame.
An end miter is cut across the end of a wider workpiece, such as the mitered corner of a box or case.
Understanding the difference helps determine how to orient the workpiece and set up the saw.
How to Cut Face Miters for a Frame
For a four-sided frame, don't cut each piece completely to size one at a time. A more consistent approach is to divide the job into two stages.
Cut the First Miter on Every Piece
Start by cutting a miter on one end of all four workpieces.

Completing the same operation on every part before changing the setup reduces unnecessary adjustments and helps keep the cuts consistent.
After each cut, move the workpiece clear of the blade before pulling the miter gauge back toward you. This prevents the freshly cut edge from contacting the blade on the return stroke.
Keep the Workpiece Firmly Against the Fence
Consistent pressure is important throughout the cut.
The workpiece should remain firmly against the auxiliary fence and down on the saw table as the miter gauge carries it through the blade.
[IMAGE 5: Proper hand positioning while cutting a face miter. Use 5349944_snip_1548392366549.png.]
The original setup places the miter gauge to the left of the blade, with the left hand securing the workpiece against the fence and table while the right hand advances the miter gauge.
Keep your hands a safe distance from the blade and use a different fixture or holding method if the workpiece is too small to control safely.
Use a Stop Block to Make Opposite Sides Equal
Cutting a perfect 45° angle isn't enough to make a square frame.
Opposite sides also need to be exactly the same length. That's where a stop block comes in.

After cutting the first miter on each piece, clamp a mitered stop block to the auxiliary fence.
Place the previously cut end against the stop and make the second miter.

Cut each pair of opposite frame pieces using the same stop setting. This establishes both the second miter and the final length of each part.
Because this particular setup restricts how the workpiece can be moved after the cut, follow the safe removal procedure appropriate to the setup. The original technique either moves the piece beyond the blade before removing it or shuts off the saw and waits for the blade to stop.
How to Cut End Miters for Boxes & Cases
Mitering the end of a wider board requires a different approach.
Instead of angling the miter gauge, an end miter is typically cut with the saw blade tilted to 45° while the miter gauge supports the workpiece.

Start by checking the blade angle. Here again, you can use the head of a combination square between the blade and table to verify that the blade is exactly 45°.
Put the Waste on the Correct Side
Workpiece orientation matters with a tilted blade.
Position the miter gauge so the blade tilts toward the waste side of the cut. This prevents the workpiece from becoming trapped during the cut.
Make a Light Final Pass for Cleaner Miters
Trying to remove all the material in one heavy pass can affect the quality of an end miter.
The secret is to make multiple passes. The first removes most of the waste, while a second, lighter cut removes the remaining material.

That final light pass helps produce a flatter, cleaner miter without a dip in the middle of the cut.
This can be especially helpful on wider workpieces where even a small irregularity becomes noticeable when the two miters come together.
Use a Sled for Mitering Small Parts
Small workpieces present another challenge. They can be difficult to control and are more susceptible to tearout or damage during a cut.
The solution shown here is a simple miter gauge sled.

The sled consists of a hardboard base with fences along its front and back edges. It's clamped to the miter gauge to provide a smooth, continuous surface for the workpiece.
Precut kerfs provide clearance for the blade, while adhesive-backed sandpaper helps prevent a small workpiece from creeping during the cut.
The result is better support, greater control, and a cleaner cut than trying to guide a small part directly across the saw table.
The Secret to Tight-Fitting Miter Joints
Perfect miters aren't the result of a single trick.
Start with a table saw that's properly aligned. Make sure the blade is square—or accurately tilted to 45° for end miters—and eliminate excessive play from the miter gauge. Add an auxiliary fence for support and verify your 45° setting with test cuts.
Then concentrate on consistency: Cut matching operations with the same setup, use stop blocks to make opposite parts identical in length, and keep each workpiece firmly supported throughout the cut.
Those small details are what turn two ordinary 45° cuts into a clean, tight-fitting miter joint.


