



Build a Small Parts Router Table Sled
Routing small workpieces can be tricky. Unlike larger boards that provide plenty of room for your hands, small parts are difficult to hold securely while keeping your fingers safely away from the router bit.
But that doesn't mean a router table is any less useful for small pieces.
The solution is a simple small parts router table sled that holds the workpiece securely while giving you a larger surface to guide through the cut.
I built this adjustable sled using a hardboard base, a pair of sliding blocks, and a toggle clamp. The design makes it easy to secure workpieces of different sizes without having to hold them directly next to the bit.
It's a practical shop-made jig that provides better control when routing small parts.
How the Small Parts Routing Sled Works
The sled provides a stable platform for holding small workpieces while they're routed.
Instead of gripping the workpiece directly, you secure it to the sled using a toggle clamp and two adjustable positioning blocks.
The blocks slide along slots in the base and can be positioned to match the width or length of the workpiece.
Once the blocks are adjusted, threaded knobs lock them in place.
The toggle clamp then holds the workpiece securely against the sled.
This arrangement makes it possible to rout small parts while keeping your hands farther from the cutting area.
The larger base also provides better control as you guide the workpiece past the router bit.
Building the Small Parts Router Table Sled
The construction is straightforward and requires only a few components.
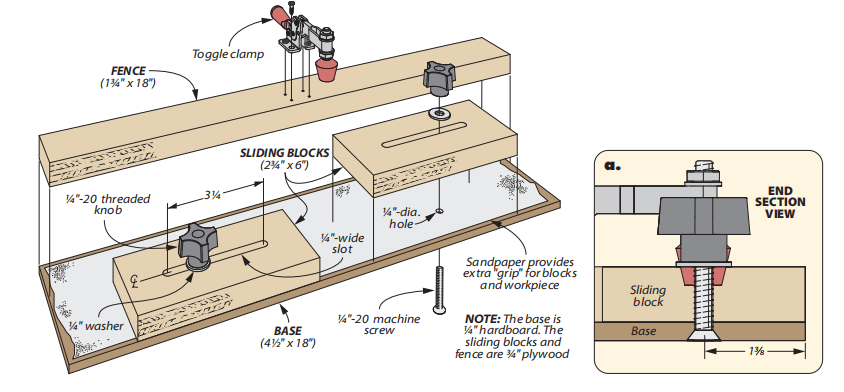
The sled consists of a hardboard base, a fixed rear fence, two adjustable blocks, and a toggle clamp.
Step 1: Make the Hardboard Base
Start by cutting a piece of hardboard to form the sled's base.
The hardboard provides a flat, smooth surface that slides easily across the router table.
It also creates a larger platform for guiding small workpieces through a cut.
The base should be large enough to support the adjustable blocks and clamp while providing a comfortable area for controlling the sled.
Step 2: Install the Rear Fence
Next, attach a fence along the back edge of the hardboard base.
The fence provides a mounting surface for the toggle clamp and helps support the workpiece during routing.
Glue the fence securely to the base, keeping it square and properly aligned.
Step 3: Add the Adjustable Sliding Blocks
The two sliding blocks allow the sled to accommodate workpieces of different sizes.
Cut slots in the hardboard base to provide adjustment.
Then attach the blocks using threaded knobs that pass through the slots.
Loosening the knobs allows you to slide the blocks into position.
Once the blocks are adjusted to the width or length of the workpiece, tighten the knobs to lock them in place.
This simple arrangement makes the sled adaptable to a wide variety of small parts.
Step 4: Install the Toggle Clamp
Mount a toggle clamp to the rear fence.
The clamp should be positioned so it can apply firm pressure to the workpiece while the sliding blocks provide support.
The toggle clamp makes it quick and easy to secure or release a part.
With the workpiece held in place, you can concentrate on guiding the sled rather than trying to keep a small piece steady next to the router bit.
Using the Router Table Sled
The sled can be used for several types of routing operations.
One option is to use it with a bearing-guided router bit, such as the slot cutter shown in the original photo.
The sled supports the workpiece while the bearing guides the cut.
You can also use the sled with the router table fence in place.
In this arrangement, the fence helps register the sled and workpiece as you make the cut.

Adjust the Sled for Each Workpiece
Before routing, loosen the threaded knobs and position the sliding blocks to fit the workpiece.
Tighten the knobs to secure the blocks.
Then position the workpiece and engage the toggle clamp.
Make sure the workpiece is held firmly and cannot shift during the cut.
Check that the clamp, blocks, and other sled components will clear the router bit throughout the operation.
Keep Your Hands Away from the Bit
The biggest advantage of this sled is that it increases the distance between your hands and the cutting area.
Rather than holding a small part directly, you guide the larger sled across the router table.
This provides more control and reduces the temptation to reach close to the spinning bit.
Safety Tip: Before turning on the router, verify that the workpiece is securely clamped and that all sled components clear the bit. Use the proper feed direction, make appropriately sized cuts, and follow the router and bit manufacturers' safety recommendations.
A Handy Router Table Jig for Small Workpieces
Small parts don't have to be difficult to rout.
This simple router table sled provides a convenient way to secure small workpieces while keeping your hands farther from the bit.
The adjustable blocks make it easy to accommodate different sizes, while the toggle clamp holds the workpiece firmly in place.
And because the sled is built from basic materials, it's an easy addition to your collection of shop-made router table accessories.
It's a simple solution that makes routing small parts more controlled and convenient.
How to Make Spline Joints with a Router Table
 A slot-cutting bit is a versatile addition to your router table. Learn how to cut matching slots and use plywood splines to create strong, accurately aligned joints for frame-and-panel assemblies and other woodworking projects.
LEARN SPLINE JOINERY → Strong, Simple Joinery with a Slot-Cutting Bit


