


5 Simple Saw Blade Storage Ideas for Your Workshop
A good saw blade is an investment, and proper storage is one of the easiest ways to protect it. Whether you're working with table saw blades, dado sets, hand saws, or smaller blades for a scroll saw or jig saw, keeping them organized helps prevent damage and makes it easier to find the right blade when you need it.
The challenge is finding storage solutions that protect sharp teeth without taking up valuable workshop space.
Fortunately, you don't need expensive cabinets or specialty organizers to get the job done. A few scraps of plywood, some dowels, and common hardware are often all it takes.
These five DIY saw blade storage ideas will help keep your cutting tools protected, organized, and within easy reach.
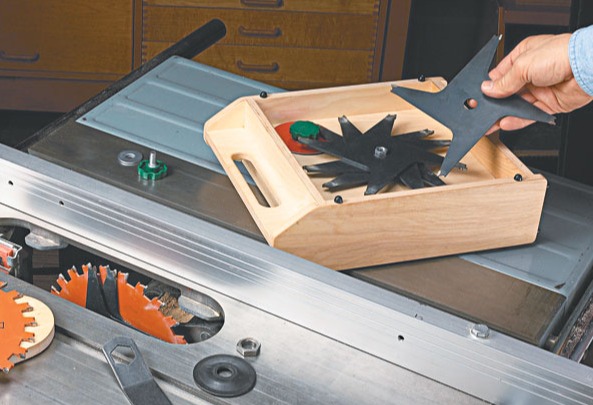
1. DIY Dado Blade Storage Case
A stacked dado blade set is one of the most useful accessories for a table saw. But keeping all the scoring blades, chippers, and shims together can be a challenge.
The cardboard boxes that come with many dado sets eventually wear out, leaving the individual components loose in a drawer or cabinet.
That's a problem because the carbide teeth can chip if the blades knock against one another.
A simple plywood storage case provides a better solution.

GET THE COMPLETE STEP-BY-STEP PLANS: Build a Dado Blade Storage Case
How the Dado Blade Case Works
This compact storage case keeps the two outside scoring blades on one side and the chippers and shims on the other.
Separating the components helps protect the carbide teeth while keeping everything together.
The case is built from 1/2"-thick plywood using simple dado joinery.
A coupling nut is glued into the center panel. The nut is sized to fit within the arbor holes of the blades.
Star knobs thread into opposite ends of the coupling nut, securing the blades and chippers to the case.
The surrounding plywood sides help protect the components when the case is laid flat.
Add a Comfortable Carrying Handle
A handle cut into the center panel makes the case easy to carry and store.
After cutting the opening, use a router with a 1/4" roundover bit to soften the edges.
This makes the handle more comfortable to grip.
Once the case is assembled, apply a couple coats of polyurethane to protect the plywood.
The finished case provides a convenient way to store an entire stacked dado set without worrying about the individual components getting lost or damaged.

Woodsmith Tip: Before tightening the star knobs, make sure the blades and chippers are positioned so their carbide teeth won't contact one another. Thin protective separators can provide additional protection when needed.
2. Wall-Mounted Table Saw Blade Storage Rack
Most woodworkers keep several blades for their table saw.
A rip blade handles cuts along the grain, a crosscut blade produces clean cuts across the grain, and a combination blade works well for general-purpose cutting.
The problem is finding a way to store these blades without damaging their carbide teeth.
Stacking loose blades in a drawer can lead to chipped teeth, while keeping them in individual boxes makes it harder to see which blade you need.
A wall-mounted blade rack solves both problems.

Build a Simple Blade Rack
This storage rack is a shallow plywood cabinet with a series of dowel supports.
The dowels hold the blades upright and keep them separated.
That prevents the carbide teeth from contacting adjacent blades.
The open design also makes it easy to identify each blade without removing it from the rack.
The rack is assembled with simple rabbet joints and glue.
A 1/4"-thick plywood back helps keep the assembly rigid.
To install the supports, drill matching holes in the sides and glue the dowels into place.
Mount the Rack Near Your Table Saw
For convenient access, mount the rack on a wall near your table saw.
Drive screws through the back and into wall studs or other suitable structural supports.
Position the rack where the blades are easy to reach but won't interfere with other shop activities.
With the blades stored upright and separated, you can quickly find the one you need while protecting the cutting edges.
Woodsmith Tip: Arrange the blades by purpose—rip, crosscut, combination, and specialty blades. This makes selecting the right blade faster and keeps your table saw accessories organized.
3. Scroll Saw Blade Storage Tube
Scroll saw blades are small, inexpensive, and easy to misplace.
They're also consumable items that need to be replaced regularly.
If you use a scroll saw frequently, keeping spare blades close to the machine can save time and frustration.
This simple storage solution uses a short length of PVC pipe to create a compact blade holder that mounts directly to the saw.

Make the Blade Storage Tube
Start with a piece of PVC pipe cut slightly longer than the scroll saw blades you want to store.
Attach a PVC cap permanently to one end using the appropriate cement.
Leave the cap on the opposite end removable so you can access the blades.
Coloring the removable cap makes it easy to identify which end opens.
The tube keeps the blades contained and prevents them from becoming scattered around the shop.
Mount the Holder to Your Scroll Saw
A pair of spring clips provides a convenient mounting system.
These are the same style of clips commonly used to hold broom handles on a wall.
Attach the clips to a suitable location on the scroll saw base using sheet metal screws, provided the mounting location is approved and won't interfere with the machine.
The tube simply snaps into the clips.
Whenever you need a replacement blade, remove the tube, take out a blade, and snap the holder back into place.
It's a simple way to keep spare blades organized and within reach.
4. Wall-Mounted Hand Saw Storage Rack
Hand saws can be surprisingly difficult to store.
They're often too long for a drawer, and leaning them against a wall leaves the teeth exposed to damage.
Hanging them on nails or hooks isn't always a good solution, either.
You don't want to drill holes in valuable saw handles or blades, and you certainly don't want the teeth rubbing against a metal hanger.
This wall-mounted rack provides a simple alternative.

A Cam-Action Saw Hanger
The rack uses a series of beveled wooden blocks sandwiched between two hardboard faces.
Loose dowels fit between the beveled blocks.
These dowels act as cams, gripping the saw blades and holding them securely.
When a saw is lowered into a slot, the dowel rolls into position and pinches the blade against the beveled block.
The design holds the saw without requiring holes in the handle or blade.
It also keeps the teeth from resting directly against a metal hook.
Build the Rack from Shop Scraps
One of the best things about this hand saw rack is that it requires very little material.
You can make it from scrap hardwood, hardboard, and a short length of dowel.
Cut the beveled blocks to size, then sandwich them between the two hardboard faces.
Leave enough space between the blocks for the saw blades and dowels to operate properly.
Once assembled, mount the rack securely to the shop wall with screws.

Removing a Saw
To remove a saw, simply lift the handle slightly.
This releases the pressure on the dowel, allowing the blade to slide out of the slot.
The rack keeps several saws organized in a small area while making them easy to access.
It's especially useful near a workbench where hand saws are used frequently.
Woodsmith Tip: Make sure the dowels grip the smooth portion of each saw blade rather than the teeth. The rack should hold the saw securely without contacting or damaging the tooth set.
5. Jig Saw Blade Storage Ring
Jig saw blades have a habit of disappearing.
You open a package, use one blade, and toss the remaining blades into a drawer.
A few weeks later, you're searching through the drawer for a replacement—or opening another package because you can't find the blades you already have.
This simple storage idea keeps spare jig saw blades together using a common household item.

Use a Shower Curtain Ring
A shower curtain hanger makes a convenient storage ring for jig saw blades.
Many jig saw blades have openings in their shanks that fit over the hanger.
Simply slide the blades onto the ring and close it.
The blades stay together instead of scattering throughout a drawer.
You can store the ring in a cabinet, hang it on a hook, or keep it with your other jig saw accessories.
Before using this method, check that the openings in your particular blades fit the ring securely.
Organize Blades by Type
If you keep several styles of jig saw blades, consider using separate rings.
For example, you might have one for general-purpose wood blades and another for fine-cutting or specialty blades.
This makes it easier to select the right blade without sorting through a collection of loose pieces.
It's an inexpensive solution that takes only a few seconds to put together.
Keep Your Saw Blades Sharp, Protected, and Organized
Proper saw blade storage doesn't have to be complicated.
The goal is to protect the cutting edges, keep related accessories together, and make each blade easy to find.
A plywood case protects a stacked dado set, while a wall-mounted rack keeps table saw blades separated and accessible.
A PVC tube keeps scroll saw blades close to the machine, and a cam-action rack provides convenient storage for hand saws without damaging their teeth.
Even something as simple as a shower curtain ring can solve the problem of misplaced jig saw blades.
Best of all, these projects require only basic woodworking skills and a few inexpensive materials.
Choose the storage solutions that fit your shop, and you'll spend less time searching for blades and more time woodworking.
3 DIY Saw Blade Storage Ideas: Cabinets, Racks & Pegboard

Protect your saw blades and keep them within easy reach with three practical shop storage solutions. Learn how to build a pull-out blade cabinet, a versatile pegboard organizer, and a wall-mounted rack that keeps your blades organized and ready to use.
EXPLORE MORE SAW BLADE STORAGE IDEAS → More Ways to Keep Your Saw Blades Organized


