


DIY Wooden Canisters with Threaded Lids — No Lathe Needed
Looking for a woodworking project that's a little different from the usual box or cutting board? These wooden canisters with threaded lids combine decorative details, clever joinery, and a unique twist-on lid to create a set of containers that are as fun to build as they are to use.
They're perfect for storing small items, displaying on a shelf, or giving as handmade gifts. And while the finished canisters look like something you'd make on a wood lathe, the entire project can be completed using common woodworking tools, including a table saw, band saw, drill press, and router table.
The real surprise is the lid. Instead of simply lifting off, it screws into the canister using matching wooden threads cut with a shop-made router jig.
In this episode of the Woodsmith Shop, Phil Huber, Chris Fitch, and Logan Wittmer walk through the construction process, from assembling the 10-sided canister body to adding decorative inlays and fitting the threaded lid.
Want to build your own? Get the complete woodworking plans for the wooden canisters and the shop-made threading jig used to create their twist-on lids.
GET THE STEP-BY-STEP WOODWORKING PLANS → Build the Wooden Canisters & Threading Jig
A Unique Weekend Woodworking Project
Small woodworking projects are a great opportunity to try new techniques without committing to a large furniture build.
These wooden canisters offer several interesting challenges in a compact project. You'll create a round body from individual hardwood pieces, add contrasting wood accents, and make a lid that threads smoothly into place.
The finished containers feature a clean cylindrical shape, decorative dots along the sides, and a shaped wooden handle on top.
They're also easy to personalize. Choose contrasting wood species, experiment with the arrangement of the inlays, or customize the lid handle to create a one-of-a-kind gift.
The canisters are a manageable weekend-scale project, particularly if you've already built the threading jig. Building the jig for the first time will add shop time.

Building the 10-Sided Wooden Canister
The canister starts as a 10-sided assembly made from individual hardwood staves, much like the construction of a wooden barrel.
Each stave is cut to final length but left slightly oversized in width.
Before cutting the beveled edges, use a straight bit at the router table to form a small rabbet along the inside lower edge of each piece. These rabbets create a recess for the canister bottom.
Next, move to the table saw and tilt the blade to 18°.
Cut a bevel along one edge of each stave, then adjust the rip fence and cut the opposite edge to bring the pieces to their final width.
When assembled, the beveled edges come together to form the 10-sided canister body.
Add Decorative Wood Inlays
One of the details that makes these canisters stand out is the pattern of graduated dots along the sides.
These are actual wood inlays, not painted decorations.
The process starts at the drill press, where a Forstner bit creates shallow recesses in the individual staves.
A stop block clamped to the drill press fence helps keep the holes positioned consistently and symmetrically from the ends of each piece.
Next, switch to a plug cutter to make matching wooden plugs from a contrasting species.
Glue the plugs into the recesses and allow the adhesive to dry.
A handsaw removes most of the excess material, leaving the plugs slightly proud of the surface for final cleanup.
In the video, basswood provides a light-colored contrast for the decorative accents.
It's a relatively simple detail that adds a distinctive look to the finished project.
Gluing Up the Canister with Masking Tape
Assembling a 10-sided container presents an interesting clamping challenge. Standard bar clamps aren't particularly useful for holding all those angled joints together.
The solution is ordinary masking tape.
Arrange the staves side by side against a straightedge clamped to your workbench.
Make sure all the rabbets face the same direction so they'll form a continuous recess for the bottom.
Apply strips of masking tape across the joints to hold the pieces together, then carefully flip the entire assembly over.
Spread a thin, even coat of glue on the beveled edges.
Avoid using too much glue. Excess squeeze-out inside the canister can be difficult to clean up after assembly.
Finally, roll the connected staves into a cylinder and use another strip of tape to close the last joint.
The tape holds the assembly together while the glue dries.
This technique is useful for other multi-sided woodworking projects, including small boxes, containers, and decorative columns.
How to Make Round Wooden Canisters Without a Lathe
Here's where the project gets especially interesting.
Once the glue dries, the canister is still a 10-sided shape. To transform it into a smooth cylinder, Phil uses a shop-made jig at the router table.
The jig suspends the canister on an axle above the router bit, allowing it to rotate as the cutter removes the flat facets.
The Router Table Rounding Jig
The jig consists of two L-shaped plywood brackets connected by a pair of plywood rails.
A narrow opening between the rails allows the router bit to reach the canister.
Plywood discs on the axle center and secure the workpiece, while guide rails attached to the router table provide a controlled path for the jig.
A bowl and tray router bit removes the waste.
The rounded corners of the bit help produce a smooth surface with minimal tear-out.
By advancing the jig slightly and rotating the canister across the cutter, you gradually remove the facets until the outside is round.
After a little sanding, the result looks much like a turned wooden container.
It's a clever way to make round woodworking projects without owning a lathe.
Fitting the Wooden Canister Bottom
With the outside rounded, the next step is fitting the bottom.
The inside of the canister still has 10 flat sides, so the bottom needs to match that shape rather than the round exterior.
Although plywood is an option, the video demonstrates a glued-up mahogany bottom planed to fit the rabbet.
Set the canister on the bottom blank and use a sharp pencil to mark the corners of the rabbet around the inside perimeter.
Then take the blank to the band saw and carefully cut along the layout lines.
The closer you cut to the lines, the less sanding you'll need to achieve a good fit.
The bottom completes the basic canister body and prepares it for the threaded lid.
Making the Twist-On Wooden Lid
The threaded lid is what really sets this project apart.
Instead of using hinges or a friction-fit top, the canister features a wooden plug with external threads that engage matching internal threads inside the container.
To create them, Chris uses a shop-made wood threading jig powered by a router.
The jig holds the workpiece on a rotating platen connected to an Acme-threaded rod.
As the platen turns, the rod controls how far the workpiece advances, creating a consistent thread pitch.
For this project, the jig uses a 1"-diameter Acme-threaded rod with five threads per inch.
A router fitted with a 90° double-bevel cutter forms the wooden threads.
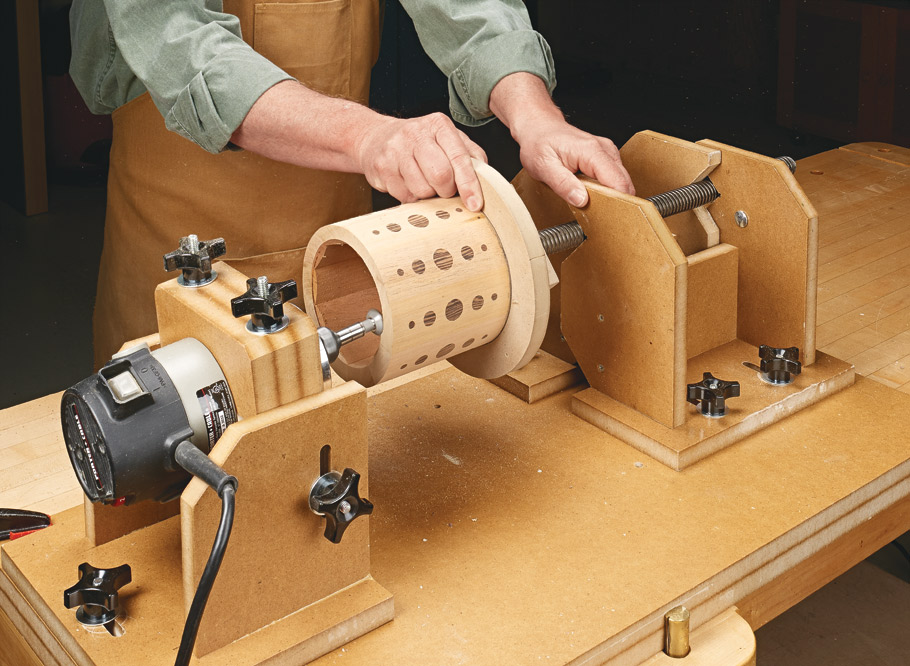
Cutting the Internal Threads
The canister is attached to the jig's platen, and the router carriage is adjusted to position the cutter inside the opening.
A pencil mark approximately 3/4" inside the canister indicates the required thread depth.
Rather than cutting the full depth at once, Chris makes several light passes, adjusting the cutter between passes.
This gradually forms the internal threads while reducing cutting resistance.
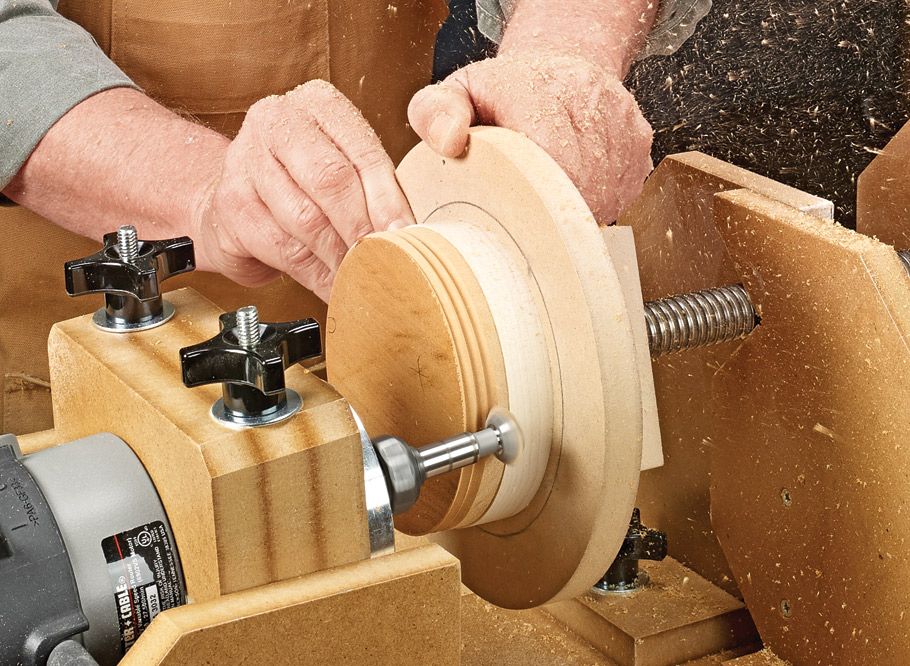
Cutting the Matching Lid Plug
The threaded plug is mounted to the same platen using a spacer that provides clearance for the cutter.
Using the same Acme-threaded rod ensures that the internal and external threads have matching pitches.
The external threading operation has a different cutter engagement and presents a greater risk of grabbing, so it requires a purpose-built, properly guarded jig and careful adherence to the approved cutting procedure.
Once the threads are formed, test-fit the plug in the canister.
If the fit is too tight, return the plug to the jig for another light pass.
The goal is a smooth, secure fit that allows the lid to thread into place without binding.
This is a process where patience pays off. Removing material gradually makes it easier to achieve the right fit.
Cutting and Shaping the Canister Lid
The lid consists of three parts: the threaded plug, a larger circular top, and a decorative handle.
Logan uses a band saw circle-cutting jig to make the round top.
The jig has a platform that rides in the band saw's miter slot and a pivot pin that establishes the radius of the circle.
Once the blank is positioned on the pivot pin, it can be rotated into the blade to cut a smooth, consistent circle.
The handle is also shaped at the band saw.
In the video, basswood is used for the handle to match the decorative inlays on the canister body.
The woodworking plans include a handle pattern, but this is also a great opportunity to create your own design.
Round Over the Edges
To soften the appearance of the canister and lid, use a 1/8" roundover bit at the router table.
Both the top and bottom edges of the canister lid receive a roundover, as do the top and bottom edges of the canister body.
The bottom roundover helps protect the lower edge from chipping when the container is moved across a surface.
The rounded edges also help disguise minor differences between the lid and canister, giving the finished project a more refined appearance.
Assemble the Threaded Lid
With all the parts shaped, it's time to assemble the lid.
Start by attaching the handle to the circular top with two screws driven from underneath.
The handle isn't glued in place, allowing the wood to move as humidity changes.
Be sure to predrill the screw holes, especially when working with softer woods like basswood.
Next, glue the threaded plug to the underside of the lid.
Keeping the two circular parts perfectly centered is important. If the plug is off-center, the lid may sit unevenly when screwed onto the canister.
Logan uses the center holes created during circle cutting as alignment references.
A small dowel fits into the holes to register the two pieces while they're glued together.
After the glue dries, thread the lid onto the canister and check the fit.
A little careful sanding can help smooth the edges and fine-tune the appearance before applying the finish of your choice.
Handmade Wooden Canisters Make Great Gifts
There's something special about a handmade gift that combines craftsmanship with a practical purpose.
These wooden canisters work well for storing small keepsakes, sewing supplies, desk accessories, or other small items.
The twist-on lid makes them especially satisfying to use, while the contrasting wood inlays and shaped handle give them a distinctive look.
You can also build several canisters at once, changing the wood species or decorative patterns to create a coordinated set.
Whether you're making them for family and friends or simply looking for an interesting weekend woodworking project, these containers offer plenty of opportunities to put your skills to work.
Get the Wooden Canister & Threading Jig Plans
Ready to build your own set of threaded-lid wooden canisters?
The Shop-Made Threading Jig & Canisters woodworking plan includes both projects: the jig for cutting internal and external wooden threads and the round canisters with their twist-on lids.
You'll get the project information needed to build the specialized threading jig, then put it to work creating these unique wooden containers.
It's a rewarding combination of shop-made jigs, decorative woodworking, and practical gift projects.
GET THE STEP-BY-STEP WOODWORKING PLANS → Build the Wooden Canisters & Threading Jig


