


There are plenty of simple finishing techniques that promise quick application and good-looking results. There's a reason they're popular. After spending days or weeks building a project, most woodworkers aren't eager to spend just as much time finishing it.
But speed and simplicity aren't the only goals. A good finish also needs to provide the durability and protection a quality woodworking project deserves.
Fortunately, you don't have to choose between the two.
This three-step wood finishing process combines boiled linseed oil, shellac, and varnish. Each finish performs a specific job. The linseed oil brings out the warmth and color of the wood, shellac quickly builds a smooth film, and varnish adds durability and protection.
The result is a great-looking finish without a complicated application process.

Step 1: Bring Out the Color with Boiled Linseed Oil
Start by wiping on a very light coat of boiled linseed oil. You only need enough to darken the wood and bring out its natural color and figure.
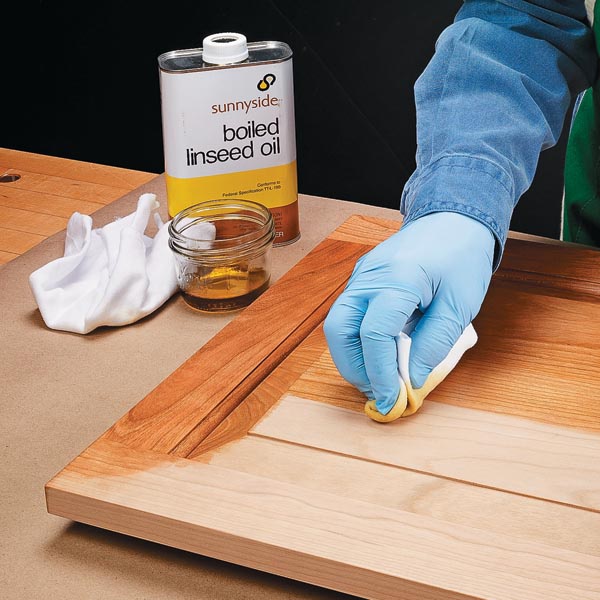
Apply the oil evenly, then thoroughly wipe away any excess. When applied sparingly, the oil can cure beneath the following coats of shellac and varnish.
The effect is immediate. The oil gives many woods a noticeably warmer, richer appearance and adds depth to the grain before you begin building the film finish.
Woodsmith Tip: Keep the Oil Coat Light. Don't flood the surface with oil. This isn't meant to be a heavy oil finish. Apply just enough to enhance the color of the wood, then wipe the surface thoroughly to remove the excess.
Step 2: Build the Finish with Shellac
After allowing the linseed oil to dry for about 30 minutes, you can begin applying thinned shellac.
Shellac is ideal for this finishing schedule because it dries quickly. That means you can build several thin coats without waiting hours between applications.
 Wipe on the shellac in thin, even coats. By the time you've finished one coat, the area where you started may already be ready for the next.
Apply about three coats, then give the shellac roughly an hour to cure before applying several more coats.
There's no need to sand between each application. The goal at this stage is simply to build a smooth, even film.
After the second round of shellac has cured for about an hour, lightly sand the surface with 320-grit or finer sandpaper. This levels the surface and prepares it for the protective varnish topcoat.
Woodsmith Tip: Let Conditions Guide Drying Time. Drying and recoating times can vary with the specific product, temperature, humidity, and thickness of the application. Use these times as a general guide and follow the manufacturer's instructions for the finishes you're using.
Step 3: Add Protection with Wiping Varnish
The final step is what gives this finish added durability.
A fast-drying varnish thinned to a wiping consistency is easy to apply in a thin, even coat and provides the protective surface you're after.

Pour the varnish into a clean jar and add an equal volume of mineral spirits. Mix the two thoroughly, then use a soft pad to wipe a light, wet coat over the surface.
Depending on the project and the amount of protection it needs, you can stop after the first coat.
For greater durability, allow the varnish to dry, lightly sand the surface, and apply a second coat.
Depending on the varnish you're using, recoating may be possible in as little as a couple of hours. Always check the manufacturer's directions for thinning and recommended drying and recoating times.
Why Combine Oil, Shellac & Varnish?
You could certainly finish a project using only one type of finish. The advantage of this approach is that you're asking each product to do what it does best.
Boiled linseed oil adds warmth and depth. A light application enhances the color and figure of the wood without requiring you to build the entire finish with oil.
Shellac builds a smooth film quickly. Its short drying time allows you to apply multiple thin coats in relatively quick succession.
Varnish adds durability. The final coat or two provides a tougher protective surface for the completed project.
Together, the three finishes give you the benefits of a layered finishing schedule without making the process unnecessarily complicated.
Test the Finish Before Starting
Whenever you're combining multiple finishes, it's worth making a sample first.
Ideally, use a scrap from the project so the wood, grain, and surface preparation match the finished piece.
Take the sample through the entire process: Boiled linseed oil → shellac → wiping varnish
This gives you a chance to evaluate the final color and appearance before committing to the actual project. It's also an easy way to practice the application process and determine how the finishes behave under the conditions in your shop.
Once you're satisfied with the sample, you're ready to finish the project.
A Simple Finish with Lasting Protection
A good finish doesn't have to involve a complicated schedule or days of waiting between coats.
Start with a light application of boiled linseed oil to bring out the character of the wood. Build a smooth film quickly with several thin coats of shellac. Then protect everything with one or two coats of wiping varnish.
It's a straightforward three-step wood finish that delivers the warm appearance you want along with the durability a well-made woodworking project deserves.
Not Sure Which Finish to Use?
There’s no single finish that’s right for every woodworking project. Durability, appearance, ease of application, and how the project will be used all play a role in choosing the best option.
Our guide to choosing the best wood finish breaks down the different types of finishes and helps you decide which one makes the most sense for your next project.
EXPLORE WOOD FINISH OPTIONS → Best Wood Finish: How to Choose the Right Finish for Any Project


