


How to Build an Adjustable Drill Press Fence with T-Track
A good drill press fence makes woodworking easier, more accurate, and more repeatable. While a simple straight board clamped to the table can get the job done, an adjustable fence with built-in accessories offers a lot more versatility.
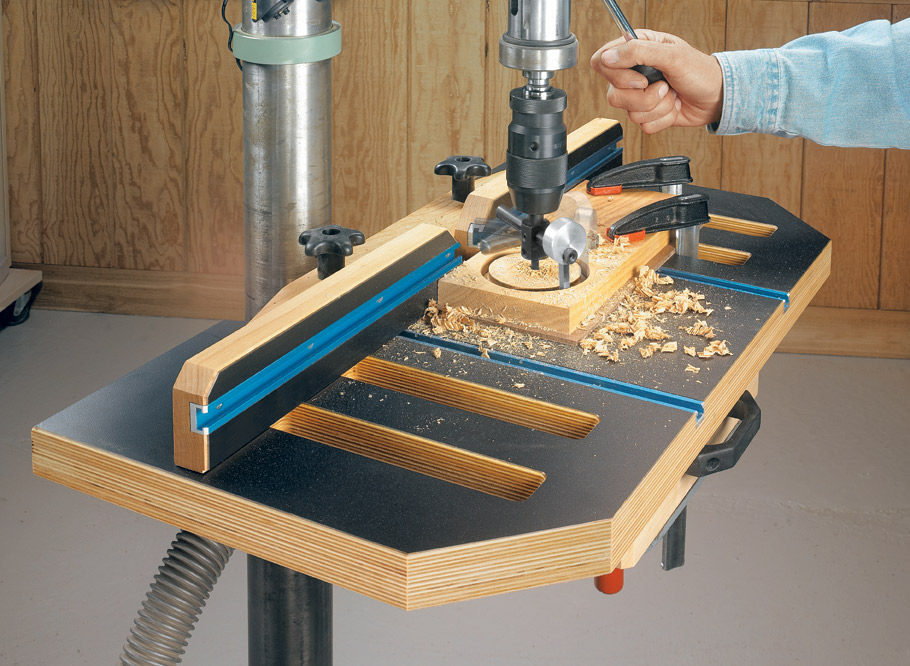
In Part 3 of our Woodworking Drill Press Table build series, we're adding a custom fence that slides along the T-track in the tabletop. It features a durable laminate face, built-in T-track for accessories, and a split design that provides clearance for the drill press chuck while accommodating dust collection.
Best of all, the fence is easy to adjust and locks securely in place with a pair of knobs.
Why Your Drill Press Needs an Adjustable Fence
The main purpose of a drill press fence is to provide a straight, reliable reference for positioning your workpieces.
Once the fence is set, you can slide a board along it to drill a series of accurately aligned holes. This is especially useful for line boring, shelf-pin holes, and other drilling operations that require consistent spacing.
A fence also helps prevent a workpiece from rotating if the drill bit catches. However, it doesn't replace the need to clamp the workpiece securely when drilling.
Rather than attaching the fence with ordinary clamps, this design uses T-bolts and knobs that fit into the T-track installed in the tabletop. Simply loosen the knobs, slide the fence into position, and tighten them to lock it down.
Adding a Durable Laminate Fence Face
Just like the drill press tabletop, the fence gets a layer of black plastic laminate.
The laminate isn't essential, but it provides a smooth, durable surface that stands up to repeated use. It also gives the fence a finished appearance that matches the tabletop.
To attach the laminate, apply spray contact adhesive to both the back of the laminate and the fence face. Allow the adhesive to tack off according to the manufacturer's directions before carefully bringing the two surfaces together.
Once the laminate is positioned, use a J-roller to apply firm, even pressure and ensure a good bond.
After the adhesive has set, trim the excess laminate flush with the edges of the fence using a flush-trim router bit. For these relatively narrow pieces, a router table makes the job easier to control.
Installing T-Track for Adjustable Stops and Accessories
One of the most useful features of this drill press fence is the aluminum T-track installed along its face.
The T-track makes it easy to add adjustable stop blocks, hold-downs, and other accessories. With a stop block in place, you can quickly drill multiple workpieces at exactly the same location without measuring and marking each one.
To install the track, cut a groove in the fence using a dado blade at the table saw. The groove is sized to accept the aluminum T-track, keeping it neatly recessed in the fence.
Combined with the T-track in the tabletop, this creates a flexible system for positioning both the fence and its accessories.
Building a Split Drill Press Fence
Unlike a conventional one-piece fence, this design uses two separate fence faces with a gap in the center.
The split-fence design serves two important purposes.
First, it provides clearance for the drill press chuck when drilling with small bits. With a solid fence, the chuck can interfere with the fence when the workpiece needs to be positioned close to the bit. The center opening gives the chuck additional room.
Second, the opening accommodates dust collection. It works with a cove in the fence base and the dust collection system that will be added underneath the tabletop in Part 4.
After cutting the T-track groove, divide the fence into two sections. Small chamfers on the outside corners eliminate sharp edges, while larger chamfers on the inside ends provide additional chuck clearance.

Adding Dust-Relief Rabbets
Another small detail makes this fence more accurate in everyday use.
Narrow rabbets along the bottom edges of the fence faces provide space for chips and sawdust to collect.
Without these relief areas, debris can become trapped between the fence and the workpiece, preventing the board from seating tightly against the fence.
The rabbets allow small chips to move out of the way, helping maintain consistent positioning while drilling.
Shaping the Fence Base for Dust Collection
The two fence faces are attached to a single base that holds the assembly together and connects it to the tabletop.
Before assembly, the base needs a recessed opening for dust collection.
This cove is cut using a dado blade at the table saw. Because the cut doesn't extend through the entire workpiece, it's important to establish a clear stopping point and use an appropriate setup for making the stopped cut.
The cove provides a passage for dust and chips to move from the center opening of the fence toward the collection system.
After cutting the cove, shape the outside edges of the fence base with tapered cuts at the band saw.
Finally, drill the mounting holes for the T-bolts that secure the fence to the tabletop.
Assembling the Adjustable Drill Press Fence
With the fence faces and base complete, assembly is straightforward.
The two fence sections are glued to the base with a 1" opening between them.
A temporary spacer block makes it easy to maintain that opening while applying glue and clamps. The spacer also helps keep the fence sections from shifting during assembly.
Apply a thin, even layer of glue to the mating surfaces, position the fence faces against the spacer, and clamp everything securely until the glue dries.
Installing and Adjusting the Drill Press Fence
The completed fence mounts to the tabletop using T-bolts and threaded knobs.
One detail worth noting is that the holes in the fence base are slightly oversized. For the 5/16" T-bolts used here, the mounting holes are drilled to 3/8" diameter.
That extra clearance prevents the bolts from binding as the fence slides along the T-track.
Once the fence is in position, simply tighten the knobs to lock it securely in place.
The result is a smooth-adjusting fence that's easy to reposition for different drilling operations.
What's Next? Adding Storage and Dust Collection
With the adjustable fence installed, the woodworking drill press table is fully functional. The large tabletop, convenient clamping options, replaceable insert, and adjustable fence make it a significant improvement over a standard cast-iron drill press table.
But there's one more upgrade to come.
In Part 4, we'll build a drawer box that mounts beneath the tabletop. In addition to providing convenient storage for drill bits and accessories, it incorporates a dust collection port that connects to a shop vacuum.
The completed system makes the drill press even more versatile, especially when using sanding drums.
Watch the Complete Drill Press Table Build Series
- Part 1: Woodworking Drill Press Table Overview — Explore the features that make this drill press table a versatile woodworking upgrade.
- Part 2: Building the Main Table — Build the laminated work surface with clamping slots, T-track, and replaceable inserts.
- Part 3: Making the Adjustable Fence — Add a split fence with T-track, adjustable positioning, and dust relief. (Video embedded above.)
- Part 4: Adding Storage & Dust Collection — Complete the project with a storage drawer and hidden vacuum connection.
- Part 5: Making Custom Dust Collection Inserts — Upgrade your drill press table with three easy-to-make replaceable inserts that improve airflow, capture dust and chips, and add versatility for drilling and drum sanding.
Get the Woodworking Drill Press Table Plans
Ready to upgrade your drill press? This shop-built table combines a durable work surface, adjustable fence, convenient clamping options, storage, and dust collection into one versatile woodworking accessory.
The complete plans include detailed drawings, a materials list, and step-by-step instructions to help you build your own.
GET THE COMPLETE STEP-BY-STEP WOODWORKING PLANS → Build a Woodworking Drill Press Table Plans


