


This modern book tower breaks one of the most familiar rules of furniture design: Everything should be square. Its angled shelves appear to form a loose, slightly askew stack, creating a compact bookshelf that's as much a piece of contemporary furniture as it is a place to store books.
Look around and you'll probably see parallel lines and 90° corners everywhere. There's a good reason for that. Square construction is strong, efficient, and predictable. But there's also something visually interesting about breaking that uniformity. Tilt something just slightly off square and it immediately takes on a little more movement and personality.
That's the idea behind this angled book tower. From the front, the solid-wood shelves appear to float in a staggered stack with little visible support. Look behind them and the secret is revealed: A sturdy center post acts as a spine, supporting each shelf at an alternating angle.
Finger joints connect the solid-wood shelf components and add crisp geometric lines that contrast with the playful angles. Beech provides warm natural color, while painted MDF forms the center post and top of the base. The combination creates a visually light, modern bookshelf with plenty of interesting woodworking along the way.
 Beveled faces on the post hold these shelves at offset angles, granting this tower a devil-may-care demeanor.
 Finger joints connect the solidwood parts, creating square lines to contrast with the angled shelves.
 Painted MDF provides a sturdy post to support your books. Its stability is important in keeping these angles aligned long-term.
A BOX-JONT BASE
 This tower begins at the base. It’s a four-piece frame topped with an MDF panel. Within the frame are leveling mounts threaded into feet blanks to ensure the tower sits plumb.
BASE FRAME
The front, back, and sides were the first pieces I tackled. Beech was my hardwood of choice, and after sizing the parts, I turned to the joinery.
FINGER JOINTS
 Finger joints make for a solid connection and add a nice sense of geometry to the base. Best of all, they’re a pretty easy joint to make at the table saw. Figure 1 shows how. A dado blade makes the cut while a tall auxiliary miter fence supports the workpiece. A key locates the workpieces for each cut. The key needs to be 3⁄4"-thick, 3⁄4"-wide, and 2"-long. Cut another 1" length from the same strip to use as a spacer as well.
Alongside the key, a tall auxiliary miter fence supports the workpieces being cut on-end. The key needs to be 3⁄4" from the blade, so cut a notch for the key in the fence, then use the 3⁄4"-wide spacer to position the fence. To cut the fingers in the front and back, follow Figure 1, with the workpiece butted against the key. For subsequent cuts, slot the new notch over the key.
For the sides, make the initial cut with the last notch on the front or back piece slotted over the key and the side butted against it. After the finger joints are cut, the front and back need holes on their top edges for dowels that will secure the top. Once those are drilled, glue up the fingers.
OFFSET TOP
The top panel is just a piece of MDF. The catch is that it’s offset from the frame by 3° (detail ‘b’). To achieve this, lay the top out and center the frame on it. Then, use a bevel gauge to adjust it to 3° while making sure the edges stay evenly spaced. Once it’s in position, mark the location on the top with a pencil.
Since you’ve already drilled the holes in the frame, dowel centers work well for transferring the hole locations to the top. After they’re marked, drill them out. Then glue the top to the base using the dowels for alignment. A few additional holes are needed in the top to attach the post. We waited to make these because they’re parallel to the base frame, not to the edges of the top.
These will accept dowels and a bolt to hold the post. Their locations are shown in detail ‘b.’
LEVELER FEET
Because this book tower is tall and narrow, it’s important that it stands plumb. Leveler mounts create adjustable feet for this purpose. These thread into inserts in the feet blanks glued inside the frame (detail ‘a’).
BEVELED POST
 With the base complete, it’s time for the post that the shelves will attach to. Like the base, the front, back, and sides make up most of this assembly, so I began there.
FOUR-PIECE POST
Tongues and grooves join the post. The grooves in the front and back were cut at the table saw with a dado blade, while the tongues on the sides were made by rabbeting their edges using a dado blade recessed in an auxiliary rip fence. Once the joinery is complete, glue the four post pieces together.
ALTERNATING FACES
The alternating bevels across the front face of the post hold the shelves at their alternating angles. To create these, I used the router jig shown below. The routing is done one section at a time using a dado cleanout bit.
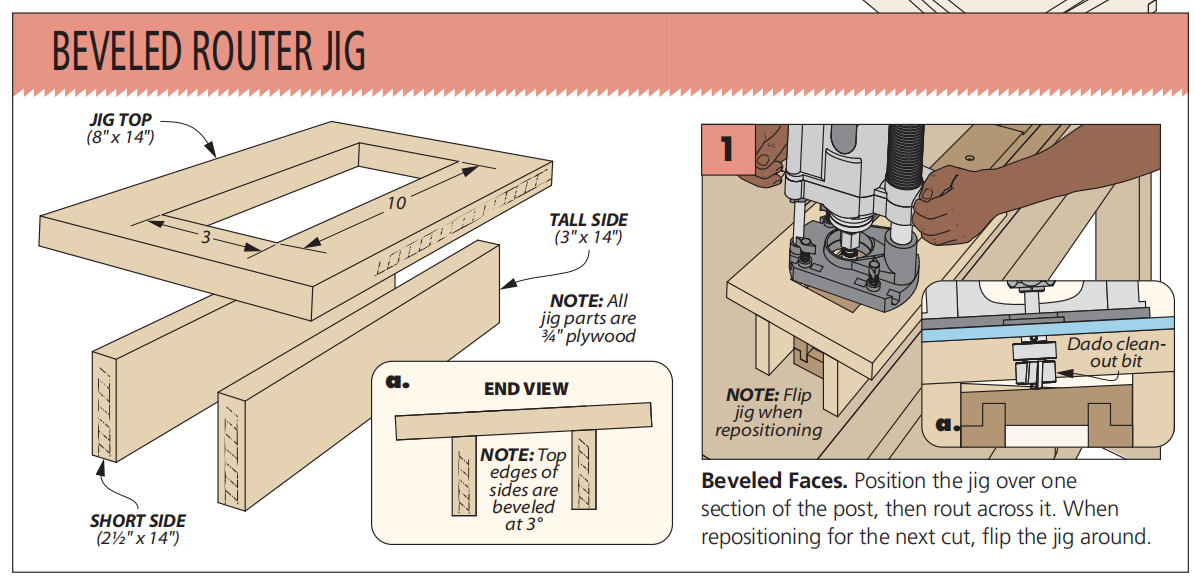
CAP & FILLER
The final post components are the cap and filler. The cap is rabbeted to fit into the top (detail ‘a’). The filler is cut to fit in the bottom of the post. A counterbored through hole accepts a T-nut and bolt to attach the post to the base (detail ‘c’). After drilling it, insert the T-nut and glue the filler into the post. Once dry, the post is complete and it’s time for the shelves.
HONEYCOMB SHELVES
 The skewed shelves are the last element of this tower. Detail ‘b’ shows how they’re joined with finger joints. The shelves are attached to the post with screws (details ‘a’ and ‘c’). Before any of that, however, we need to address the holes that adorn the tops and bottoms of these shelves.
A HOLEY TEMPLATE
 The box shows how I cut the holes in the shelves. A template was the best choice to keep everything identical. Rather than cut each opening individually in the template, I used a strategy similar to cutting the finger joints.
I began by cutting twelve strips to length. I cut lap joints in them using a key and miter fence (Figure 1) and assembled them on their lap joints to make a grid (Figure 2). Then I headed over to the drill press. On each piece, I attached the template and drilled holes to remove most of the waste, as in Figure 3 below.
The holes aren’t just circles, but squares with radiused corners. To achieve this shape, I routed around each opening using a pattern bit (Figure 4). You’ll likely need to make a second pass on each shelf with the template removed to reach full depth, registering the bearing on the previously cut portion.
SHELF BACKS
Now, it’s time for the shelf backs. Aside from the finger joints, they need two recessed through holes in their centers (detail ‘a’). These holes accept the washers and screws used to attach the shelves to the post. First, drill out the counterbores for each hole using a Forstner bit. Then use the dimple left by the bit’s tip to make a centered through hole.
Rout the waste between the counterbores using a pattern bit with a straightedge on either side to make the recess. Finally, drill pilot holes in the post to match. Using the shelf backs as guides, countersink those holes as well. This helps pull the shelves snug to the post. We used machine screws for their higher thread count here.
FINGER JOINTS
Next come the finger joints. These are the same size as the fingers in the base (detail ‘b’) and have the same spacing, so you can use the same setup from that process. After cutting the fingers, glue up the shelves.
BRING IT TOGETHER
Before assembling your pieces, you’ll want to paint the post and base top (and finish the solidwood parts). For more on creating the high-gloss painted finish, see our guide to achieving a smooth, high-gloss finish. That aside, a hex bolt threads through the base top and into the T-nut in the post filler to secure the post.
The two other holes accept dowels, which keep the post square to the base. The shelves attach to the post with screws and washers (detail ‘c’). Once the shelves are secured, your book tower is complete and ready for your collection.


