


This small DIY bookcase proves that you don’t need a lot of lumber — or a lot of space — to build a useful piece of furniture. With some careful planning, the entire bookcase can be built from just two 8'-long 1x12 boards and a small piece of plywood for the back. Its compact size makes it a natural fit for a bedroom, home office, or reading corner, while three shelves provide plenty of room for books and display pieces.
Over the last 45 years, bookcases have been some of the most popular furniture projects we’ve featured in Woodsmith. That means our designers are always looking for a different approach. For this project, designer John Doyle found inspiration in a small antique bookcase he picked up for his own home.
The antique-inspired profile gives this bookcase plenty of character without making the construction complicated. Straightforward dado-and-rabbet joinery connects the sides, shelves, and plywood back, making this an approachable woodworking project that relies on fundamental techniques.
The finish provides the final distinctive touch. Rather than choosing between paint, stain, or a natural finish, we used two thin layers of colored paint that allow hints of the base coat to show through the top coat. A tinted wax completes the layered paint finish, highlighting the details and giving this newly built bookcase some of the character of its antique inspiration.
All that remains now is for you to gather up the materials you’re going to use and head to the shop. Don’t be surprised if you find yourself looking at a completed project not long after.
 The overhanging top of the bookcase features casual roundovers for a hand-friendly surface. The edges on the rest of the project are merely eased in keeping with its quiet look and elegance.
 The layered paint finish allows the yellow base coat to glow through the red top coat, yielding a range of tones and visual effects. Tinted wax gathers in the recesses and corners to mute the colors and enhance details like the toe kick.
SIDES WITH STYLE
 While it doesn’t matter what you make this bookcase out of, I want to talk about some aspects of working with softwood 1x12s. The first of those starts at the home center. Set aside some time to rummage through the stacks.
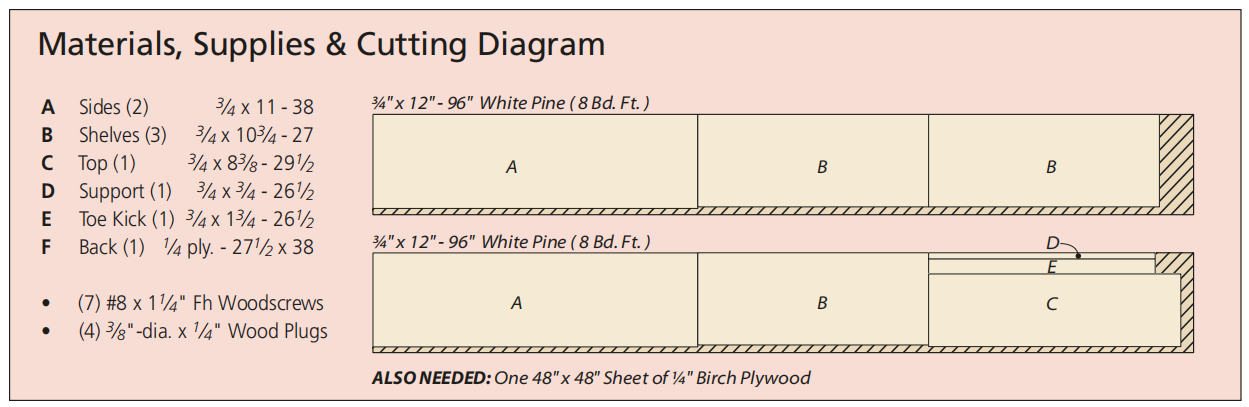
Keep two goals in mind: straight, flat boards and those with good-looking grain patterns. (The second one isn’t as important if you go with a paint finish.) The cutting diagram at the end of this article shows one way to get the pieces you need from two boards. However, you can go off-script in order to get better-looking project parts.
I take the plans, a tape measure, and some chalk with me to the store. I scribble some memory aids right on the boards.
IN THE SHOP
 The joinery on the bookcase is dadoes and rabbets. The dadoes are sized to match the thickness of the shelves. For snug-fitting joints, it’s a good idea to plane and sand parts first. Doing so after cutting the joinery can result in a loose fit. This is one of the reasons for taking the time to find quality boards — there’s less planing and sanding to do.
SIDES
The drawing above shows the starting line: the sides. These two parts are made as a mirror-image pair. If your bookcase will have a natural or stained finish, these two pieces are the most visible. So select the best parts of your boards before cutting them to size. As I said, the joinery takes a fundamentals approach. The three shelves fit into dadoes, as shown in detail ‘b.’
For clean, flat-bottomed cuts, I prefer to use a router guided by a straightedge and a straight bit. This is shown in the box. Ideally, a 3/4" bit will work. However, if your shelves end up thinner, you can use a “plywood” bit. This kind of bit cuts a kerf that’s fractionally smaller and is a good addition to your bit set.
RABBET
 The other joinery step is to cut a rabbet along the back edge of each side. Sticking with the router theme, the box above shows a router table method. The rabbet is sized to hold a plywood back panel that comes later (detail ‘a’).
SHAPING
Your attention shifts from joinery to shaping the sides. This involves cutting a step at the top and a cutout along the bottom. In order for both sides to end up matching, I do all the work on one side, then use it as a template to shape the other.
STEP BACK
The main detail of the bookcase is the step back at the top. It opens access to the upper shelf and adds visual appeal. I laid out the shape of the step according to the dimensions shown in the main drawing. Then I rough cut it at the band saw. The pine is light enough to balance without trouble. Another option is to use a jig saw. From there, I refine the curve and work to my layout lines with a spokeshave, rasp, and file.
MAKE SOME FEET
 The cutouts along the bottom of each side form two feet. This provides greater stability than long surfaces. To form the cutout, I drilled out the ends at the drill press. Then I removed the waste at the band saw using the rip fence. Clean up the blade marks with files and sandpaper.
DOUBLE UP
With one side complete, trace the profile onto the remaining side. Then create a copy with a flush-trim bit, as illustrated above.
THE PLACES TO STORE STUFF
 A bookcase isn’t much without shelves. This one requires three — plus a top, which, let’s be honest, acts as another storage surface. We’ve already talked about making sure the surface is relatively smooth on these parts before cutting the dadoes.
Your focus at this point is making sure the shelves are all the same length. As for the width, the shelves are flush with the front of the sides. They extend to the shoulder of the rabbet at the back. It’s a good idea to base the width off the sides rather than the dimensions listed in the drawing above. My preference is to leave the shelves a tad wide and have the excess extend beyond the front of the sides. I then trim the shelves flush after assembly.
GLUE IT UP
Speaking of, it’s time to grab the glue bottle and clamps. The main objective is keeping the case square while the glue dries. Align the back edge of each shelf with the rabbet. Then pull a pair of clamps across each level. If you have assembly squares, clamp them in several corners. Otherwise, check for square once the clamps are snugged up. Then make any adjustments to the clamping pressure as necessary.
TOP IT OFF
 The top overhangs the front and sides. Like the antique original, the underside of the top sports a roundover, as shown in detail ‘a.’ The box shows this step being done
at the router table.
The top overhangs the front and sides. Like the antique original, the underside of the top sports a roundover, as shown in detail ‘a.’ The box shows this step being done
at the router table.
The top is attached with woodscrews counterbored from the upper face, as you can see in details ‘a’ and ‘b.’ Matching plugs cover the screw holes. Attached below the top sits a support. It serves to stabilize the top edge of the back panel. It’s attached with glue and screws, as in detail ‘c.’
BACK IT UP
 There are just two parts left to make. The first of these is a toe kick that sits just below the bottom shelf. Detail ‘b’ shows how it’s inset slightly to create a shadow line. If you plan to paint the bookcase, I recommend a construction pause here. You have much better access and will get a smoother result painting before installing the back.
THE ONLY PLYWOOD
The back panel is made from plywood. When it’s glued and nailed into the rabbets and secured to the support, it adds stability to the whole structure. Take care to size the back for a snug fit. The back is finished with a coat of lacquer (tape off the glue surfaces). Once again, do this prior to attaching it to the case.
If you're ready to build this compact pine bookcase, then get the complete step-by-step plans at WoodsmithPlans.com. If you want to find out more about creating the layered paint finish, check out this how-to article.


