Making this small box is a welcome break in a busy shop. It provides a second life for orphaned scraps — as well as a tender gift.
 The ability to sift, sort, and store mementos is enhanced by the drawer that resides under the main chamber of the box.
There’s a quote from L. M. Montgomery (the author of Anne of Green Gables) that captures the scope and worth of a memory box: “Nothing is really lost to us as long as we remember it.” The memories we want to hold on to often run the gamut from grief to gratitude. The bits can be the glowing memory of a concert held in a torn ticket stub — or an artistic masterpiece done with a shocking amount of wit by a five-year-old grandchild.
TINY BUT MIGHTY
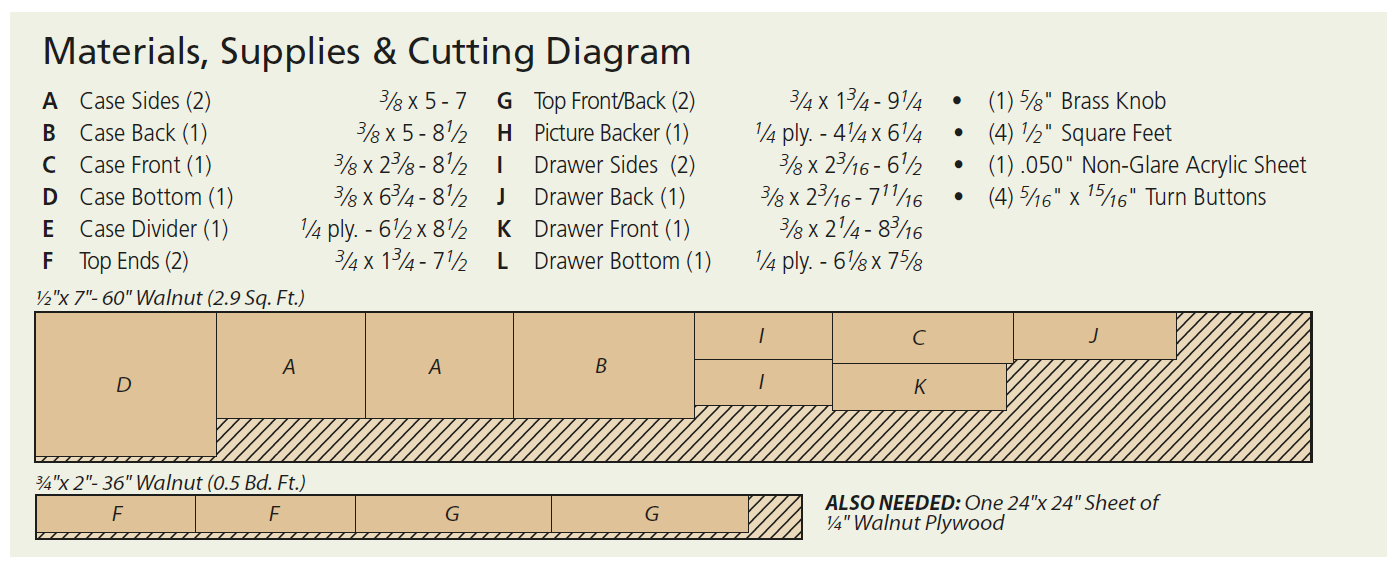
Regardless of what is ultimately stored in this keepsake container, it’s a pleasant project that lets you hone your skills at the router table, along with crafting shopmade cove molding for the box top. In an effort to keep the look of the box light but strong, we milled the walnut parts to 3⁄8"-thick pieces from 1⁄2" stock. Now let the work begin.
SIZING PARTS
 With the blanks planed to thickness, you can cut the parts of the box to size. Look a little closer and you’ll notice that the front, back, and bottom have some straightforward grooves and tongues to deal with. The stopped dadoes and grooves in the sides require some upfront layout work before heading to the router table.
STOPPED GROOVES
 The key is to first mark the location of the bit’s contour on the fence of the router table (Figure 1). Then lay out the stopping points and intersections of the grooves and dadoes on the edges, as well as the outside face of the sides. Since the sides are mirrored, the entry point for the bit will vary between the two parts. Figure 1 shows the easy part. Figure 2 shows one example of making a stopped groove.
TONGUES
Next, cut the tongues in the front, back, and case bottom (Figure 3). There’s a rabbet to cut around the underside perimeter of the divider (detail ‘b’). Before gluing up the case, cut the groove along the front edge of the case bottom for the tab on the underside of the drawer (detail ‘c’).
MAKE A NICE LID & DRAWER
 Making your own cove molding for the lid of the box aligns perfectly with the notion of the box being a unique keepsake. It’s a subtle touch that’s worth the effort. More on how to make your own cove shortly — first let’s visit a little bit more about the lid and the drawer.
ANATOMY
The lid is a frame of four mitered pieces designed to hold a photo (or art) in the center. There’s a modest rabbet on the underside that holds the lid in the box. The drawer shown here is delicate and light, but comes with seriously strong joinery.
At the back it’s tongue and dadoes that hold the box together — up-front it’s locking rabbets. So you’ll spend a little more time at the router table making these parts. Let’s make the lid now.
THE LID
 After cutting a blank to final size (detail ‘b’), cut the rabbet for the glass opening first, like you see in Figure 1. If you’ve never made your own cove molding, the process is not overly complicated. Check out this article on making your own cove molding at the table saw.
GLUE UP THE LID
To bring the frame together, miter the pieces to length and glue them up with a band clamp. Once the glue is dry, and the band clamp is rolled up, sand all the surfaces smooth. Then rout the rabbet on the underside of the lid (Figure 3). We used a thin piece of non-glare acrylic to protect the photo from above. From below, it’s a piece of plywood that’s used for the photo backer. Install the turn buttons after the top coat has been applied.
THE DRAWER
 I talked earlier about the anatomy and joinery of our little drawer — but there’s one thing I left out. If you take a peek at detail ‘c’, you’ll notice on the underside of the front edge there’s a tab. That tab mates with the groove you made earlier in the case and will hold the drawer in place — preventing it from falling out of the box. Okay, back to work: cut all the parts to size.
FRONT FIRST
Making a locking rabbet joint starts off by standing the drawer front on end and holding it tightly against the fence to make a slot that matches the width of the side. Now you need to lay the workpiece flat to cut back the inner lip, forming the tongue. The tongue will fit in the dado you’ll make in the sides. All of this is shown in detail ‘b’.
Next, trim away the waste on the bottom edge of the front to make the tab. The tongue-and-dado joint at the back of the drawer is a snap compared to the front. Then rout the groove along the bottom edge to hold the drawer bottom. The drawer bottom needs a rabbet cut on the underside of it (detail ‘d’). With that done, you can glue up the drawer. Apply two coats of lacquer — no stain needed for this little gem. Then add the feet to the bottom of the case, and the
knob to the drawer.