


This small project says a lot. These twisted dovetail joints will make for a unique challenge and an eye-catching addition to your shop.
Hand-crafted joints are always a thing of beauty. As a woodworker, I have a deep appreciation for the technical skill and understanding of the tools and materials one needs to make a clean joint by hand. Dovetails are often hailed as the pinnacle of hand-cut joinery, but what you see here brings the technique to a new level.
When Chris Fitch first drew up these plans, hand-cutting wasn’t the primary intention. He wanted to create a stripped-down project that would allow us to focus on the specifics of the joinery used. At first we thought it might be most efficient and consistent to use the table saw.
However, the compound angles need to be exactly the same for these joints to work, and there was just too much inconsistency between the table saw’s tilt and a miter gauge’s angles. In the end we found the old-fashioned way was best (and a good use for the saws that will go inside).
The twisted dovetail can be a bit difficult to wrap your head around at first, but in truth, it’s cut quite similarly to how one would cut a traditional dovetail by hand. As you’ll see, the key is really in a proper layout and learning the muscle memory to cut a compound angle. The joint is quite strong, and the unique look will certainly catch the eye of any astute observer, leaving many wondering how it was done. If you have some saws in need of a little workout — and a good home — look no further than this dutiful till.
 Hand-cut pins set at compound angles slide into these “twisted” tails, creating a strong and striking joint on the corners of the case.
 Kerfs cut in the central shelf provide clearance for saw blades, holding them upright and keeping the teeth safe.
Beginning the TILL
 The saw till begins with four case pieces: a top, a bottom, and two sides. Before getting to the twisted dovetails that join them, there are a few things to address. First, when cutting the top and bottom pieces to width, bevel cut the front edges, as you see in detail ‘b’ above.
Keep in mind that detail ‘b’ shows the top piece—the bevel on the bottom piece goes 10° in the opposite direction. Additionally, you’ll want to plane the shelf to thickness now as well. This piece is the same thickness as the top, bottom, and sides, and it’ll help you size the dadoes that come next.
STOPPED DADOES.
 A stopped dado in each of the sides will fit the shelf that will be added later. These dadoes will match the width and thickness of the shelf (shown in detail ‘a’ above).
After laying out the dadoes, I made a template, which you can see in the box to the left. After securing the template with double-sided tape, I put a dado cleanout bit in my plunge router and removed most of the waste from the slot. To clean up the corners, I simply used a chisel.
A stopped dado in each of the sides will fit the shelf that will be added later. These dadoes will match the width and thickness of the shelf (shown in detail ‘a’ above).
After laying out the dadoes, I made a template, which you can see in the box to the left. After securing the template with double-sided tape, I put a dado cleanout bit in my plunge router and removed most of the waste from the slot. To clean up the corners, I simply used a chisel.
TWISTED PINS
Now for the interesting part of this saw till: the twisted dovetails. Because of their shape, it’s most efficient to cut these by hand. Luckily, this is similar to cutting traditional dovetails by hand, with a few exceptions of course. The key to this style of joint is the marking guide shown.
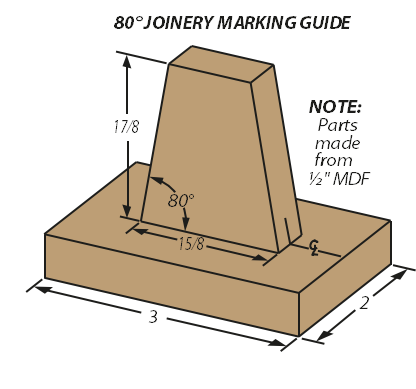
It’s two pieces of MDF; one registers against the edge of the workpiece and the other is cut at 80° to help lay out the angles of the pins and tails. The pins and tails are at compound 80° angles, exactly equal in both directions. While it doesn’t matter if these angles aren’t precisely 80°, it is vital that they’re equal on both axes, which is where the marking guide comes in.
LAYING OUT THE PINS.
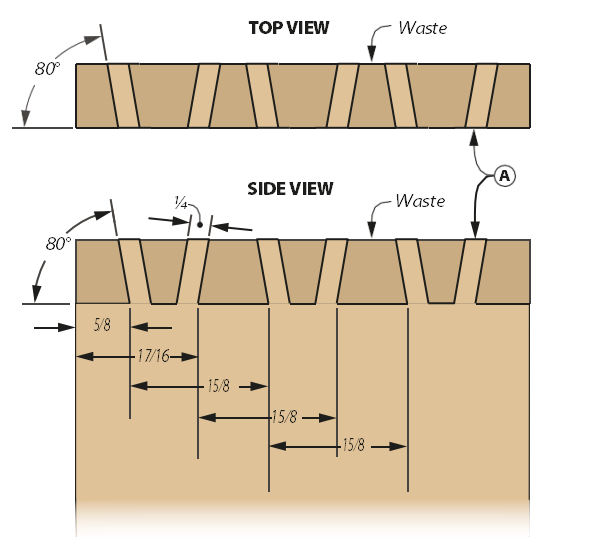
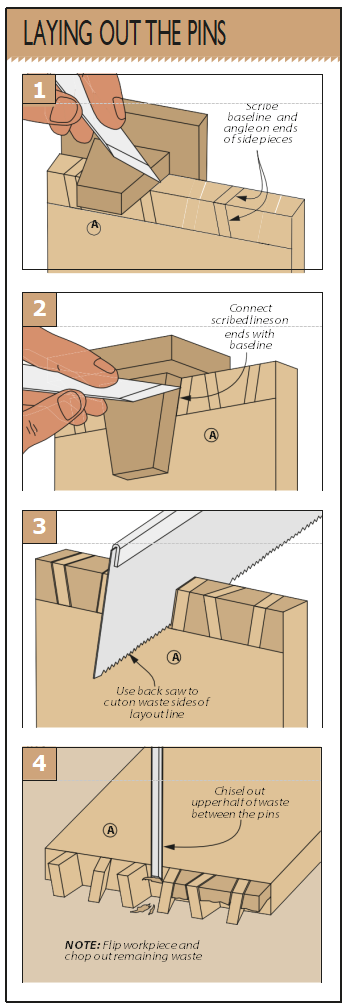
Although it’s really a matter of preference, I always begin my dovetails at the pins. The illustrations show the ideal layout for the pins on the side pieces. The first step is to scribe the baseline. I used the top piece to help me mark this out, clamping it flush to the end of the side and scribing along it with a marking knife.
A marking knife is important, as it’ll give you a groove to register your chisel in. With the baseline in place, I used the marking guide to lay out the pins. I began as in Figure 1, scribing the angles on the ends, first. From there I connected those lines to the baseline with the guide in place (Figure 2).
HAND-CUT PINS.
Cutting the pins is easier than it seems, but it will require either a steady saw hand or some dedication with a chisel. Removing the waste begins by forming the sides with a back saw (Figure 3). The goal here is like blackjack: get as close to the layout line as you can without going over. If you’re well-practiced with a saw, this will really cut down on the chisel work.
If not, take your time and correct as needed while sawing, getting as close to the line as you feel confident going. It’s a good idea to make a few test cuts on scrap pieces first. If you’re anything like me, it’ll take a little bit to make the compound angle feel natural. After sawing to the baseline on each pin, chop out the waste with a chisel. Start from one side, going halfway down, then flip the workpiece to finish the pins from the other side (Figure 4).
Matching the TAILS
 After you’ve pared your pins down to the proper shape and size, it’ll be time to work on their mating tails. You’ll find your work on the pins paying off here, as the layout and cutting are done in the same way. Of course, there are still a few curveballs to keep your eye on.
TAIL LAYOUT.
After scribing a baseline on the layout for the tails, begin by transferring the locations of the pins from the side pieces to the top and bottom, as in Figure 1. With those in place, use the marking guide to scribe the layout of the tails on the ends (Figure 2). I advise keeping the mating piece nearby as you scribe these lines to make sure you have the guide at the proper orientation. Finally, like you see in Figure 3, use the guide to connect the lines on the end to the baseline.
CUTTING THE TAILS.
You can walk into this next procedure with confidence — you’ve already cut the pins and this is no different. As before, get the feel for the compound angle with a few test cuts, then try to cut as close to that layout line as possible.
A small amount of waste will make for easier (ergo cleaner) cuts with a chisel. Once you’re feeling confident, cut along the sides of the waste. Now, back to the chisel. Lay your piece face down once more and begin chopping out the upper portion. After getting through the upper waste, flip the piece over and clean out the rest.
TEST YOUR JOINTS.
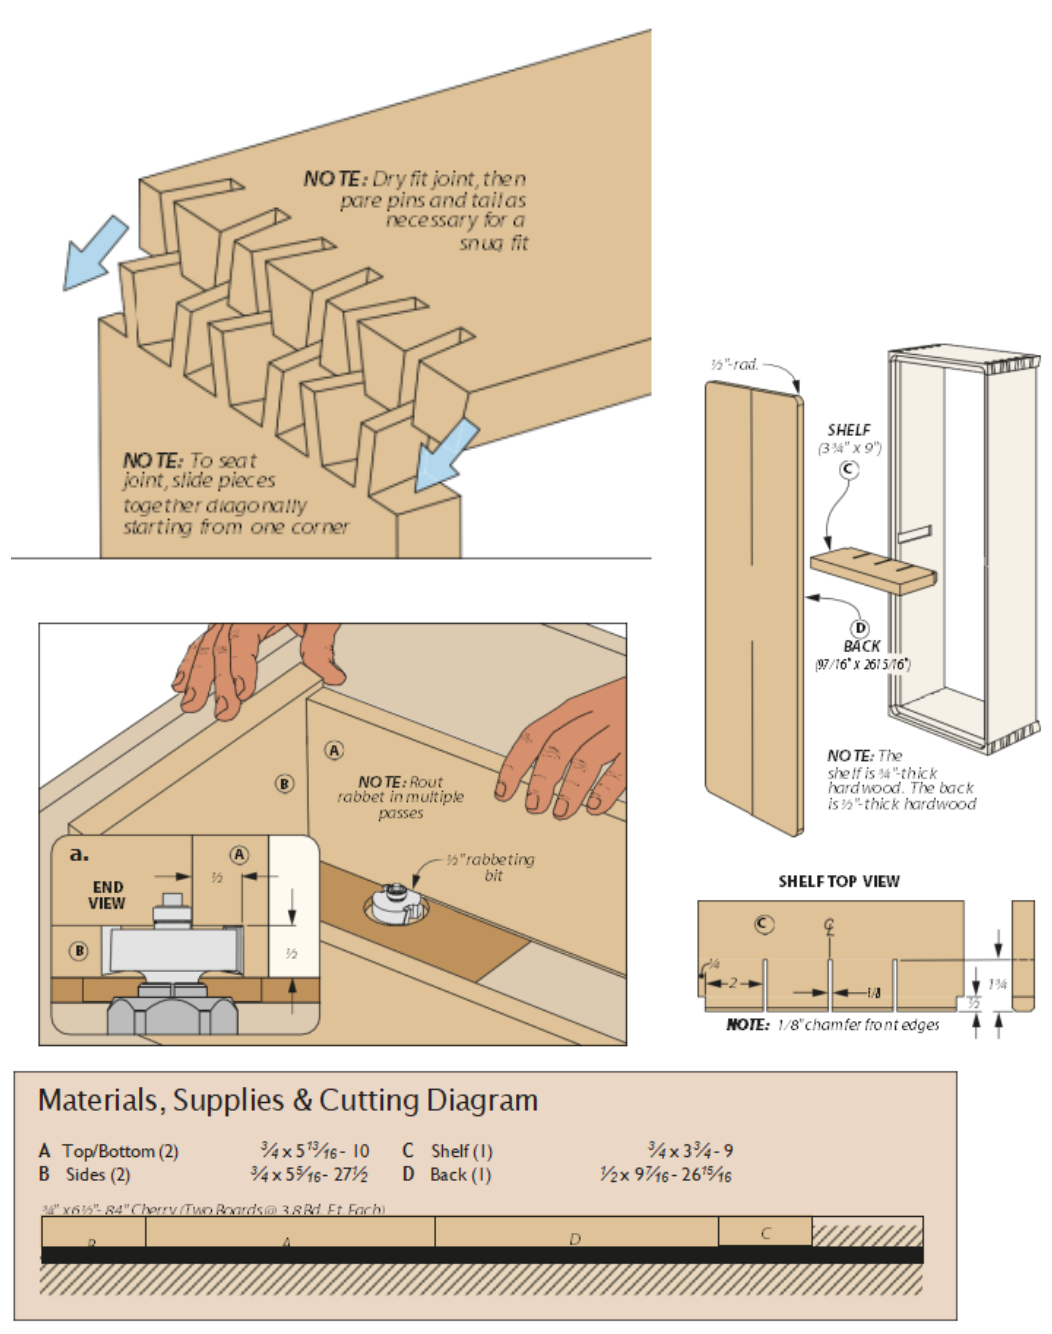
The final step before putting the case together is to ensure you’ve got a well-fit joint on each corner. You can see how these joints come together, but there’s a chance that they won’t fit quite that nicely on the first try.
In that case, use a pencil to shade over high spots and pare them down. Take your time. Once the joints slide together about halfway, you should be ready to apply the glue and fully seat them with a mallet.
SHELF & BACK
The twisting dovetails complete the case and certainly give the project its form, but there’s still a matter of function. It is a saw till after all. So, while the glue dries on the case, there are two other pieces to work on.
SAW SHELF.
The first piece on the docket is one you’ve already planed: the shelf. After cutting the shelf to fit between the sides, I took it over to the router table to create the chamfer along the front edges. After that, I headed to the table saw.
Here I set up an auxiliary fence on my miter gauge to back up the shelf while I made my cuts. I began with a dado blade buried in an auxiliary fence, using it to cut the notches on the front corners that wrap around the unslotted fronts of the sides. Next, I moved the fence away and put in a narrow, flat-topped blade. After raising the blade up, I used it to create the saw kerfs.
BACK RABBET.
After the clamps come off the case, you’ll next need to make room for the back panel. A rabbet along the back edge of each case piece does the trick — you can see how I did this at the router table in the illustration below. This is an easy task to accomplish, just remember to turn the case clockwise to avoid backrouting.
BACK PANEL.
Finally, the back panel can be cut to size. The only thing to do on this piece is make those radiused corners. I marked out the radii using a compass, then cut most of the waste at the band saw. I got the final shape at the edge sander. Once the back is complete, the shelf can be glued in and the back can be pin-nailed in place.
To finish the till, I only used a bit of tung oil. This project won’t need that much protection, and the oil alone brings out the grain wonderfully. Now you just need to choose this till’s new home.


