



Woodworker's Glue Brushes & Applicators: What Works Best?
When it comes to assembling a woodworking project, clamps usually get most of the attention. But there's another part of the glue-up process that's just as important: getting the glue where it needs to go.
For years, I've used whatever was handy to spread glue, including my fingers. It works, but it can also get messy in a hurry.
These days, I prefer keeping a few dedicated wood glue brushes and applicators close at hand.
There are more options than you might expect, from inexpensive acid flux brushes to silicone spreaders, specialty glue bottles, and applicators designed for specific woodworking joints.
The good news is that you don't need every gadget on the market. A handful of reliable tools will handle nearly every glue-up you're likely to encounter.
Here's a look at some of my favorites and where they work best.
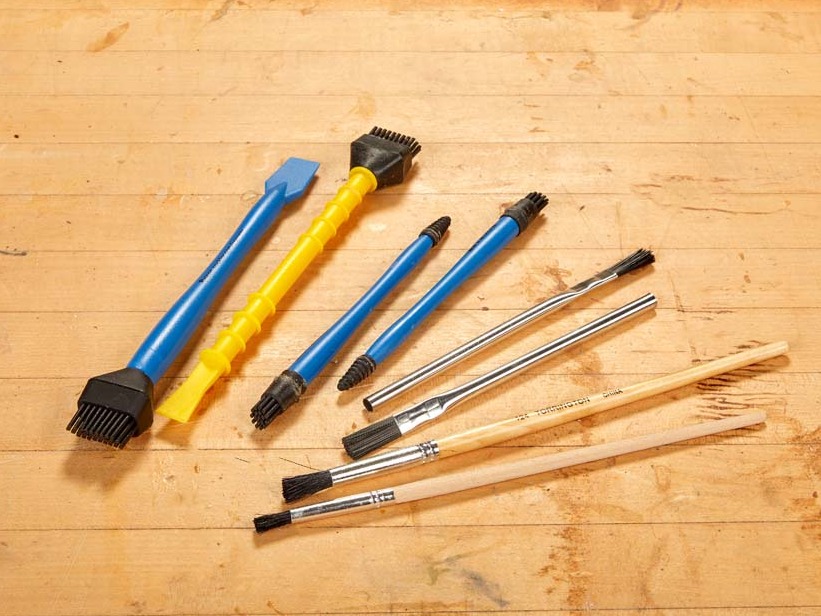
Acid Flux Brushes: An Inexpensive Wood Glue Applicator
When I first started woodworking with my dad, he used acid flux brushes to spread glue.
They're still popular in the Woodsmith shop, and for good reason.
These small, metal-handled brushes are inexpensive, durable, and surprisingly versatile.
They're useful for spreading glue on edge joints, rabbets, and other areas where you want better control than you get from squeezing glue directly out of a bottle.
Trim the Bristles for Better Glue Coverage
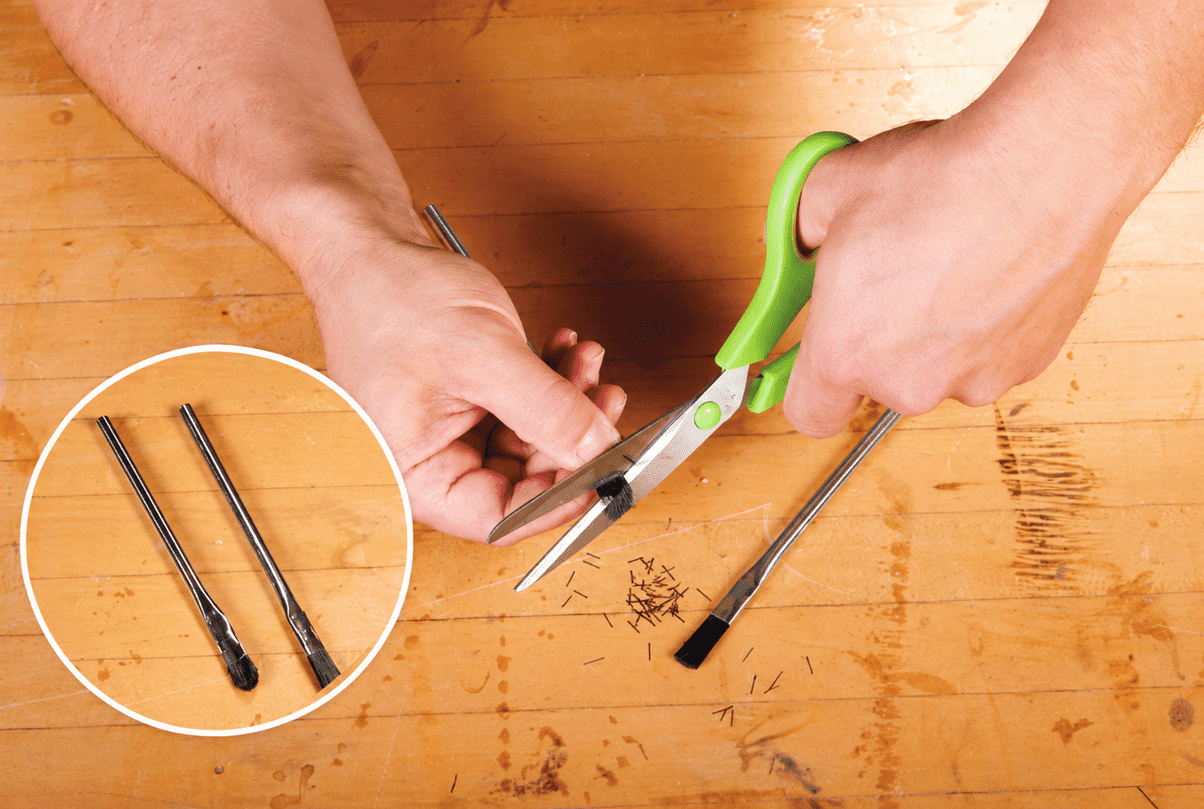
One simple modification makes these brushes work even better.
Start by pinching the bristles to spread them out. Then use scissors to trim the ends into a rounded profile.

The rounded shape makes it easier to distribute glue evenly and reach into confined joinery details.
It's a small improvement, but one that gives you more control over where the glue goes.
Dedicated Wood Glue Brushes for Joinery
Until recently, I didn't even realize that dedicated glue brushes were available.
These look much like small paintbrushes, but their bristles are held in round ferrules rather than the flat ferrules found on acid flux brushes.
Torrington makes a line of these brushes, and I've found two sizes particularly useful.
Small Glue Brushes for Grooves and Dovetails
The smaller Torrington model 122 is handy for applying glue in narrow grooves and between dovetails.

Its round profile allows it to reach into tight spaces where a larger brush would be awkward.
This is especially useful when you need to coat the sides of a joint without leaving a large puddle of glue at the bottom.
Larger Brushes for Edge Joints and Tenons
The larger model 124 is better suited to spreading glue across wider surfaces.
It's a practical choice for edge-gluing boards, coating tenon cheeks, and applying glue to rabbets.
For general furniture assembly, a couple of brushes in different sizes can handle a wide range of tasks.
Silicone Glue Brushes: Easy Cleanup and Broad Coverage
Silicone brushes have become popular woodworking glue applicators in recent years.
They resemble the silicone basting brushes you might find in a kitchen, but they're designed for spreading glue.
The flexible bristles hold a useful amount of glue and work well on larger surfaces.
I particularly like them when applying glue to broad joints where a small brush would take too long.
Are Silicone Glue Brushes Worth It?
One of their biggest advantages is easy cleanup.
With many common woodworking glues, dried glue can be peeled away from the silicone bristles.
However, I wouldn't make a habit of letting glue dry in the brush.
Pulling out a hardened clump can also pull out some of the silicone bristles.
A quick rinse with warm water is still the best approach.
Smaller round silicone brushes are available, too, although I've found that some don't hold much glue and can still be too large for narrow joinery.
A Glue Brush with a Built-In Scraper
One clever option is the Titebrush, which combines a silicone brush with a flat paddle on the opposite end.

The brush spreads glue across the joint, while the paddle can be used to scrape away squeezeout after the clamps are installed.

It's a convenient combination that eliminates the need to reach for a separate scraper.
Glue Rollers for Veneering and Large Panels
Spreading glue across a large surface with a small brush is like mowing the lawn with scissors.
You can do it, but there are better ways.
For large panels, veneer work, or laminating boards into a thick benchtop, I prefer a pour-and-spread approach.

Use a Foam Roller for Even Glue Coverage
Woodsmith shop manager Marc Hopkins uses a simple setup that works particularly well.
He starts with a 4" roller frame and cuts an inexpensive 8" thin foam roller down to size.
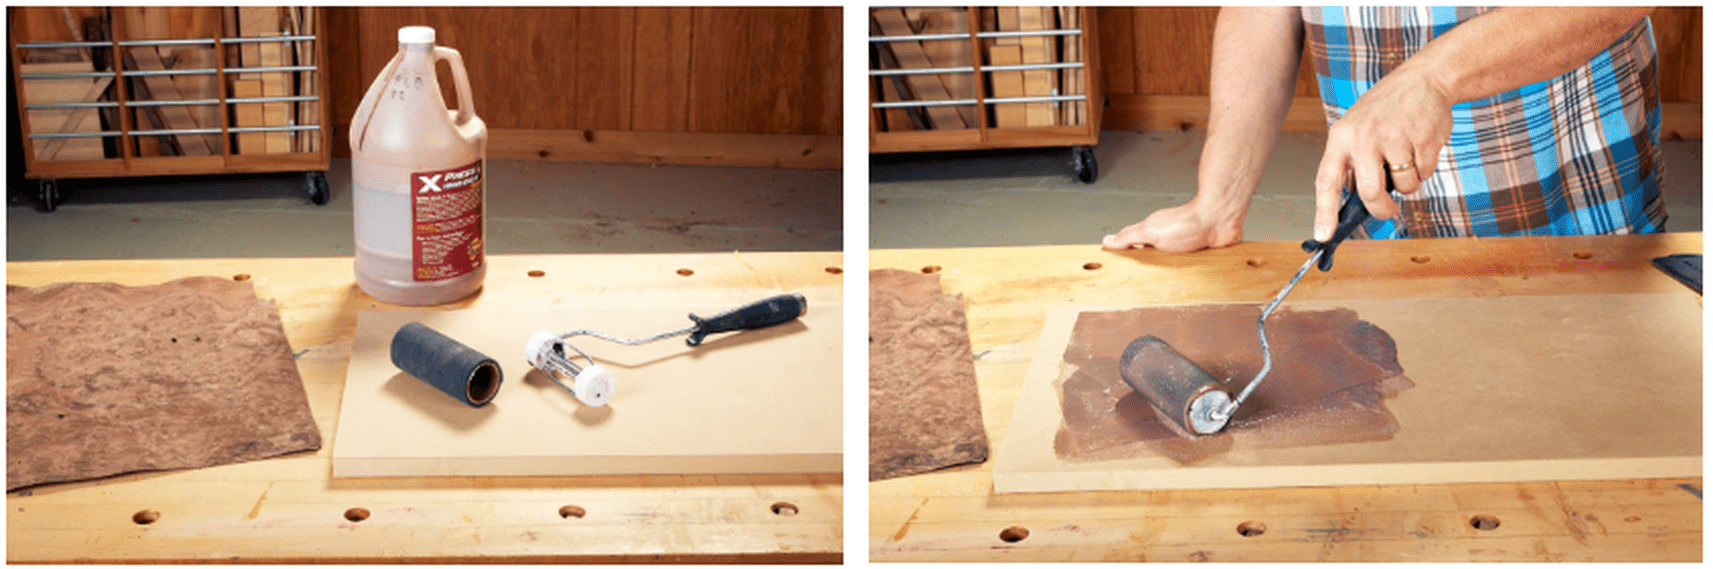
The result is a compact glue roller that quickly spreads adhesive across large surfaces.
It's an inexpensive alternative to some of the specialized glue-spreading tools on the market.
Just be sure the roller material is compatible with the adhesive you're using.
Silicone Glue Spreaders
Another option is a silicone spreader with comb-like teeth.
The flexible teeth distribute glue across the surface, leaving a consistent pattern that makes it easier to judge coverage.
These are useful for laminating panels and certain veneering operations.
Like silicone brushes, the spreaders are easy to clean with warm water, and dried glue can often be removed from the teeth.

Specialty Glue Applicators for Dowels, Biscuits & Loose Tenons
Most common woodworking joints can be handled with a basic glue brush.
But some joinery presents special challenges.
Dowel holes, biscuit slots, and small loose-tenon mortises are good examples.
In these cases, getting glue onto the walls of the joint can be more important than simply squeezing glue into the opening.
Glue Applicators for Dowel Holes
A small round silicone applicator with a tip resembling a cotton swab can help spread glue along the walls of a dowel hole.
This is useful because simply squeezing glue into a hole may leave too much adhesive pooled at the bottom.
The goal is to distribute glue over the mating surfaces without applying so much that the joint becomes difficult to assemble.
Biscuit Joinery Glue Spreaders
For biscuit joinery, specialized applicators are available that fit into the narrow slots cut by a biscuit joiner.
One design has a duckbill-shaped head with a textured surface that helps distribute glue around the slot.
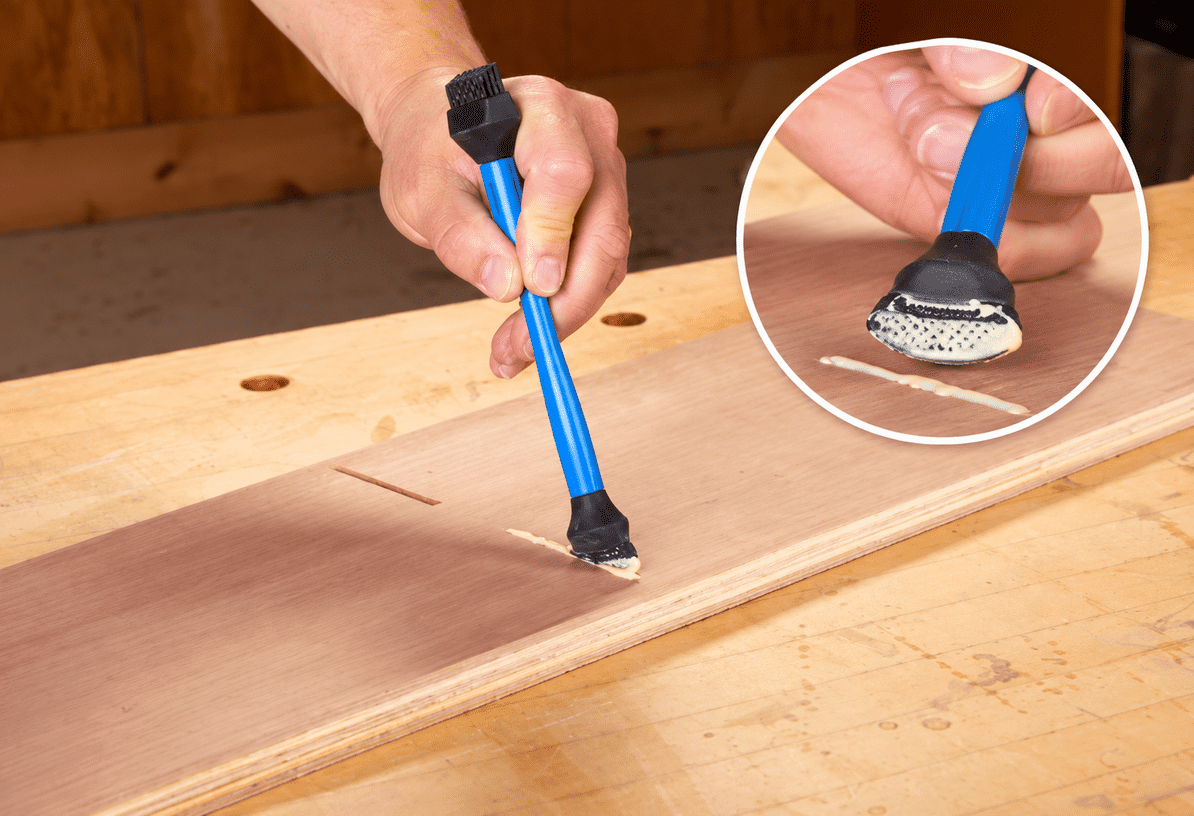
As someone who enjoys biscuit joinery, I find this one especially tempting.
Similar applicators are available for loose-tenon joinery, including mortises cut for Domino-style tenons.
Wood Glue Bottles and Specialty Nozzles
Sometimes the problem isn't spreading the glue. It's getting the right amount out of the bottle.
A clogged nozzle, oversized opening, or awkward bottle can make a simple glue-up unnecessarily messy.
Fortunately, there are several easy ways to improve glue dispensing.
Specialty Glue Bottle Nozzles
Some glue bottle attachments are shaped specifically for certain joints.
For example, narrow nozzles are available that fit into biscuit slots.
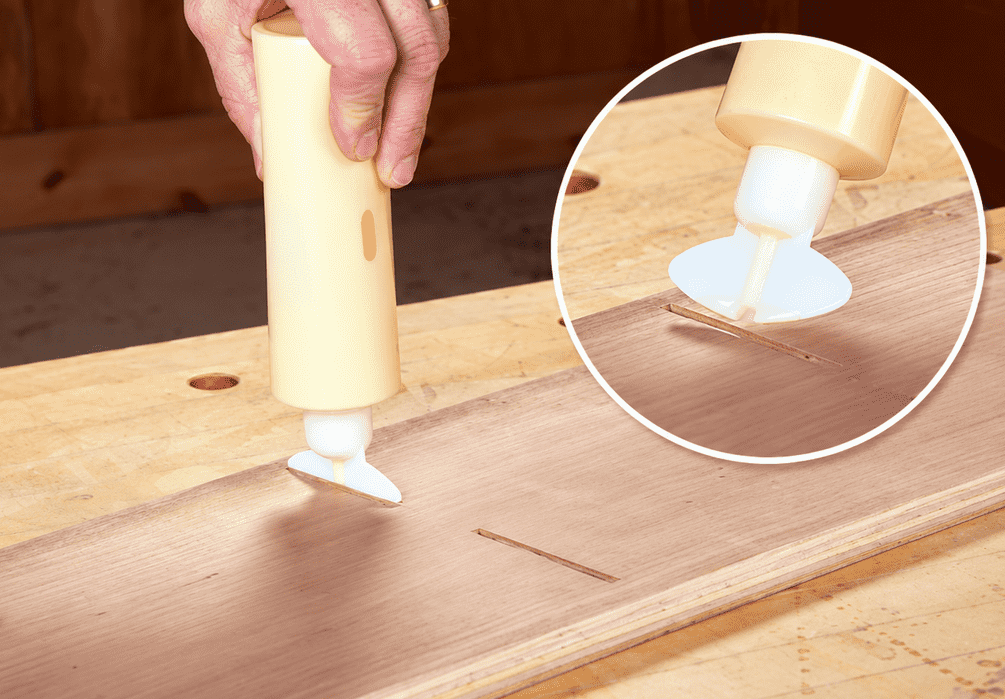
These allow you to dispense glue directly into the joint while limiting how much comes out at once.
Other bottle attachments incorporate rollers for spreading glue across larger surfaces.
Try a Squeeze Bottle with a Narrow Tip
One solution I've adopted is a squeeze bottle with a narrow dispensing tip.

The design gives me better control over how much glue comes out, and the glue can drain back into the bottle when I release the pressure.
Another inexpensive option is a clean condiment bottle.

These often have small nozzles that work well for getting glue into tight spaces.
It's a simple way to improve glue application without purchasing a specialized woodworking accessory.
Glue Cups and Trays Make Assembly Easier
For many glue-ups, I prefer pouring a small amount of glue into a separate container.
That allows me to hold the glue in one hand and a brush in the other.
It also keeps me from repeatedly picking up and setting down a large glue bottle.
I often reuse small, clean plastic snack cups for this purpose.
Silicone glue trays are another option. They're designed to make it easier to remove dried glue after use.

A Simple Trick for Applying Liquid Hide Glue
I often use liquid hide glue for furniture projects.
One reason is its longer working time, which can make complicated assemblies less stressful.
I also like the way its color blends with many wood tones.
The challenge is that liquid hide glue can be fairly thick.
My solution is to warm it gently before applying it.

I place a small plastic cup of glue over a glass filled with hot water.
The warmth helps the glue flow more easily, making it simpler to brush onto the joint surfaces.
Be careful not to overheat the adhesive. Follow the glue manufacturer's temperature recommendations.
How to Clean and Maintain Wood Glue Brushes
Regardless of which applicator you choose, proper cleaning helps it last longer.
It's easy to treat inexpensive brushes as disposable, but I've had glue brushes last for years with a little maintenance.
For common water-based woodworking glues, rinse the brush thoroughly with warm water after each gluing session.
A little dish detergent can help remove stubborn residue.
If your shop doesn't have running water, keep a jar of water nearby so you can soak the brush until you're ready to clean it properly.
For other adhesives, follow the manufacturer's cleaning instructions.
The important thing is to avoid letting glue build up in the bristles.
Put Together a Basic Wood Glue Kit
You don't need a drawer full of specialized glue applicators to handle most woodworking projects.
But having a few essentials ready before starting a glue-up makes the process much easier.

Here's what I keep close at hand:
- Fresh wood glue: Make sure the bottle is ready to use and the nozzle isn't clogged.
- Small glue cup: Holds a convenient amount of glue for brushing.
- Glue brush: Spreads adhesive evenly across joint surfaces.
- Cup of warm water: Provides a quick way to clean up drips and squeezeout.
- Shop rag: Wipes away excess glue and water.
- Old toothbrush: Helps remove glue squeezeout from corners and tight spaces.
The toothbrush is particularly useful for cleaning glue out of inside corners.
A little warm water and gentle scrubbing can remove fresh glue before it becomes a problem.
Follow up with a cloth to absorb the excess moisture.
Choosing the Best Wood Glue Applicator for Your Shop
After trying a variety of glue brushes and applicators, I've found that the simplest tools are often the most useful.
An inexpensive acid flux brush works well for everyday glue-ups.
A small round brush is handy for narrow joinery, while a silicone brush makes spreading glue over larger surfaces easier.
For veneering and laminating panels, a foam roller can save considerable time.
And when you're working with biscuits, dowels, or loose tenons, a specialized applicator may be worth having.
The key is choosing tools that suit the kind of woodworking you do.
You don't need every glue gadget in the catalog. A few reliable brushes, a good dispensing bottle, and some basic cleanup supplies will make most glue-ups easier, cleaner, and more predictable.


