


How to Use a Shooting Board for Perfect-Fitting Joints
Sometimes getting a woodworking joint to fit perfectly comes down to removing just a shaving or two from the end of a board. Whether you're fine-tuning a miter joint, squaring the end of a workpiece, or adjusting the length of a small part, making these tiny cuts at the table saw can be challenging.
That's where a shooting board comes in.
This simple workbench accessory holds a workpiece at a precise angle while guiding a hand plane along its end. With each pass, the plane removes a thin shaving, allowing you to gradually trim the part until it fits exactly as intended.
In this Woodsmith woodworking tip, you'll see how to use an adjustable shooting board to trim miter joints and square-cut parts with accuracy and control.
Want to build your own? Get the step-by-step plans for this adjustable shooting board, including an optional sanding attachment.
GET THE STEP-BY-STEP WOODWORKING PLANS → Build the Shop-Made Shooting Board
What Is a Shooting Board?
A shooting board is a woodworking jig that guides a hand plane while holding a workpiece in a fixed position.
Unlike planing the long edge of a board, where the plane rides directly on the wood, a shooting board supports the plane on its side as it travels along a straight track.
The workpiece rests against a fence that establishes the cutting angle.
As the plane moves forward, its cutting edge removes a thin shaving from the end of the board.
This makes a shooting board especially useful for trimming end grain, correcting slightly out-of-square cuts, and fine-tuning miter joints.
Rather than trying to remove a tiny amount of material with a power saw, you can make controlled adjustments one shaving at a time.
Why Use a Shooting Board for Woodworking?
A shooting board is one of those simple shop accessories that becomes more useful the longer you have it.
It's particularly handy when a workpiece is already close to its final dimensions but needs a little adjustment.
For example, you might cut a miter at the table saw only to discover that the joint doesn't close perfectly.
Instead of returning to the saw and trying to remove a tiny amount of material, you can bring the part to your workbench and make a few passes with a hand plane.
The shooting board provides a consistent reference, allowing you to make small, repeatable adjustments.
It's also useful for trimming square ends on small parts, fitting components between fixed openings, and improving the accuracy of joinery.
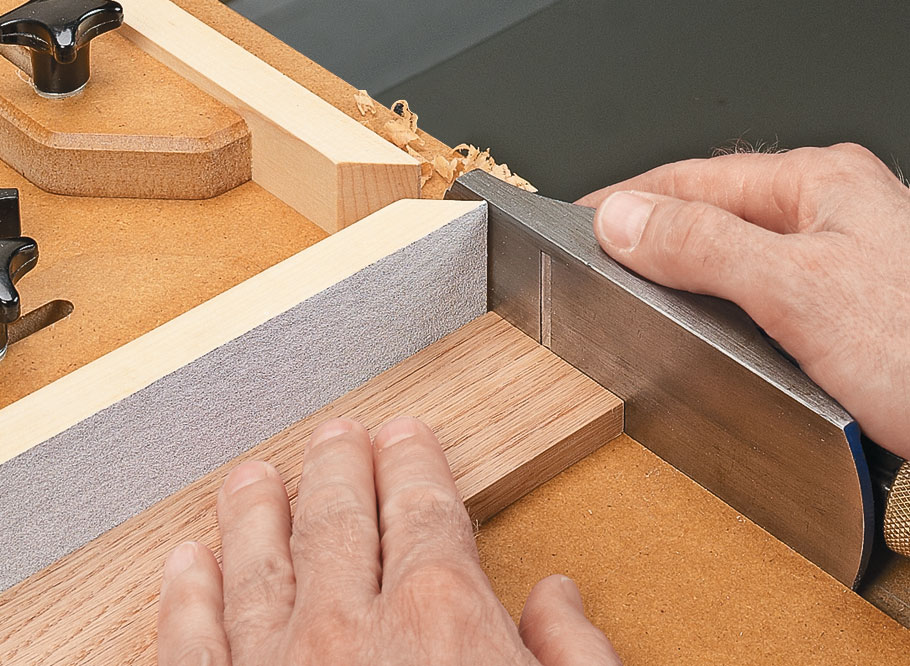
An Adjustable Shooting Board for Miters and Square Cuts
Most basic shooting boards have a fixed fence set at 90° to the plane's travel.
That's useful for squaring the ends of boards, but this shop-made version offers more versatility.
Its adjustable fence system allows you to position the workpiece for 45° miters, 90° square cuts, and angles in between.
The fence can be locked in position, giving you a stable reference for trimming the workpiece.
Guided Track for the Hand Plane
The base includes a track along its front edge that guides the hand plane.
A rabbet cut along the track provides a reference surface for the plane as it moves forward.
This helps maintain a straight, consistent cutting path.
Because the plane follows the same track with every pass, you can concentrate on holding the workpiece firmly against the fence and controlling the cut.
Adjustable Fence for Accurate Angles
The adjustable fence is the feature that makes this shooting board particularly useful.
You can set it for a 45° miter, reposition it for a square cut, or adjust it for another angle.
The movable fences also provide backing support for the workpiece, helping reduce tear-out as the plane exits the cut.
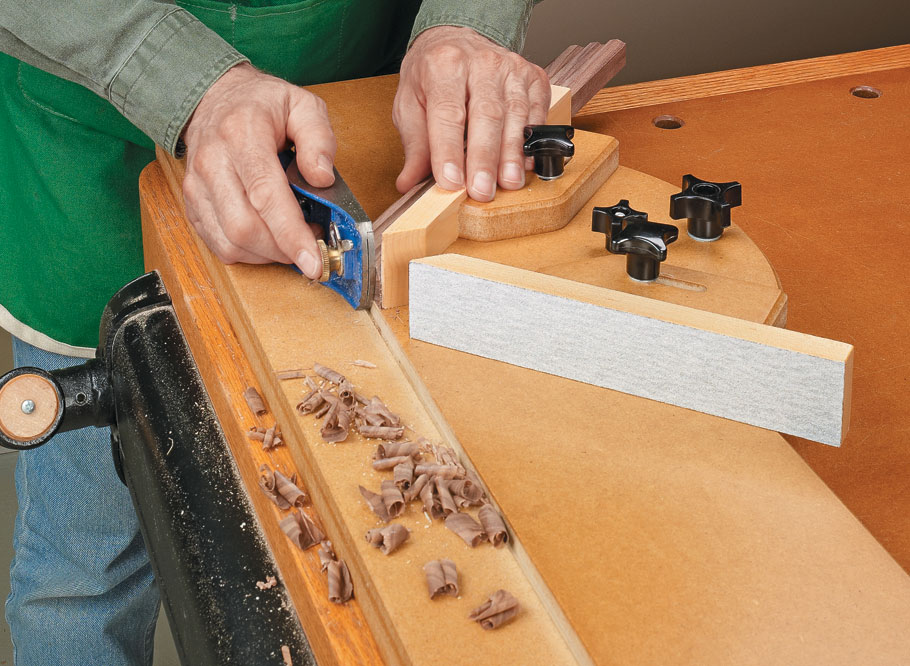
How to Use a Shooting Board to Trim Miter Joints
One of the most useful applications for a shooting board is fine-tuning a miter joint.
A miter that is slightly too long or just a little out of alignment can leave a visible gap when the pieces come together.
Here's how to use a shooting board to improve the fit.
Step 1: Set the Fence to 45°
Start by adjusting the shooting board fence to the required miter angle.
Make sure the fence is securely locked in position.
For accurate results, verify the angle with a reliable square or other layout tool before trimming your workpiece.
Step 2: Position the Workpiece
Place the mitered workpiece on the shooting board and hold it firmly against the fence.
Position the end of the board so the hand plane will remove only a small amount of material.
The goal isn't to make a heavy cut. It's to remove just enough wood to improve the fit.
Step 3: Make a Light Pass with the Hand Plane
Set the hand plane for a fine shaving.
Lay the plane on its side in the guided track, with the sole held firmly against the shooting board's reference surface.
Move the plane smoothly forward to trim the end of the workpiece.
The guided track helps keep the plane moving straight while the fence maintains the cutting angle.
A sharp blade and a light cut will help produce a clean surface, even when planing end grain.
Step 4: Check the Fit
After making a pass, remove the workpiece and check the miter joint.
If the fit still needs improvement, return the piece to the shooting board and make another light pass.
Continue checking and trimming until the joint closes properly.
The key is to remove material gradually. It's much easier to take another shaving than to correct a workpiece that's been trimmed too short.
How to Square the End of a Board with a Shooting Board
A shooting board isn't limited to miter joints.
By adjusting the fence to 90°, you can use the same jig to square the end of a workpiece.
This is particularly useful for small parts that are difficult to trim accurately at the table saw.
Position the board against the fence and make a light pass with the hand plane.
Check the end with a square, then make additional passes if necessary.
Because the shooting board supports the workpiece and guides the plane, you can remove very small amounts of material while maintaining a consistent angle.
This makes it a handy tool for fitting cabinet parts, box components, and other pieces that require accurate lengths and square ends.
Tips for Getting Better Results with a Shooting Board
A shooting board is simple to use, but a few details can make a noticeable difference in the quality of your cuts.
Use a sharp hand plane. End grain can be difficult to plane cleanly with a dull blade. A sharp cutting edge makes it easier to take thin, controlled shavings.
Set the plane for a light cut. Removing too much material at once increases resistance and makes it harder to fine-tune the fit.
Keep the workpiece firmly against the fence. Any movement during the cut can affect the angle and accuracy.
Support the exit edge. A properly positioned backing fence helps prevent tear-out as the plane completes the cut.
Check your progress frequently. Make one or two passes, then test the fit before removing more material.
Keep the plane registered against the track. Consistent contact with the shooting board's guide surface helps produce repeatable results.
These habits are especially important when trimming miters and other joints where even a small gap can be noticeable.
Build Your Own Adjustable Shooting Board
The shooting board featured in this Woodsmith tip is designed to provide more flexibility than a basic fixed-fence version.
The shop-made design features a two-layer MDF base with a cleat that allows you to secure the jig in a workbench vise.
Adjustable fences accommodate 45° miters, square cuts, and angles in between.
The guided rabbet track keeps the hand plane moving along a consistent path, while the movable fences provide support for the workpiece.
There's even an optional sanding attachment that slides along the base like a hand plane.
This gives you another way to fine-tune joints or smooth a surface using the same basic jig.

Get the Shop-Made Shooting Board Plans
Want to add this versatile jig to your workbench?
The Shop-Made Shooting Board woodworking plan includes step-by-step instructions for building the adjustable base, fence system, and optional sanding plane.

It's a practical shop project that can help improve the accuracy of many future woodworking projects.
GET THE PLANS → Build the Shop-Made Shooting Board from WoodsmithPlans.com
Fine-Tune Your Woodworking Joints with a Shooting Board
A shooting board is a simple solution to a common woodworking problem: removing just a little material to get a better fit.
Whether you're trimming a miter, squaring the end of a board, or adjusting the length of a small part, the combination of a guided hand plane and an accurate fence gives you precise control over the cut.
And with an adjustable design like this one, a single shooting board can handle a variety of angles and joinery tasks.
It's a useful addition to any workbench and a great way to get more accurate results from your hand tools.


