Shellac has a lot going for it as a woodworking finish. It dries quickly, builds a smooth film in multiple thin coats, and doesn't require complicated application equipment.
One of the easiest ways to apply it is with a soft cloth pad rather than a brush. The technique, appropriately called padding, allows you to wipe on thin coats in quick succession.
For an even richer and more durable finish, we like to use padded shellac as the middle step in a three-part finishing schedule. A light application of boiled linseed oil first warms up the wood. Several thin coats of shellac quickly build a smooth film. Finally, wiping varnish adds a more durable protective topcoat.

Start with a Light Coat of Boiled Linseed Oil
Before applying the shellac, wipe on a very light coat of boiled linseed oil.
Don't flood the surface. Apply only enough oil to darken the wood and enhance the grain, making sure you cover the edges and corners as well.
Then thoroughly wipe away any excess.

The purpose of this coat isn't to build an oil finish. Instead, the linseed oil acts as a toner that adds warmth and depth before the film finish goes on.
Allow the oil to dry for about 30 minutes before moving on to the shellac.
Woodsmith Tip: Less Oil Is Better. A light application is all that's needed. Leaving excess linseed oil on the surface can interfere with the finishing schedule. Wipe the wood thoroughly after applying it.
Thin the Shellac for Padding
For padding, a thinner shellac is easier to wipe across the surface and lays out more smoothly than a heavier mixture.
We use a 3-lb.-cut shellac diluted one-to-one with denatured alcohol. This produces a thin, fluid mixture that's well suited to applying multiple wipe-on coats.
Because shellac dries so quickly, you can build a film much faster than you could with multiple coats of varnish.
But before combining shellac with another topcoat, there's one important consideration.
Use Dewaxed Shellac Under Varnish or Polyurethane
Shellac naturally contains wax, and that wax can sometimes create adhesion or drying problems when another finish is applied over it.
If you're planning to topcoat shellac with varnish or polyurethane, dewaxed shellac is the safer choice.
One way to remove the wax is to pour the shellac into a jar and allow it to sit undisturbed for several days. The wax settles toward the bottom, allowing the clearer shellac above it to be carefully poured off.
Using dewaxed shellac eliminates a potential compatibility problem between the shellac and the protective topcoat.
Woodsmith Tip: Test Your Finish First. Whenever you're combining different finishing products, make a complete sample on project scrap before finishing the actual project. It's an easy way to check the color, sheen, and compatibility of the entire finishing schedule.
Make a Simple Shellac Pad
You don't need a special applicator to pad shellac.
Start with a piece of soft, lint-free cloth. Fold the edges inward to create a flat pad roughly 2" square.
Dip the pad into the thinned shellac until it's saturated.
The goal isn't to scrub shellac into the surface. Instead, think of the pad as a soft substitute for a brush.
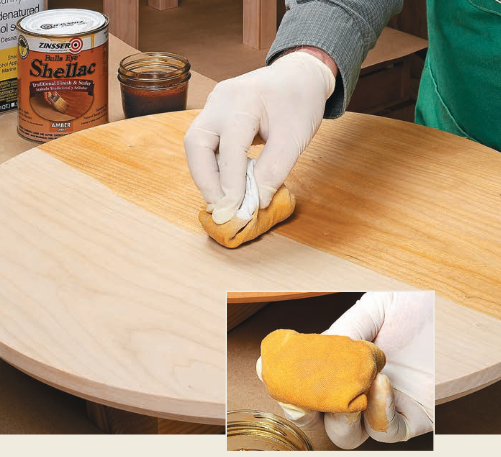
How to Apply Shellac with a Pad
Wipe the pad across the wood using long, smooth strokes. Slightly overlap each stroke until the entire surface is covered.
The thin shellac should flow out smoothly, so there's no need to spend a lot of time working each coat.
And since you'll be applying several coats, don't worry about making the first application perfect.
One of the biggest advantages of shellac is its speed. Often, by the time you've completed one coat, you can begin applying another.
Continue adding thin coats until you start to see a smooth, glossy film develop.
Build the Shellac in Stages
Rather than trying to build the entire finish at once, apply the shellac in groups of coats. Start with about three thin coats and then allow the shellac to cure for roughly an hour.
There's no need to sand between these initial coats.
After the first group has cured, apply several more thin coats using the same padding technique. Then allow the shellac to cure again.
At this point, lightly sand the surface with 320-grit or finer sandpaper. You're not trying to remove the shellac you've just applied. The goal is simply to level minor imperfections and prepare the surface for the protective topcoat.
Woodsmith Tip: Watch the Clock — and the Finish. Shellac dries quickly, but temperature, humidity, application thickness, and the product you're using all affect drying time. Let the condition of the surface and the manufacturer's recommendations guide you before sanding or applying another finish.
Add a Wiping Varnish Topcoat
Shellac creates a beautiful surface quickly, but adding varnish gives the project another layer of protection.
A fast-drying varnish thinned to a wiping consistency makes the final application straightforward. For this finishing schedule, mix the varnish with an equal volume of mineral spirits. Satin or semi-gloss varnish works especially well when you want a consistent final sheen.
Fold another soft cloth into a pad and wipe on a light, wet coat.
Unlike the quick shellac applications, take a little more care with the varnish. You can work it briefly to even out the coverage, then leave it alone and allow it to dry.
For additional protection, lightly sand after the first coat has dried sufficiently and apply a second coat.
Follow the manufacturer's recommendations for thinning, drying, and recoating the particular varnish you're using.
Rub Out the Final Finish
Once the final varnish coat has cured overnight, you can refine the surface and even out the sheen.
Lightly buff the finish with #0000 steel wool.
This final step knocks down minor surface imperfections and leaves the project with a smooth, consistent appearance.
Three Steps to a Smooth, Durable Finish
The entire process can be boiled down to three basic stages.

1. Add Warmth with Linseed Oil
Apply boiled linseed oil sparingly and wipe away the excess. This brings warmth and depth to the wood without building a heavy oil finish.

2. Build the Film with Shellac
Pad on multiple thin coats of shellac. Its fast drying time allows you to build a smooth film quickly without sanding between every coat.

3. Protect It with Varnish
Finish with one or two thin coats of wiping varnish. This adds durability and protection over the shellac while maintaining the smooth surface you've already created.
Want the Complete Three-Step Finish Recipe?
Padding shellac is only one part of this finishing schedule. See how boiled linseed oil, shellac, and wiping varnish work together to add color, quickly build a smooth film, and protect the finished project.
SEE THE 3-STEP FINISH → A Fast & Durable Three-Step Wood Finish
Which Wood Finish Should You Use?
Oil, shellac, varnish, polyurethane, and other finishes each have advantages. The right choice depends on the project, the appearance you want, and how much protection the surface needs.
Our complete guide explains the options and helps you choose the right finish for your next woodworking project.
EXPLORE WOOD FINISH OPTIONS → Best Wood Finish: How to Choose the Right Finish for Any Project