


Plywood is one of the most useful materials in a woodworking shop. It's stable, economical, and makes building cabinets, shop projects, and other large assemblies relatively quick.
There's just one problem: a full sheet is big, heavy, and awkward to handle.
That can make something as simple as laying out and cutting a straight line more challenging than it needs to be.
The solution isn't wrestling a full sheet through every operation. Instead, use a few simple techniques to make handling, measuring, cutting, and assembling plywood more manageable while maintaining accuracy.

Start by Making Plywood Easier to Handle
Before worrying about precise cuts, you have to get the plywood into the shop.
A simple shop-made plywood carrier makes moving a full sheet much easier, especially when you're working alone. It gives you a comfortable handhold while supporting the bottom edge of the sheet.

Once the sheet is where you need it, accuracy starts with careful layout.
How to Lay Out Plywood Accurately
Accurate plywood parts start with straight, reliable layout lines.
The larger the workpiece, the more important your layout tools become. A small error that doesn't seem significant at one end of a sheet can become much more noticeable across several feet.

Make Multiple Reference Marks
For quick cuts, measure from the plywood edge and make multiple marks along the sheet.
Then align a straightedge with the marks and draw your cut line.
This works well as long as your straightedge is long enough to span the required distance. Continually moving a short straightedge and connecting several lines introduces another opportunity for error.
Use a Long Layout Rule
For full sheets, a quality long steel or aluminum rule makes layout easier. The important thing is that the rule itself is straight and rigid. A flimsy straightedge can flex while you're marking the sheet.
A long rule also lets you establish a continuous layout line instead of connecting several shorter lines. Some versions include a hook or stop that registers against the plywood edge, making repeated measurements easier.
Use a Square Large Enough for Sheet Goods
A combination square is indispensable around the shop, but its short blade isn't ideal for laying out large plywood parts.
A larger square lets you establish a reliable 90° line across a wider section of the sheet. And don't automatically assume the factory edge and corner are perfectly square. Check them before using them as references for the rest of your layout.
Woodsmith Tip: Establish a Reference Edge. Once you've identified a straight, reliable edge, use it consistently as your reference for subsequent measurements. This reduces the chance of small layout errors accumulating across a panel.
RELATED ARTICLE: 7 Essential Woodworking Layout Tools for Accurate Projects
How to Cut Plywood Accurately
Once the layout is complete, you need to turn those lines into straight, square parts. Two approaches work especially well:
- A table saw is fast and accurate for manageable panels.
- A track saw or guided circular saw makes breaking down full sheets much easier.
The best method depends largely on the size of the plywood you're handling.
Cutting Plywood on the Table Saw
When a plywood panel is small enough to control safely, the table saw is a quick way to bring it to final size. The challenge isn't necessarily making the cut. It's supporting the panel throughout the cut.
A large piece needs support before it reaches the blade, while it's being cut, and as it leaves the saw. Without that support, the weight of the plywood can make the sheet difficult to control.

Add Outfeed Support
A dedicated outfeed table is ideal, but you don't necessarily need one.
A nearby workbench can serve the same purpose. If the bench is lower than the table saw, place spacer blocks on top to bring the support surface to the correct height.
The goal is to prevent the plywood from dropping as it leaves the saw.
Don't Forget the Infeed Side
Large panels can also benefit from support before the cut begins.
A router table or another suitable shop surface can help support the plywood while you get into position.
The important part is maintaining stable control of the sheet without putting yourself in an awkward position around the saw.
Breaking Down Full Sheets with a Track Saw
For a full 4x8 sheet, it's often easier to bring the saw to the plywood instead of bringing the plywood to the saw.
That's where a track saw — or a circular saw paired with a straight cutting guide — really shines.
Place the plywood on a sacrificial sheet of rigid foam insulation. This supports the entire panel while allowing the saw blade to pass just through the plywood and slightly into the foam.
Align the guide with your layout line, set the cutting depth appropriately, and position the guide so the saw kerf falls on the waste side of the line.
This setup has several advantages. The entire panel stays supported, the offcut doesn't fall at the end of the cut, and you can work at a comfortable height without balancing a large sheet on a machine.
Use Parallel Guides for Repeatable Plywood Cuts
A track makes it easier to cut a straight line, but you still need to position that track accurately.
For repeated cuts, parallel guides can make the process faster and more consistent.

The guides attach to the track and register against the reference edge of the plywood.
Set the guides for the desired width, place the track on the sheet, and slide it into position until the guide stops contact the plywood edge.
This keeps the track parallel to the edge and makes repeated cuts easier to reproduce.
How to Reduce Chipout When Cutting Plywood
Plywood's thin face veneers make it susceptible to splintering along a cut.
A good track-saw setup can produce very clean edges, but if you're using a shop-made circular-saw guide, pay close attention to blade selection, support, and how the cut line is established.
A clean cut is especially important when the plywood edge will remain visible in the finished project.
And whenever possible, break down oversized sheets first and make final dimensioning cuts afterward. Smaller panels are easier to control and give you a better opportunity to make precise final cuts.
Assemble Plywood Projects Accurately
Accurate cutting is only half the job. Perfectly sized panels can still produce an out-of-square cabinet if the assembly shifts during glue-up.
Before applying glue, organize the parts, fasteners, clamps, and assembly aids you'll need.
Then perform a dry assembly. Put the project together without glue and make sure everything fits correctly. Position your clamps and determine the sequence you'll use once the glue is applied.
A few minutes spent rehearsing a complicated assembly can save a lot of scrambling once the glue starts setting.
Choose Glue with Assembly Time in Mind
Large plywood cases may involve several joints that need to be aligned and clamped at once. That means working time matters.
For a complicated assembly, choose an appropriate woodworking glue that provides enough open time to position the components, check the case for square, and install the clamps without rushing.
Simpler assemblies may not require as much working time.
Whatever adhesive you choose, follow its manufacturer's recommendations for application, assembly time, clamping, and curing.
Predrill Screw Holes in Plywood
If the project uses screws, lay out and drill the holes before glue-up whenever possible.
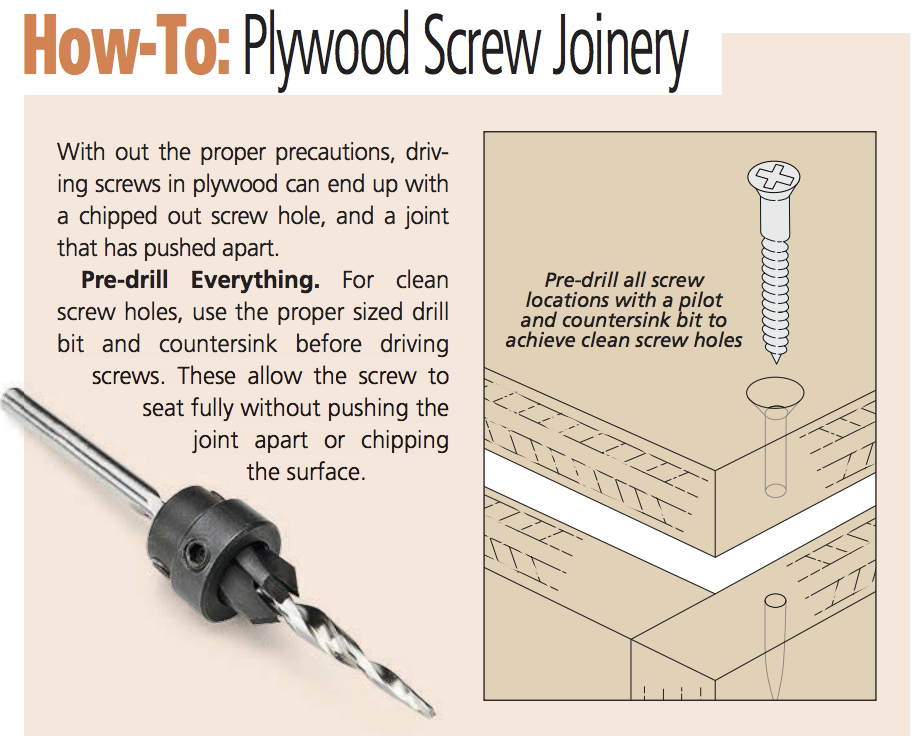
Predrilling gives you better control over screw placement and helps reduce the chance of damaging or splitting the plywood as the fastener is tightened.
It's much easier to handle this operation while the parts are still accessible than after a large case is partially assembled.
Dry-Fit Your Clamps Before Glue-Up
Before reaching for the glue bottle, make sure you have every clamp you'll need.
Set up the project dry and position the clamps just as you plan to use them during the actual glue-up.
This confirms two things: The parts fit correctly, and you have enough clamps to complete the assembly.
Once you're confident in the setup, take it apart, apply the glue, and repeat the sequence. Pasted text
Clamp the Corners Square First
For a cabinet or case, start by establishing square corners. Corner squares or similar assembly aids can hold the adjoining panels at 90° while you add the remaining clamps.

Once the corners are positioned correctly, add clamps along the joints to bring everything snug.
Avoid excessive pressure. The goal is to close and secure the joints, not distort the panels.
If screws are part of the assembly, they can be driven after everything has been aligned and clamped.
Accurate Plywood Projects Start with a Good Process
Working with plywood gets much easier when you stop treating the entire sheet as one oversized workpiece.
Start by making the sheet easier to handle. Establish accurate reference lines. Support large panels properly when using the table saw, or break them down with a track saw or guided circular saw. Then dry-fit the parts and clamps before committing to the glue-up.
The result is plywood parts that are easier to handle, more accurately cut, and simpler to assemble square — exactly what you want when building cabinets, furniture, and shop projects from sheet goods.
Get Better Results from Plywood
Once you have large sheets under control, there's a lot more you can do to improve plywood projects — from cleaner cuts and stronger joinery to edge treatments that make plywood look like solid wood.
SPECIAL THANKS: To WoodPeckers for supplying the tools shown in this article. This article was originally published in the Plywood Shop Projects Book.


