


You don't need a dedicated hollow-chisel mortiser to cut clean, accurate mortises. With a plunge router and a precision mortising jig, you can create straight, smooth, and repeatable mortises for furniture and other woodworking projects.
This shop-built router mortising jig securely holds the workpiece while guiding the plunge router through the cut. Adjustable stops control the length of the mortise, while the movable table lets you position the cut exactly where you need it.
Once the jig is dialed in, you can repeat the same setup across multiple workpieces — a major advantage when building tables, cabinets, frames, and other projects with multiple mortise-and-tenon joints.
GET THE PLANS: ROUTER MORTISING JIG WOODWORKING PLAN
In this video from Woodsmith Shop Episode 1207: Router Joinery, Chris demonstrates how to set up and use the jig, position the workpiece, adjust the stops, and rout clean, consistent mortises with a handheld plunge router.
Why Use a Plunge Router for Cutting Mortises?
A plunge router is well suited for mortising because it gives you precise control over the depth of cut. But there's one challenge: The router needs to be guided accurately.
Trying to guide a handheld router using layout lines alone makes it difficult to keep the sides of a mortise perfectly straight and parallel. And if you're making several matching joints, even small variations in position or length can create problems during assembly.
That's where a plunge router mortising jig makes a big difference.
Instead of relying on your hands to control every part of the cut, the jig controls the router's position and travel. Once everything is adjusted and locked in place, you can concentrate on making smooth, controlled passes.

How the Router Mortising Jig Works
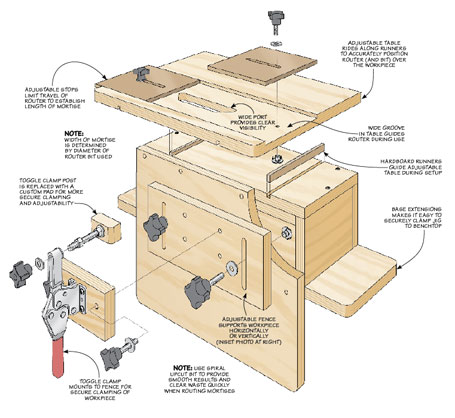
The jig clamps securely to your workbench and holds the workpiece beneath the plunge router.
A toggle clamp makes it quick to secure and release project parts, which is especially helpful when you're cutting the same mortise in several pieces.
The jig also incorporates an adjustable table and stops that control three important parts of the mortise: Location, length, and alignment.
Once those adjustments are made, studded knobs and T-nuts lock the components securely in place.
The result is a setup that turns an ordinary handheld plunge router into a much more controlled mortising tool.
Step 1: Lay Out the Mortise
Start by marking the width and length of the mortise on the workpiece.
Then add a centerline through the mortise.
That centerline is especially important because it provides the reference you'll use to position the workpiece in the jig.
For matching furniture parts, lay out the first workpiece carefully. Once you've used it to establish the jig settings, the remaining pieces may only need a centerline for positioning.
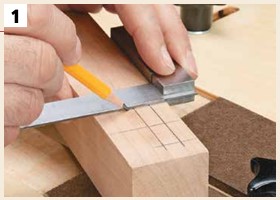
Let the Layout Drive the Setup
The advantage of starting with a complete mortise layout is that you can visually confirm the router bit's position before making a cut.
Mark both ends clearly and extend the centerline far enough that you can still see it after the workpiece is placed in the jig.
These simple reference marks make the remaining setup much easier.
Step 2: Support the Workpiece
Place the workpiece in the mortising jig and adjust the fence so the workpiece butts firmly against the table.
This provides solid support directly below the router and helps keep the workpiece properly positioned while the mortise is being cut.
For thicker workpieces, you can place spacers beneath the fence and clamp block to accommodate the additional thickness.
The goal is to support the workpiece securely while keeping the mortise layout accessible for the next adjustments.
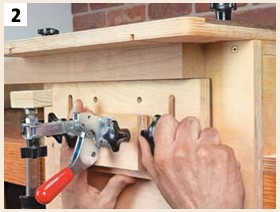
Step 3: Align and Clamp the Workpiece
With the workpiece supported, use the centerline you marked earlier to establish the position of the mortise.
Align the centerline of the mortise with the reference line on the jig's adjustable table.
Once the two reference lines match, secure the workpiece with the toggle clamp.
This is one of the features that makes the precision jig convenient when you're working with multiple project parts. The toggle clamp allows you to secure and release workpieces quickly without changing the rest of the setup.
For repeated mortises, the centerline is all you need to position each new workpiece once the jig has been adjusted.
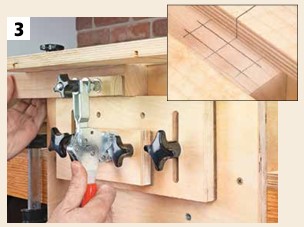
Step 4: Match the Router Bit to the Mortise
Now you can fine-tune the location of the mortise.
Position the plunge router on the jig so the guide bushing sits between the adjustable stops.
Then adjust the jig's table until the router bit lines up with the mortise layout on the workpiece below.
This is where the full layout you made in Step 1 comes in handy. You can visually compare the router bit with the marked mortise and make small adjustments until the two match.
Once you're satisfied with the position, lock the table adjustment in place.
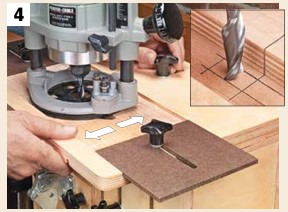
Use a Spiral Upcut Bit
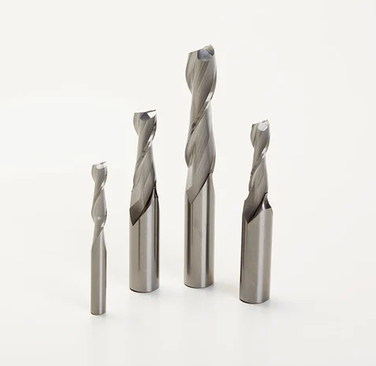
A spiral upcut router bit is a good choice for cutting mortises.
The spiral cutting action produces a clean cut while helping pull chips up and out of the mortise. This becomes increasingly important as the mortise gets deeper.
Choose a router bit that matches the required width of the mortise.
Step 5: Set the Stops and Rout the Mortise
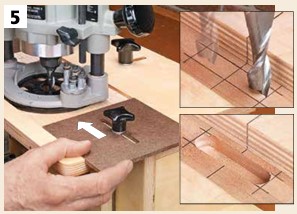
The final setup is establishing the length of the mortise.
Adjust the two stops so the router's guide bushing limits the travel of the router at each end of the mortise.
Use the mortise layout to position each stop accurately, then lock the stops in place.
Now the jig controls both the location and length of the mortise.
Rout the Mortise in Multiple Passes
Don't try to rout a deep mortise in one pass.
Instead, set the plunge router for a shallow initial cut. A series of passes of about 1⁄4" at a time, as shown in the original Woodsmith method, allows the router and bit to remove the waste efficiently.
Start the router, plunge into the workpiece, and move the router between the two stops.
Retract the router, increase the cutting depth, and repeat the process.
Continue making progressively deeper passes until you reach the final mortise depth.
Use the Router's Depth Stop
Set the plunge router's depth stop to establish the final depth of the mortise.
This is especially helpful when making several identical joints. Once the depth stop is set, each mortise can be routed to the same finished depth without measuring every workpiece individually.
Cut Repeatable Mortises for Furniture Projects
The real payoff comes when a project requires more than one mortise.
Once the jig is set for the first cut, leave the stops and table adjustments locked in position.
Release the toggle clamp, insert the next matching workpiece, secure it, and rout the next mortise.
Because you're using the same mechanical setup rather than laying out and guiding every cut independently, it's much easier to produce matching, repeatable mortises.
This makes the jig particularly useful for furniture components such as table legs and aprons, rails and stiles, frames, and other assemblies that rely on multiple mortise-and-tenon joints.
Clean Up the Mortise
A router bit naturally leaves rounded ends on the mortise.
Depending on the type of tenon you're using, you have two options. You can round the edges of the tenon to match the routed mortise, or square the ends of the mortise with a sharp chisel.
If you're making a traditional square-shouldered mortise and tenon, only a small amount of chisel work should be necessary.
The router has already established the straight sides, consistent width, and depth of the mortise.
Router Mortising Jig vs. Hollow-Chisel Mortiser
A dedicated hollow-chisel mortising machine is an excellent option for cutting square mortises, but not every woodworking shop has room or budget for another stationary machine.
If you already own a plunge router, a router mortising jig offers another way to make accurate mortise-and-tenon joints using a tool you already have.
A router also leaves exceptionally smooth mortise walls, and the adjustable jig makes repeated cuts much easier.
The tradeoff is that routed mortises have rounded ends. If your joinery requires square corners, you'll need to square them with a chisel or shape the tenon to match.
Neither method is necessary for every project, but a router jig can be a particularly useful option for a small shop or any woodworker who already relies heavily on a plunge router.
Build the Woodsmith Router Mortising Jig
The biggest advantage of this jig is that it takes much of the guesswork out of router-cut mortises.
Instead of trying to balance and guide a plunge router directly on a narrow furniture part, the jig provides a stable routing setup, securely holds the workpiece, and lets you mechanically control the mortise dimensions.
Once it's adjusted, you can quickly move from one workpiece to the next while maintaining the same setup.
That makes this plunge router mortising jig useful for everything from a single furniture joint to a project requiring dozens of matching mortises.
GET THE STEP-BY-STEP PLANS FOR ROUTER MORTISING JIG FROM WOODSMITHPLANS.COM.


