A good pair of sawhorses is one of the most useful additions to any woodworking shop. They're handy for supporting lumber, setting up a temporary work surface, or tackling projects around the house. And when space is limited, a lightweight set that folds flat for storage is even better.
Recently, I needed to replace some old, badly damaged sawhorses in my shop. Rather than build another heavy-duty set, I wanted a simple, portable design that would be easy to carry and store. My goal was to build each sawhorse using just one 8'-long piece of 1x4 stock and a small piece of 1/4" plywood.
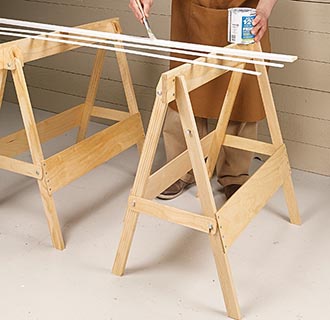
The result is this inexpensive DIY folding sawhorse. It's sturdy enough for light-duty shop tasks, and the legs fold neatly against the top beam when it's time to put it away. The design was so economical that I decided to make several.
How to Build the Folding Sawhorse
The construction is straightforward, but there are a few details worth paying attention to. In particular, the opposing legs have different profiles, and the braces serve as locks in both the open and folded positions.

Cut the Top Beam and Legs
Start by cutting the top beam to length from the 1x4 stock. Lay out and predrill the holes for the legs and mounting brackets while the beam is still easy to handle.
Next, rip the remaining 1x4 stock to make the legs and brackets. As shown in the construction drawing below, the legs on opposite sides of the top beam are different lengths and have different profiles at their upper ends. Be sure to label each leg as you cut it so the parts are installed on the correct sides of the sawhorse.
Add the Plywood Stretchers and Locking Braces
To stiffen the leg assemblies, screw a 1/4" plywood stretcher to each side. These stretchers help keep the legs aligned and add rigidity to the lightweight construction.
Next, attach the braces to the legs. One end of each brace has a notch that fits over the shank of a hex bolt in the opposing leg. When the sawhorse is set up, the braces engage these bolts to lock the legs in the open position.
A second hex bolt, positioned farther up the leg, provides a place for the brace to engage when the sawhorse is folded. This keeps the legs secured for storage or transport.

Assemble the Folding Legs
Cut the mounting brackets to size and attach them to the top beam along with the leg assemblies. Carriage bolts and lock nuts form the pivot points, allowing the legs to swing between their open and folded positions.
Adjust the lock nuts so the legs pivot freely without excessive side-to-side movement. Then check that the braces engage their bolts properly in both positions.
Construction details for the folding sawhorse, including legs, braces, and pivot hardware
Follow the original construction drawing for the leg profiles, hole locations, and hardware placement.

Folding the Sawhorses for Storage
One of my favorite features of this design is how little space it takes up when it's not in use. Simply disengage the braces from their open-position bolts, fold the legs against the top beam, and hook the braces onto the upper bolts to hold everything closed.
Folding sawhorse with its legs secured in the closed position
The folded sawhorses are easy to carry to another room or load into a vehicle for a project away from the shop. They can also be tucked against a wall or stored on a shelf until they're needed again.
For a small workshop, it's hard to beat a useful project that requires so little material and takes up so little storage space.