


3 DIY Saw Blade Storage Solutions for Your Workshop
A good table saw blade is an investment, and proper storage is one of the easiest ways to protect it. Leaving blades stacked in a drawer or leaning against one another can damage the carbide teeth, making them less effective and potentially requiring sharpening or replacement.
Fortunately, organizing your saw blades doesn't require an elaborate cabinet or expensive accessories.
These three DIY saw blade storage solutions are easy to build using plywood, hardboard, and common shop hardware. Each offers a different approach to keeping blades protected, organized, and within easy reach.
We'll look at a compact cabinet with individual pull-out trays, a convenient pegboard organizer that mounts beneath your table saw, and a wall-mounted rack with angled slots.
The video below demonstrates how to build the cabinet and wall rack. We'll also cover the construction details and a third pegboard storage option you can add to your shop.
1. Pull-Out Table Saw Blade Storage Cabinet
If you have several table saw blades and want to store them in a small space, a cabinet with individual pull-out trays is an excellent solution.
Each blade rests in a recessed hardboard tray that keeps the carbide teeth separated from other blades and surrounding surfaces.

The cabinet is essentially an open-front plywood box with grooves in its sides to support the sliding trays.
The version shown here holds six blades, but you can adjust the height to accommodate more or fewer.
Build the Plywood Storage Cabinet
Start by determining how many blades you want to store.
Allow approximately 1" of cabinet height for each blade, plus an additional 1-1/2" for joinery and spacing.
For example, a cabinet designed for six blades will be approximately 7-1/2" tall.
Cut the cabinet sides, top, and bottom from plywood.
Next, cut a series of 1/2"-wide dadoes spaced 1/2" apart in the inside faces of the cabinet sides. These grooves form the tracks for the individual trays.
Make sure the dadoes on the two sides align so the trays slide smoothly.
Cut rabbets at the ends of the sides to accept the top and bottom panels.
Finally, cut rabbets along the rear edges of the cabinet parts to receive the hardboard back.

Assemble the Cabinet
With the joinery complete, apply glue to the rabbets and assemble the plywood box.
Secure the joints with screws, checking that the cabinet remains square.
Install the hardboard back in the rear rabbets.
Once the glue dries, you're ready to make the pull-out trays.
Make the Protective Hardboard Trays
Each blade tray is made from two layers of 1/4"-thick hardboard.
The bottom layer supports the blade, while the upper layer has a circular opening that keeps the blade teeth recessed and protected.
The easiest way to cut the circular opening is with a handheld router and a simple trammel or circle-cutting jig.
Make the opening slightly larger than the saw blade's diameter. This provides clearance around the teeth and makes the blade easier to remove.
A small trim router works well for this operation.
To protect your workbench and keep the material from shifting during the cut, place the hardboard on a piece of rigid foam insulation. Double-sided tape can help secure the workpiece and the circular waste piece.
Once the opening is cut, glue the upper layer to the solid bottom layer.
You can also customize a tray or two for smaller circular saw blades.
Add Finger Holes and Blade Access
After the glue dries, drill a 1"-diameter hole through the center of the bottom layer.
This opening lets you push up on the blade from underneath to lift it out of the tray.
Then drill two 3/4"-diameter finger holes near the front edge of each tray.
These holes provide a convenient grip for sliding the trays in and out of the cabinet.
With the trays complete, slide them into the dadoes and load your blades.
The result is a compact storage cabinet that protects each blade individually while making it easy to find the one you need.
2. Pegboard Saw Blade Storage Under Your Table Saw
If you prefer keeping your most frequently used blades close to the table saw, a simple pegboard organizer is hard to beat.
This design takes advantage of the unused space beneath the extension wing of a table saw.

The storage panel is made from a piece of 1/4"-thick pegboard attached using the same bolts that secure the extension wing to the saw table.
This provides a convenient place to store several blades without taking up additional wall or cabinet space.
Install the Pegboard Panel
Start by measuring the available space beneath the table saw extension wing.
Cut the pegboard to fit, allowing clearance for the saw's controls, mechanisms, and other components.
The original design uses the existing extension-wing mounting bolts to secure the panel.
Before installation, verify that the bolts have sufficient engagement and that the panel won't interfere with the saw's operation. Use suitable mounting hardware for your particular saw.
Hang Blades on Heavy-Duty Hooks
The pegboard has enough room for two groups of blades.
Each group hangs from a heavy-duty plastic hook.
To prevent excessive weight on the hooks, limit each hook to three blades, as in the original design, and verify the hook's rated capacity.
One potential drawback to hanging several blades together is that the carbide teeth can contact one another.
The solution is simple: place a plastic lid or another suitable protective separator between adjacent blades.
This keeps the blades from rubbing together while allowing them to hang in a compact group.
You can also add a separate hook for the table saw's arbor wrench.
It's a convenient way to keep both the blades and the wrench within easy reach whenever you need to change blades.
3. Wall-Mounted Saw Blade Storage Rack
The third option is a simple plywood rack that works like a filing system for saw blades.
Instead of stacking blades together, the rack holds them in individual angled slots.

This arrangement keeps the blades separated, protects the teeth, and makes it easy to identify the blade you want.
The rack is also compact enough to mount on the wall near your table saw.
Build the Plywood Rack
The rack consists of three main pieces: two sides and a back.
When assembled, these pieces form a U-shaped frame.
The angled slots in the sides support the blades.
The most important construction detail is ensuring that the slots on both sides match perfectly.
Lay Out and Cut the Angled Slots
Start by cutting the two side pieces to size.
Use double-sided tape to temporarily fasten the sides together.
Lay out the slot locations on one side piece, then drill a starter hole at the bottom of each slot through both pieces.
This ensures that the ends of the slots will be in exactly the same locations.
Separate the pieces and use a bevel gauge to lay out the angled slot lines.
Cut the slots with a jigsaw or band saw, working carefully to follow the layout lines.
When using the band saw, orient the workpiece so it moves away from the saw's column as you progress through the slots. This gives you more room to maneuver the piece.
Assemble and Mount the Rack
Once the slots are complete, attach the two sides to the back with glue and screws.
Check that the slots align and that each blade fits without binding or contacting adjacent blades.
Mount the completed rack securely to the wall near your table saw, fastening it into wall studs or using appropriate structural anchors.
Now each blade has its own dedicated storage slot.
The angled arrangement makes the blades easy to see and remove while protecting the teeth from unnecessary contact.
Which Saw Blade Storage System Is Best?
Each of these three designs offers a different advantage.
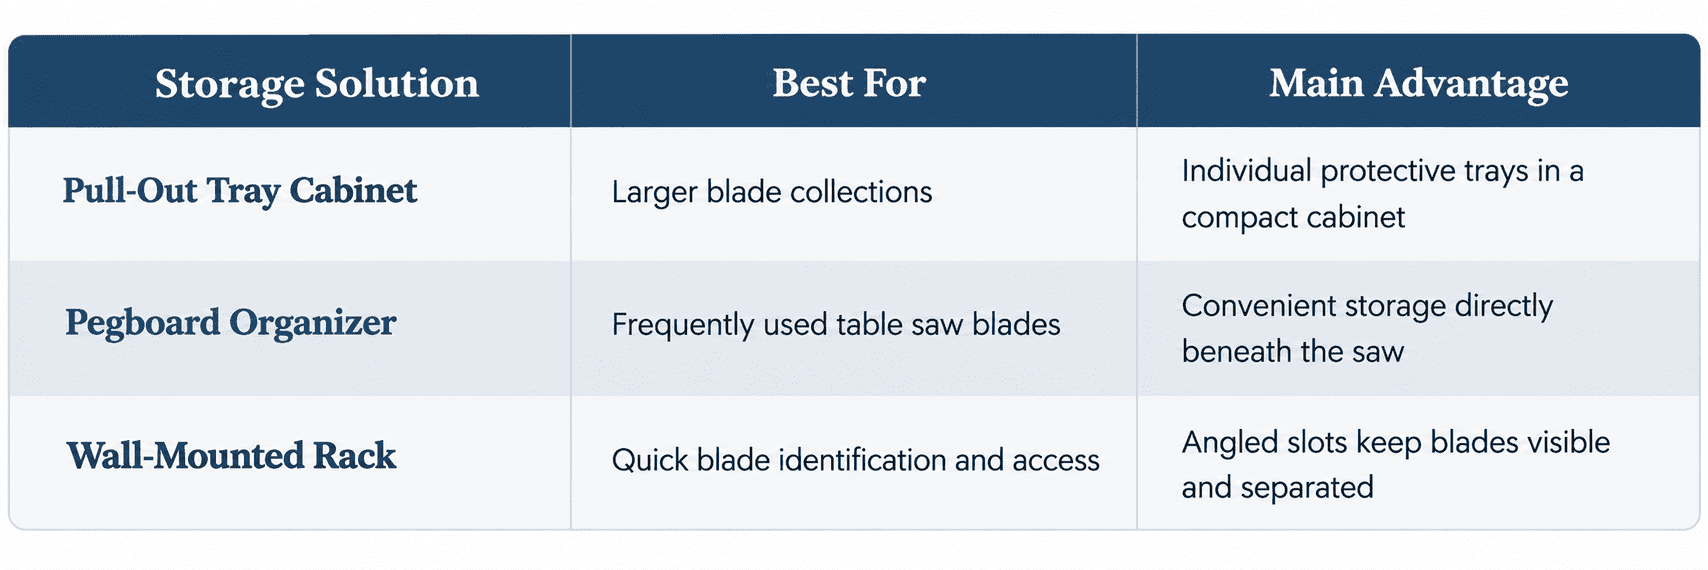
If you have several specialty blades, the pull-out cabinet is a great way to keep them organized and protected.
For the blades you use most often, the pegboard panel keeps them close to the saw.
And if you want to see your entire blade collection at a glance, the wall rack is a simple, effective solution.
You can even combine these storage systems to make the most of the available space in your shop.
Download the Free Saw Blade Storage Plans
A little organization goes a long way toward protecting your saw blades and making your shop more efficient.
Whether you build the pull-out cabinet, the wall rack, or the simple pegboard organizer, these projects use affordable materials and straightforward woodworking techniques.
Watch the video for a closer look at the cabinet and rack construction, then download the free plans to get started.
DOWNLOAD FREE STEP-BY-STEP WOODWORKING PLANS → Build 3 Table Saw Blade Storage Solutions


