



How to Tune Up a Biscuit Joiner for Accurate Cuts
A biscuit joiner is one of those woodworking tools I expect to work whenever I pick it up. Set the fence, line up the marks, and plunge the blade to cut a slot. It's a quick and convenient way to align boards and assemble woodworking projects.
But that grab-it-and-go convenience can lead to neglect. Over time, sawdust, pitch, and glue residue can build up inside the tool. The blade can become dull, and adjustments can shift out of alignment.
The result? Rough plunge action, inaccurate slots, and joints that don't fit together as well as they should.
Fortunately, a quick biscuit joiner tune-up can help restore smooth operation and accurate cutting. Here are five simple maintenance steps that will keep your plate joiner performing at its best.
1. Disassemble and Inspect the Biscuit Joiner
Before starting any maintenance, unplug the biscuit joiner or remove its battery.
The first step is to remove the blade cover, blade, and auxiliary fence, depending on the make and model of your tool.
With these components removed, you'll have better access to the areas where sawdust and debris tend to accumulate.
Take a few minutes to inspect the tool for loose, missing, or damaged parts. Check the blade mounting hardware, fence components, and plunge mechanism.
Refer to your owner's manual for the correct disassembly procedure.
2. Clean Out Sawdust and Built-Up Grime
Fine sawdust can work its way into just about every opening in a biscuit joiner. When it combines with pitch and other residue, it can interfere with the tool's smooth operation.
I like to start by removing loose dust with a brush or vacuum.
A toothbrush works well for cleaning tight spaces, while a straightened paper clip can help dislodge stubborn debris from accessible corners.

For stubborn buildup on suitable metal surfaces, a little denatured alcohol can help soften the residue. Apply it sparingly to a cloth or brush rather than pouring it into the tool, and keep it away from electrical components, bearings, and plastic parts that may be affected by solvents.
The goal is to remove anything that could interfere with the plunge mechanism or other moving parts.
If you use compressed air, follow the manufacturer's instructions and avoid directing debris into the motor or bearings.
3. Clean and Inspect the Biscuit Joiner Blade
Because a biscuit joiner operates in short bursts, its blade can last a surprisingly long time. That makes it easy to overlook blade maintenance.
However, pitch and glue residue gradually build up on the cutting teeth.
Just like a dirty table saw blade, a biscuit joiner blade with heavy buildup can generate more heat and make cutting less efficient.
Remove the blade and clean the teeth with a suitable blade cleaner and a brush.
Once the blade is clean, inspect the cutting edges.
Look for chipped or missing carbide tips, rounded cutting edges, or other signs of damage.
If the blade is dull or damaged, replace it with the correct blade for your joiner.

When reinstalling the blade, pay close attention to its rotation direction. It's surprisingly easy to install a blade backward.
Follow the manufacturer's instructions for securing the blade and reinstalling the cover.
4. Check the Biscuit Joiner Fence Alignment
Cleaning the joiner is only part of the tune-up. You also want to make sure the tool is cutting accurately.
Start by checking the front fence face for proper alignment with the blade.
If the fence isn't aligned correctly, the joiner may cut angled slots. This can cause mating parts to shift out of position during assembly.

Depending on the model, fence alignment can often be corrected using one or more adjustment screws.
The exact procedure varies, so consult your owner's manual before making changes.
Once the adjustment is complete, make a test cut in scrap wood to verify that the slot is positioned correctly.
5. Adjust the Biscuit Joiner Cutting Depth
The final step is to check the depth of the biscuit slot.
Ideally, each slot should be slightly deeper than half the biscuit's width. This allows the two workpieces to come together tightly while leaving a little room for excess glue.
If the slots are too shallow, the biscuit can prevent the joint from closing completely.
If they're excessively deep, the biscuit won't fit as intended.

I aim for a combined slot depth that's approximately 1/16" greater than the width of the biscui.
An easy way to check this is to cut matching slots in two pieces of scrap, insert a biscuit, and bring the pieces together. The joint should close fully without the biscuit bottoming out.
On some biscuit joiners, you can fine-tune the cutting depth by loosening a stop nut and adjusting the plunge rod.
Other models use a different adjustment system, so follow the instructions for your particular tool.
After making any changes, cut another test slot to confirm the setting.
Keep Your Biscuit Joiner Working Like New
A biscuit joiner doesn't require much maintenance, but a little attention goes a long way.
Cleaning out sawdust, removing buildup from the blade, and checking the fence and cutting depth can help prevent inaccurate slots and frustrating assembly problems.
Best of all, this simple tune-up doesn't take much time.
Make it part of your regular shop maintenance routine, and your biscuit joiner will be ready to make clean, accurate cuts whenever you need it.
More Ways to Use Your Biscuit Joiner
Your biscuit joiner can do more than cut slots for traditional biscuit joints. With a simple shop-made attachment, you can use it to cut evenly spaced decorative spline slots in the corners of mitered boxes.
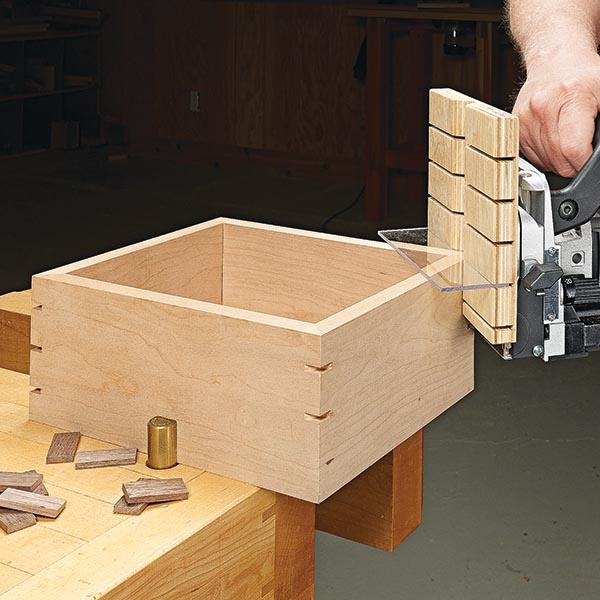
Discover how to build a Biscuit Joiner Spline Jig and add strength and visual interest to your next box project.
SEE THE BISCUIT JOINER SPLINE JIG → Cut Decorative Box Splines with a Biscuit Joiner


