



How to Use a Straightedge Guide: 4 Tips for Accurate Cuts
A straightedge guide is one of the simplest ways to improve accuracy when cutting plywood, routing dadoes, or working with large panels. Instead of trying to follow a layout line freehand, you can use the straight, smooth edge of the guide to keep your circular saw or router on track.
A self-clamping straightedge guide makes the process even easier. The built-in clamping mechanism secures the guide directly to the workpiece without requiring separate clamps.
But getting accurate results takes more than simply locking the guide in place.
Positioning the guide correctly, accounting for the offset of your tool, and checking for square can make a big difference in the finished cut.
Here are four practical straightedge guide tips that will help you get cleaner cuts, improve accuracy, and even tackle a few unexpected clamping tasks.
1. Use a Setup Block to Position Your Straightedge Guide
One of the biggest challenges when using a straightedge guide is positioning it accurately.
Unlike a track saw, where the edge of the track typically indicates the cut line, a conventional straightedge guide must be offset from the layout line.
That's because the edge of your circular saw base or router base rides against the guide, while the blade or bit cuts some distance away.
You need to account for that distance every time you position the guide.
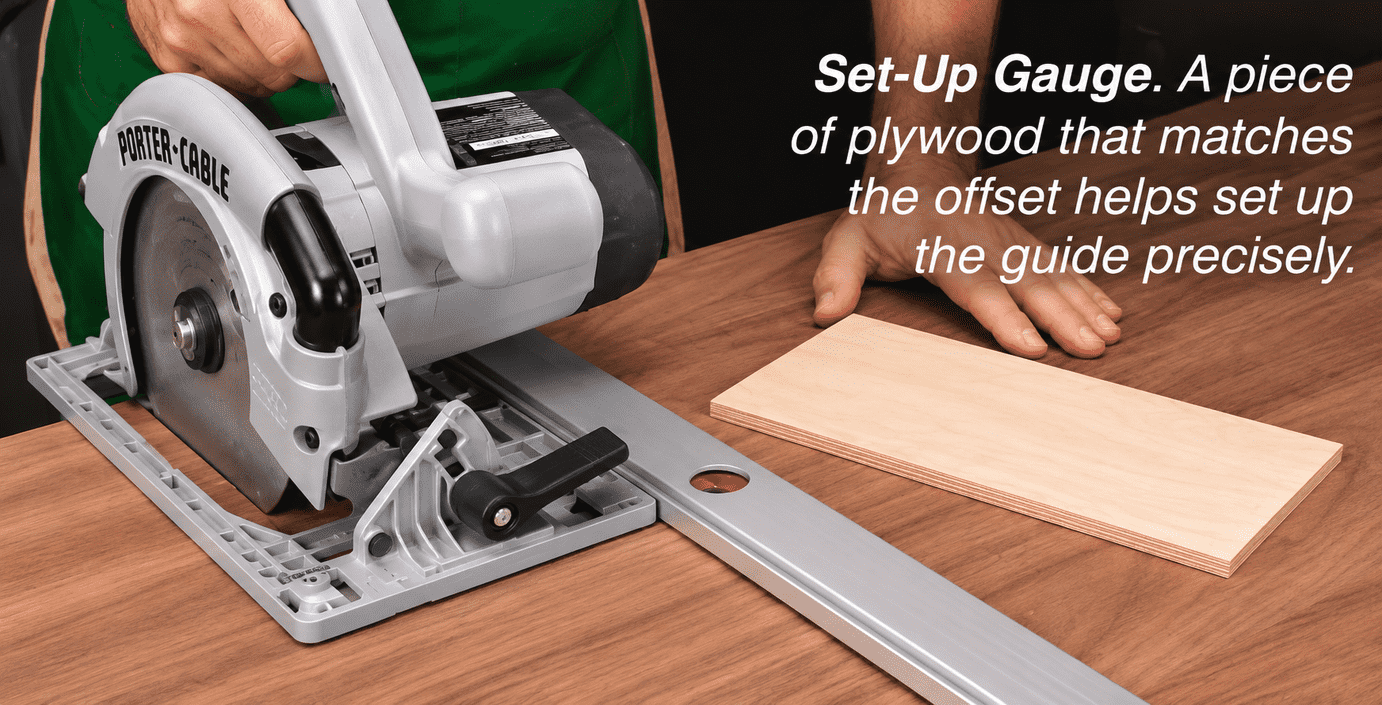
Measuring the offset for each cut works, but it can be tedious. A simple setup block makes the process much faster.

Make a Setup Block for Your Router
Start with a small piece of scrap wood.
Use your router and straightedge guide to cut a dado in the block with the bit you plan to use.
The dado establishes the exact location of the cut relative to the edge of the guide.
To position the straightedge for a future cut, place the setup block on your workpiece and align the dado with your layout marks.
Then slide the straightedge against the reference edge of the block and lock it in place.
The guide is now positioned at the correct offset without additional measuring.
Tip: Make a separate setup block for each router bit diameter you commonly use. Different bit sizes change the position of the cut relative to the router base.
Use the Same Idea With a Circular Saw
A similar setup block works with a circular saw.
The key is establishing the distance between the edge of the saw's base plate and the blade.
Once you've established that offset, you can position the guide quickly and consistently for repeated cuts.
Be sure to use the same side of the saw's base plate against the guide each time.
If you change saws or switch to a different reference edge, check the offset again.
2. Check Your Straightedge Guide for Square
A self-clamping straightedge guide is convenient because it locks securely across a workpiece.
However, don't assume the guide automatically positions itself square to the edge of a plywood panel.
Even a small alignment error can affect the accuracy of a crosscut.
For precision work, take a moment to check the guide with a framing square before locking it in place.
How to Set Up a Square Crosscut
- Mark the location of the cut on your workpiece.
- Position the straightedge guide using the correct blade offset.
- Place a framing square against a reliable reference edge of the panel.
- Adjust the guide until it's square to the reference edge.
- Lock the guide in place and verify the alignment before cutting.
This extra step is particularly important when cutting cabinet parts, shelves, and other components that need accurate, square ends.
Tip: A straightedge guide ensures the tool travels in a straight line, but it doesn't guarantee that line is square to the workpiece.
3. Clean Up Plywood Edges With a Router and Straightedge
A circular saw is a convenient tool for breaking down plywood sheets, but the resulting edges aren't always as clean as you'd like.
Depending on the blade and material, the cut can leave rough fibers, minor irregularities, or tearout along the edge.
A straightedge guide and a router equipped with a flush-trim bit provide a simple way to clean up the edge.
Set Up the Guide for Flush Trimming
Start with a plywood panel that's been cut slightly oversize.
Clamp the straightedge guide to the underside of the panel, positioning it approximately 1/8" back from the rough edge.
The guide provides a straight reference surface for the bearing on the flush-trim bit.
As you move the router along the panel, the bearing follows the guide while the cutting edges remove the excess plywood.
This produces a straight, clean edge that's ready for the next step in your project.
Make sure the guide is securely clamped, the router is fully supported, and the bearing contacts the guide throughout the cut.
If the rough edge is especially uneven, remove the waste in lighter passes rather than trying to trim everything at once.
Best uses: Cleaning up plywood panels, preparing straight edges, and trimming oversized parts to a consistent line.

4. Use a Self-Clamping Straightedge for Thin Panel Glue-Ups
A straightedge guide isn't limited to guiding power tools.
Its built-in clamping mechanism can also be useful when gluing thin wood panels.
Thin stock presents a particular challenge during glue-ups. Ordinary pipe clamps and bar clamps can apply pressure in a way that causes the boards to bow or buckle.
A self-clamping straightedge guide offers a different approach.

Why the Low-Profile Clamping Heads Help
The clamping heads on a self-clamping straightedge guide are relatively low-profile.
This makes it easier to center the clamping force on the thickness of a thin panel.
By keeping the pressure aligned with the panel, you can reduce the tendency for the boards to bow as the glue joints are tightened.
This is particularly helpful when working with thin boards that don't have enough thickness to resist off-center clamping pressure.
As with any glue-up, apply only enough pressure to close the joints and keep the pieces aligned.
Tip: Check that the straightedge's clamping mechanism is suitable for the size and thickness of your panel. These guides aren't a replacement for heavy-duty clamps in every glue-up.
Choosing the Right Straightedge Guide for Woodworking
A straightedge guide doesn't need to be complicated to be useful, but a few features make a difference.
A Straight, Rigid Guide Edge
The guide needs to remain straight along its entire length.
A rigid aluminum extrusion is a common choice because it provides a smooth reference edge for the base of a circular saw or router.
A Secure Clamping Mechanism
A self-clamping guide should lock firmly to the workpiece without shifting as the tool moves along it.
Check that the clamping heads grip securely and don't interfere with the path of the tool.
Enough Length for Your Projects
Choose a guide long enough for the cuts you make most often.
For plywood work, longer guides are especially useful for crosscutting and trimming large panels.
Keep in mind that the guide needs enough extra length for the tool to enter and exit the cut while remaining supported.
Get More From Your Straightedge Guide
A self-clamping straightedge guide is a simple accessory, but it can make a noticeable difference in the accuracy and efficiency of your woodworking.
A setup block eliminates repeated measurements when positioning the guide. A framing square helps ensure accurate crosscuts. And a router with a flush-trim bit can turn a rough plywood edge into a clean, straight surface.
The guide can even serve as a useful clamp for thin stock.
With a few simple techniques, this versatile accessory can do much more than guide a circular saw.
How to Glue Up Thin Wood Panels Without Warping

Thin boards can bow or shift when you apply clamping pressure. Learn two practical methods for keeping glue joints aligned and panels flat using plastic shims, alternating clamps, and a simple wedge-operated assembly board.
WATCH THE VIDEO➜ Learn How to Glue Up Thin Wood Panels


