


How to Straighten Rough Lumber with a Table Saw Jig
Buying rough lumber can be a great way to save money and get access to a wider selection of hardwoods. But before you can turn those boards into a woodworking project, you'll need to mill them into usable stock.
One of the first steps is creating a straight edge. That's not always easy when a board has a pronounced crook, rough edges, or bark still attached.
A jointer is usually the tool of choice for straightening lumber. However, long or severely crooked boards can be difficult to handle on a jointer, and bark or embedded debris can damage the knives.
Fortunately, there's another option. With a simple table saw straight-line ripping jig, you can create a clean, straight edge on rough lumber without relying on a jointer.
Why You Need a Straight Edge Before Ripping Lumber
When ripping lumber on a table saw, the rip fence provides a straight reference for guiding the workpiece past the blade.
But if the board has a crooked or uneven edge, it can't follow the fence consistently. The board may shift or bind as you push it through the cut.
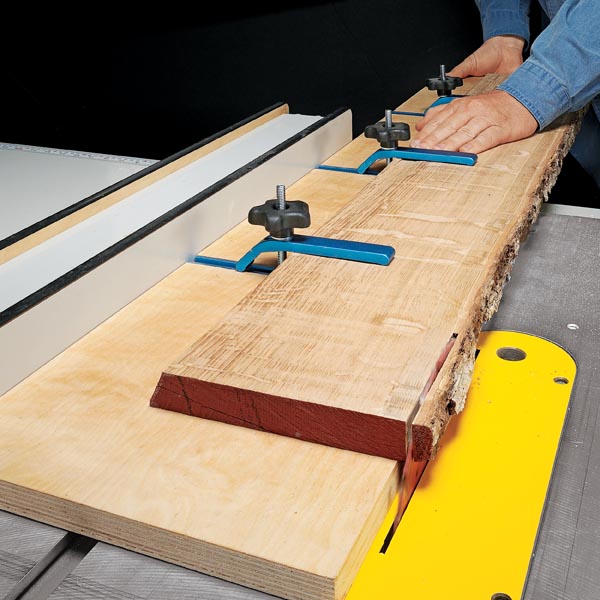
The solution is to secure the board to a straight carrier that rides against the rip fence.
This allows you to cut a straight edge on the workpiece even though the opposite edge is still rough or crooked.
Once the first edge is straight, you can use it against the rip fence to rip the opposite edge parallel.
Build a Simple Table Saw Straight-Line Ripping Jig
The jig is easy to make from a piece of 3/4" plywood and a few common pieces of hardware.
The plywood serves as a carrier for the rough board. One edge of the plywood must be perfectly straight because it will ride against the table saw's rip fence.
Add T-Track and Hold-Down Clamps
Cut dadoes in the plywood to accept lengths of T-track.
The T-track allows you to position hold-down clamps wherever they're needed to secure boards of different widths and shapes.
The clamps hold the rough lumber firmly against the carrier so it can't shift during the cut.

This adjustable arrangement makes the jig useful for a wide range of rough lumber, including boards with uneven or irregular edges.
How to Straighten a Crooked Board on the Table Saw
Using the jig is straightforward once the carrier is assembled.
Step 1: Position the Rough Board
Place the rough board on top of the plywood carrier.
Position it so the edge you want to straighten extends beyond the cutting side of the jig. The overhang should be enough to remove the crooked or irregular portion of the edge.
Make sure the board is supported securely by the carrier.
Step 2: Clamp the Board in Place
Adjust the hold-down clamps in the T-track and tighten them to secure the workpiece.
The board must remain firmly attached to the carrier throughout the cut.
Check that the clamps and their hardware are clear of the blade's cutting path.
Step 3: Rip a Straight Edge
Set the table saw's rip fence so the blade will remove the uneven edge of the board.
With the straight edge of the plywood carrier riding against the fence, guide the entire assembly through the blade.
The carrier provides a consistent reference, allowing the blade to cut a straight edge on the rough lumber.
Use appropriate blade guarding and anti-kickback protection, and keep your hands clear of the blade. Support long or heavy stock so it doesn't tip or shift during the cut.
Step 4: Rip the Opposite Edge
Once the first edge is straight, remove the board from the carrier.
You can now place the newly straightened edge against the rip fence and rip the opposite edge parallel.
The result is a board with two straight, parallel edges that's ready for the next milling steps.
Use the Same Jig to Cut Tapers
This table saw jig has another useful application: cutting tapered workpieces.
Instead of positioning the board for a straight cut, angle it on the carrier so the desired taper line follows the cutting edge of the jig.
Clamp the workpiece securely, then guide the carrier along the rip fence to make the tapered cut.
This makes the jig a versatile accessory for cutting tapered legs and other angled parts.
A Handy Alternative to the Jointer
A straight-line ripping jig is a practical addition to any woodworking shop, especially when you're working with rough lumber or don't have a jointer.
The plywood carrier is inexpensive to build, the adjustable clamps accommodate different workpieces, and the table saw provides an easy way to create a straight edge.
Whether you're milling rough hardwood, straightening a crooked board, or cutting tapers, this simple jig can help you get more from your table saw.
More Table Saw Jigs & Techniques

Get more accuracy and versatility from your table saw with practical shop-made jigs and proven cutting techniques. From straight-line ripping and tapering to precision crosscuts and joinery, discover useful tips for getting better results from your table saw.
READ MORE → Explore More Table Saw Tips & Techniques


