


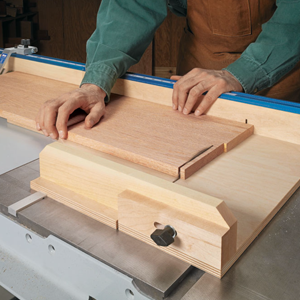
How to Install Measuring Tape on Woodworking Jigs
Adding self-adhesive measuring tape to a woodworking jig is a simple upgrade that makes setup faster and more accurate. Whether you're building a table saw crosscut sled or adding a flip stop to an auxiliary fence, a built-in measuring scale allows you to position the stop without reaching for a separate tape measure.
The key is installing the adhesive measuring tape in exactly the right position. Here's a simple technique for aligning the scale with a flip stop so you can make accurate, repeatable cuts.
Align the Measuring Tape with the Flip Stop
Before attaching the tape, you need to establish an accurate zero reference.
Start by positioning the flip stop next to the teeth of the table saw blade, with the saw turned off. The stop should be positioned so its working face corresponds to the blade's cutting edge.
Next, locate the thin reference line on the flip stop's cursor. Make a pencil mark on the fence directly beneath this line.
This pencil mark identifies where the zero mark on the adhesive measuring tape needs to be positioned.

Apply the Self-Adhesive Measuring Tape
Once you've established the zero position, flip the stop up and out of the way.
Rather than removing the entire adhesive backing at once, peel away just a few inches to get started.
Carefully align the tape's zero mark with the pencil mark on the fence. Press the exposed adhesive firmly into place, keeping the tape straight as you work along the fence.
Continue peeling away the backing a little at a time while pressing the measuring tape into position.
Working gradually helps prevent the tape from shifting or sticking in the wrong location.

Fine-Tune the Cursor for Accurate Measurements
Some flip stops include an adjustable cursor that allows you to fine-tune the reference line after installing the tape.
Once the tape is attached, make a test cut and check the finished length with a reliable measuring tool.
If the measurement is slightly off, adjust the cursor until it matches the actual cut length.
With the tape properly aligned and the cursor calibrated, you can position the flip stop quickly and confidently for repeatable crosscuts.
A Simple Upgrade for More Accurate Jigs
A self-adhesive measuring tape is an inexpensive addition that can make woodworking jigs more convenient to use.
Taking a little extra time to establish the zero reference, apply the tape carefully, and verify the setup will help you get consistent results every time you use your jig.
Featured Project: Precision Crosscut Sled
Take your table saw accuracy to the next level with our DIY Precision Crosscut Sled. This versatile shop-made jig features a rock-solid fence for square, repeatable cuts and an adjustable zero-clearance base that helps reduce chipout. Add a flip stop and measuring tape for quick, accurate setups, or customize the sled with a box joint jig and optional fence extension for longer workpieces. With detailed step-by-step plans, you'll build a reliable table saw accessory that makes every crosscut easier and more precise.
FEATURED PROJECT → Get the Precision Crosscut Sled Plans


