Sanding may not be the most exciting part of woodworking, but few steps have a bigger impact on how a finished project looks. Scratches, swirl marks, rounded edges, and uneven spots that are easy to overlook on bare wood can become much more noticeable once stain or finish is applied.
For most general sanding, a random orbital sander is one of the most useful tools in the shop. Its sanding action removes material efficiently while helping minimize the obvious scratch pattern that can come from other types of sanders.
Getting good results, however, involves more than attaching a sanding disc and turning on the tool. A few simple techniques can make a noticeable difference.

Start with a Flat, Clean Sanding Pad
Before worrying about sanding technique, take a look at the bottom of the sander.
The sanding pad should be flat from edge to edge. As a pad wears, its edges can become rounded or damaged. That makes it more difficult to keep the sander flat against the workpiece and can lead to an uneven surface.
Also check for dust, chips, or other debris between the sanding disc and pad. Even a small piece trapped beneath the abrasive can create a high spot that leaves unwanted sanding marks.

Check the Pad Before You Start
A quick inspection only takes a few seconds:
- Make sure the sanding pad is flat and undamaged.
- Remove dust and debris before installing a fresh disc.
- Seat the abrasive evenly on the pad.
- Make sure dust-extraction holes are aligned when applicable.
Starting with a clean, flat sanding surface gives you a much better chance of ending with one.
Start and Stop the Sander Smoothly
How you bring the sander onto the workpiece can affect the surface.
Rather than simply dropping a running sander onto the wood, hold it just above the surface and switch it on. Before the pad reaches full speed, gently sweep the sander onto the workpiece.
Use the opposite motion when you're finished. Sweep the sander off the workpiece before shutting it down.
This smooth landing and takeoff helps you maintain control and avoids concentrating the sanding action in one small area.

Let the Sander Do the Work
One of the easiest mistakes to make with a random orbital sander is pressing down too hard.
It feels natural to think that more pressure will remove material faster. But excessive pressure can slow the pad and interfere with the sander's normal action. Instead of improving the surface, you may end up with more visible sanding marks.
Heavy pressure can also put unnecessary strain on the sander.
Use enough pressure to keep the tool flat and under control, but don't try to force it through the cut. Let the abrasive and the motion of the sander remove the material.
WOODSMITH TIP: Don't Chase Scratches with the Edge. If you discover a stubborn scratch, resist the temptation to tip the sander and concentrate all the sanding action on one edge of the pad. You might remove the scratch, but you're also likely to create a shallow depression that's even harder to fix. Keep the sander flat and work the surrounding surface gradually.
Clean the Surface Between Sanding Grits
Moving through progressively finer grits is an important part of preparing wood for finish. But changing the sanding disc isn't enough.
Before moving to the next grit, vacuum or thoroughly wipe the surface.

Coarse abrasive particles and sanding debris left behind can become trapped beneath the finer sanding disc. Instead of refining the previous scratch pattern, those particles can create new, deeper scratches.
Cleaning between grits only takes a moment and can save a lot of additional sanding.
Keep the Sander Flat Near Edges
Edges present another challenge. As part of the sanding pad moves beyond the edge of a workpiece, the sander loses some of its support. It's easy to unintentionally tip the tool and round over what should be a crisp edge.
One simple solution is to place a backer board the same thickness as the workpiece alongside it.

The backer supports the portion of the sanding pad that would otherwise hang over the edge. That makes it much easier to keep the sander level while working all the way to the edge.
This technique is especially useful when sanding narrow parts or panels where maintaining crisp edges matters.
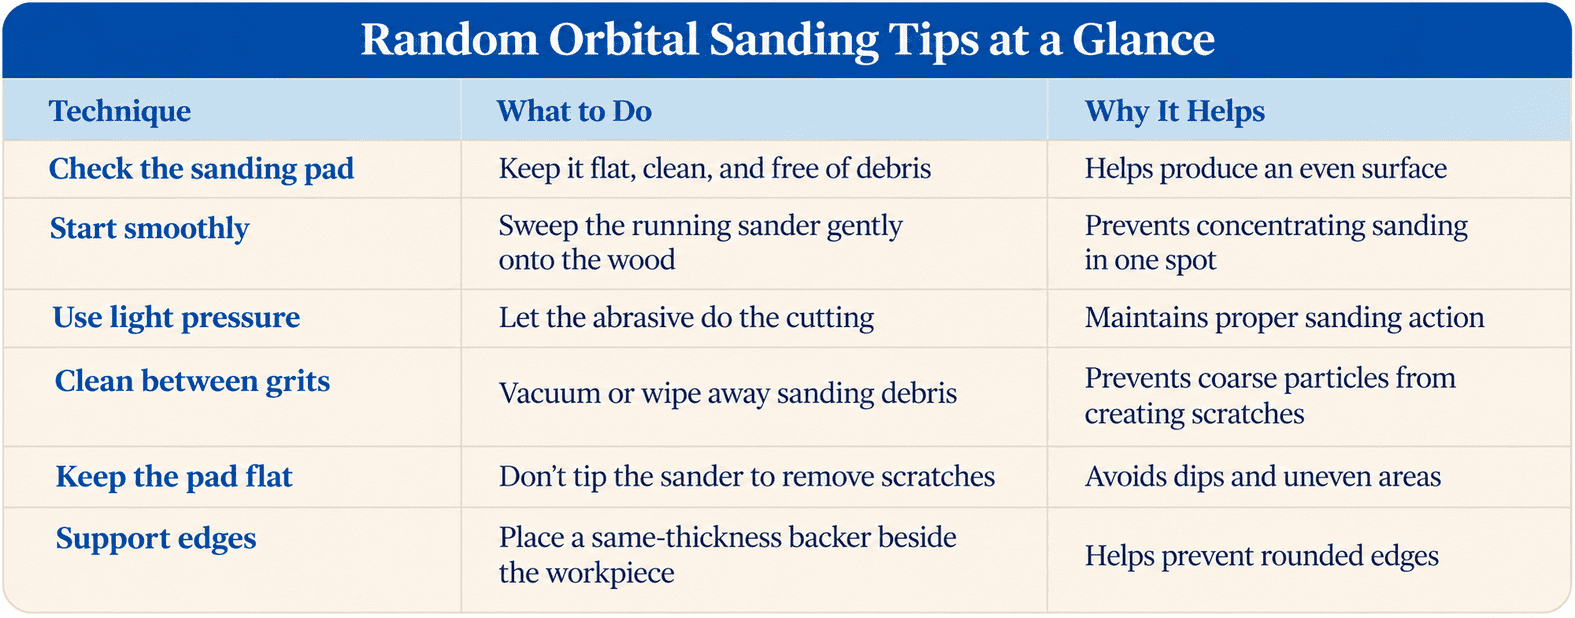
Random Orbital Sanding Tips at a Glance
A Better Surface Starts with Better Technique
A random orbital sander doesn't require a complicated technique. In fact, some of the best results come from doing less — less pressure, less tilting, and less trying to force the tool to work faster.
Start with a clean, flat sanding pad, keep the sander level, clean the workpiece between grits, and let the abrasive do its job. Those few habits go a long way toward creating the smooth, even surface you want before applying a finish.
Learn Which Sander to Use — and When
A random orbital sander is a great all-around choice, but it isn't the only sander worth having in your shop. Belt sanders, finish sanders, and detail sanders each excel at different jobs.
Our Sanders in the Shop guide explains the strengths of each type and shows you how to choose the right sander for everything from aggressive stock removal to final surface preparation.
EXPLORE SANDERS FOR WOODWORKING → Types of Sanders for Woodworking: How to Choose Them