Pegboard is one of the easiest ways to add tool storage to a woodworking shop. But there's a problem: it doesn't take long to fill the entire board. And some tools take up far more pegboard space than they really need.
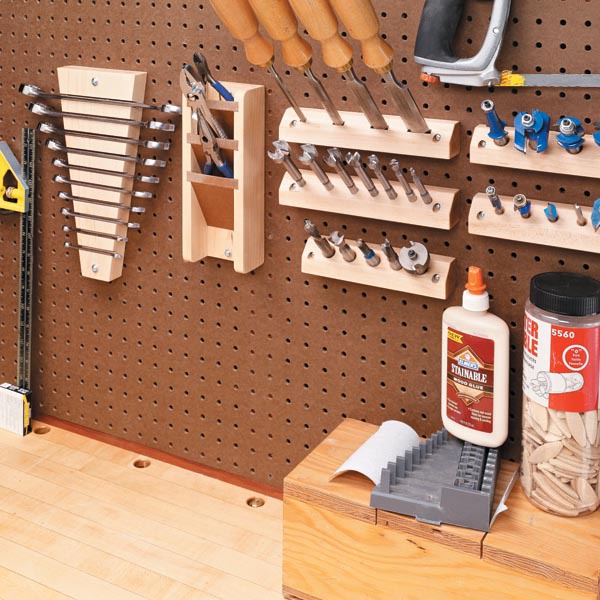
One solution is to build your own holders rather than relying entirely on standard metal hooks. These custom pegboard tool holders position tools at an angle to the wall, allowing you to store several tools in a surprisingly small area. They're simple to make from hardwood scraps and can be customized for everything from drill bits and router bits to chisels, wrenches, and pliers.
Why Angled Pegboard Storage Works
Storing a tool flat against pegboard uses a lot of valuable wall space. Chisels and pliers are good examples. Hang each one individually and a small collection can quickly spread across the board.
An angled holder changes the orientation of the tools so several can occupy the same small section of pegboard.
There's another benefit, too. Tilting the tools away from the wall makes them easier to grab. Instead of trying to slip your fingers between a tool and the pegboard, the handle is presented toward you.
The basic idea can be adapted to several types of tools.
Make a Pegboard Holder for Drill Bits & Router Bits
The simplest version is a compact rack for drill bits and router bits.
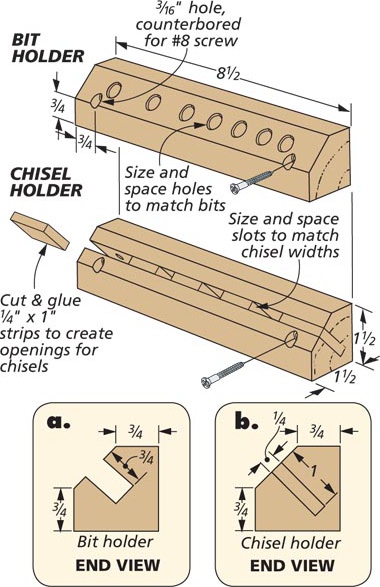
Start with a 1 1⁄2"-square hardwood blank. Cut a wide chamfer along one edge to create the angled face.
For drill bits and router bits, that's almost all the woodworking required. Lay out and drill a series of holes in the angled face sized for the shanks of the bits you want to store.
Customize the spacing to your collection. Leaving a little extra room between larger router bits makes them easier to remove without bumping neighboring cutters.
Woodsmith Tip: Build the Rack Around Your Bits. There's no reason every hole needs to be the same diameter or spacing. Lay out the actual bits before drilling and size each hole for its tool. This is especially useful for a mixed collection of router bits with different shank sizes.
Customize the Holder for Chisels
The same angled-block design can be modified to store chisels.
Rather than drilling individual holes, cut a deep kerf along the angled face. Then glue small spacers into the kerf to divide it into individual openings.
Spacing the dividers to match your chisel collection gives each tool its own slot.
This arrangement keeps the handles accessible while allowing several chisels to fit into a relatively narrow section of pegboard.
Build an Angled Wrench Rack
Wrenches present a different storage challenge, but the same space-saving principle applies.
This holder starts as a square hardwood blank.
Using a dado blade at the table saw, cut a series of angled kerfs across the blank to form slots for the individual wrenches. After cutting the slots, trim the holder to its finished wedge shape.
The angled arrangement allows the wrenches to overlap rather than spreading them individually across the pegboard.
Lay Out the Slots Before Cutting
Arrange the wrenches in order and mark their locations directly on the blank. That lets you tailor the spacing to your particular set rather than relying on equal spacing that may waste room.
Make a Compact Pliers Holder
Pliers can consume a surprising amount of wall space when they're hung individually. This holder borrows its design from a letter organizer.
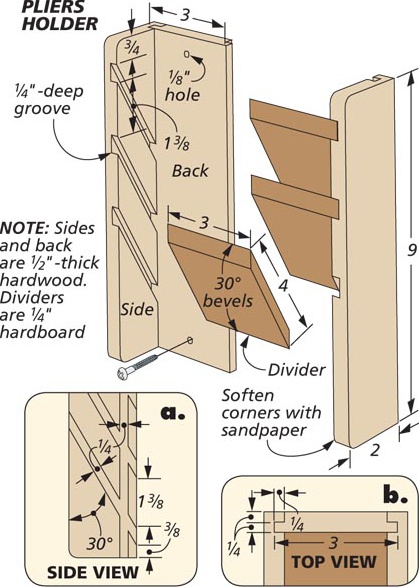
The version shown holds three pairs of pliers in separate compartments. Because they're stored one behind another and angled away from the wall, the entire group occupies much less pegboard space.
There's nothing magic about three compartments. Make the holder wider or add additional dividers to suit the number of pliers you want to store.
How to Attach Wooden Holders to Pegboard
The custom holders need a solid connection to the pegboard, especially when they're carrying several tools.
The method shown here uses wall anchors inserted into the pegboard holes. Screws pass through the wooden holder and into the anchors to secure it to the board.
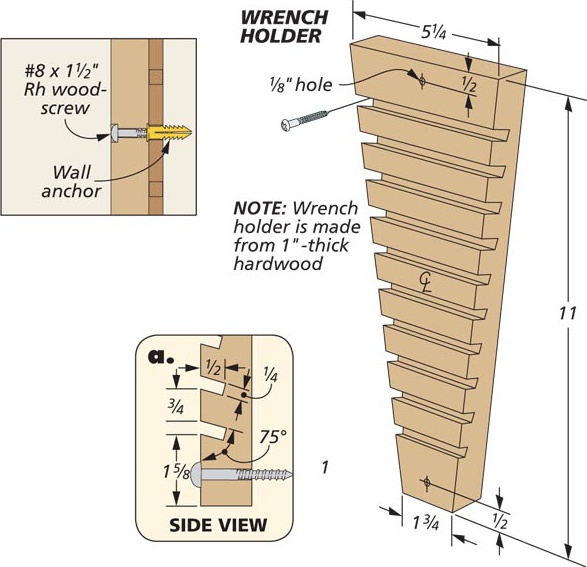
This makes the wooden rack itself the mounting point rather than depending on a collection of conventional pegboard hooks.
Before loading a holder, make sure the pegboard and its supporting frame are securely attached to the wall and that the mounting method is appropriate for the weight of the tools you're storing.
Customize Pegboard Storage to Fit Your Tools
The real advantage of these holders isn't any one design. It's the idea of building pegboard storage around the tools instead of trying to make the tools fit generic hooks.
A chamfered block becomes a rack for drill and router bits. Add a kerf and spacers and it holds chisels. Cut angled slots and you have wrench storage. Add dividers and bulky pliers can be grouped into a compact holder.
They're also ideal scrap-bin projects. A few small pieces of hardwood can turn an overcrowded section of pegboard into organized storage where every tool has a dedicated place.
More Ways to Organize Small Tools
Pegboard is only one way to get small tools off the workbench. Magnetic strips, wall-mounted racks, portable caddies, and other simple shop-made holders can organize the tools you use every day.
SEE 5 MORE SMALL TOOL STORAGE IDEAS → 5 Small Tool Storage Ideas for Your Woodworking Shop