

Handy Tool Stand: A Simple DIY Pliers Organizer
If your collection of pliers is anything like mine, it probably started with a few pairs tossed into a drawer. Before long, finding the right one meant digging through a pile of tools.
I'd been telling myself that I'd build a proper storage rack someday. Eventually, I got tired of rummaging through the drawer and decided to do something about it.
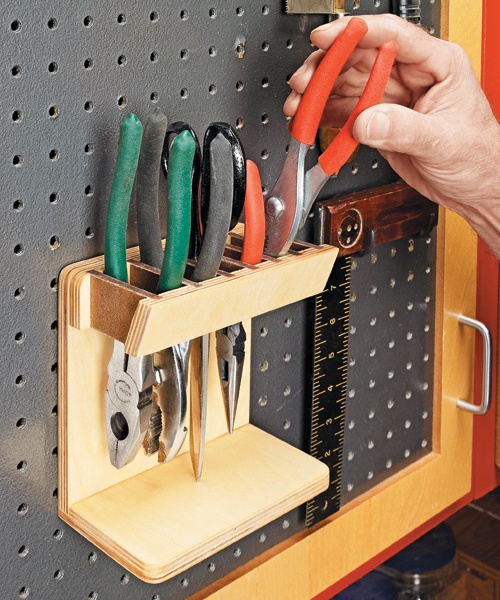
The result is this simple shop-made pliers organizer. It's an L-shaped stand with a slotted rack that holds each tool upright and within easy reach.
Best of all, it works as both a portable workbench caddy and a pegboard-mounted tool holder.
A Simple Tool Stand with Two Storage Options
The design is straightforward. An L-shaped plywood stand supports a slotted rack at the top.
Each pair of pliers rests in its own opening, making it easy to see and grab the tool you need.
The front of the rack is tapered to help keep the pliers securely in place.
I also made the base extra wide so the organizer stands securely on my workbench without tipping over.
But I didn't want the rack taking up bench space all the time. So I added a pair of L-hooks to the back, allowing it to hang on pegboard.
When I need the tools somewhere else in the shop, I can simply lift the stand off the pegboard and take it with me.
Build the Stand from Baltic Birch Plywood
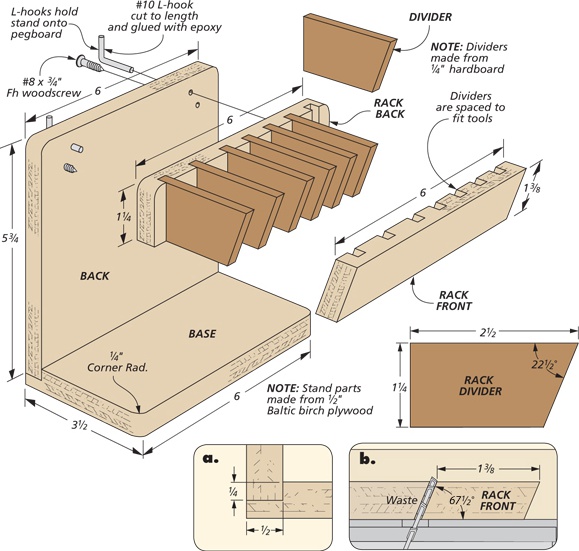
I started by cutting the base and back from ½"-thick Baltic birch plywood.
A rabbet cut along the base provides a locating surface for the back. Once the rabbet is cut, the two pieces can be glued together to form the L-shaped stand.
This simple construction creates a sturdy support for the tool rack without requiring complicated joinery.
Make the Slotted Pliers Rack
The rack is the most important part of the organizer because it keeps the tools separated and properly supported.
To ensure the grooves in the front and back pieces line up, I cut them in a single extra-wide blank before separating the parts.
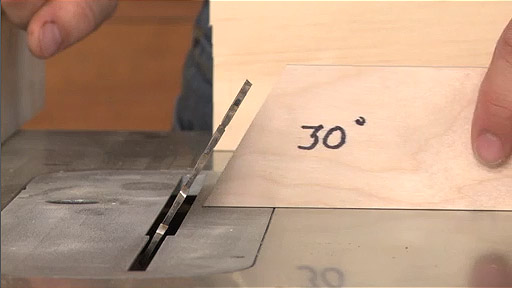
After cutting the grooves, I ripped the blank in half and cut the bevels on the front piece of the rack.
Next, I cut the hardboard dividers to size and glued the rack assembly together.
The dividers create individual openings for the pliers, while the tapered front helps keep the tools in position.
A couple of screws driven through the back of the stand secure the completed rack.
Add Pegboard Hooks for Wall Storage
To make the organizer even more useful, I installed L-hooks on the back.
These allow the entire stand to hang from a pegboard panel when it's not needed on the workbench.
The wide base serves two purposes. It supports the stand when it's sitting on a flat surface, and it makes the organizer easy to carry from one work area to another.
That means I can keep the pliers stored on the wall but bring the whole collection to my bench whenever a project calls for them.
Keep Your Pliers Organized and Ready to Use
Sometimes the best workshop storage projects are the ones that solve a small, everyday frustration.
This handy tool stand doesn't take much material or time to build, but it makes a big difference in keeping my pliers organized.
Instead of searching through a drawer, I can see all my pliers at a glance and grab the one I need.
And with both workbench and pegboard storage options, it's a practical addition to just about any woodworking shop.