Drilling one accurately positioned hole is easy enough. Drilling a long row of holes that are perfectly aligned and evenly spaced can quickly become a tedious layout job.
I ran into that problem while making cribbage boards as gifts. Each board requires row after row of consistently spaced holes. Rather than measuring and marking every hole individually, I built the simple drill press fence jig shown here.
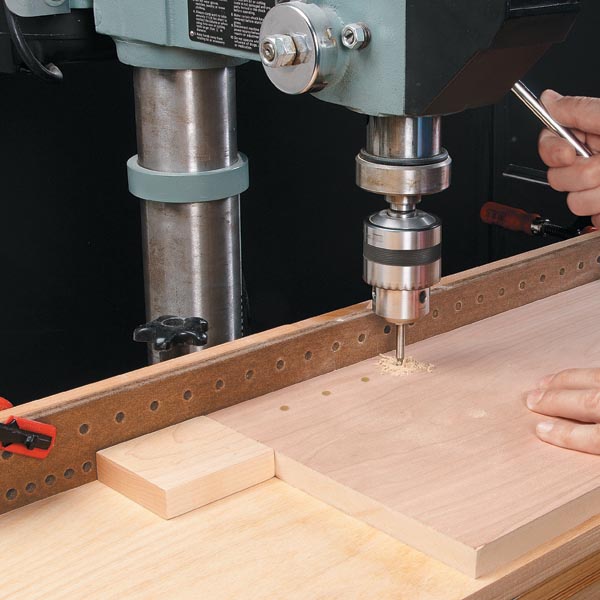
The jig consists of a long plywood base, a fence made from two layers of pegboard, and a movable stop block. The pegboard provides a series of indexing holes, while two dowels in the stop block lock it into precise positions along the fence.
Once it's set up, there's almost no measuring involved. Move the workpiece against the stop, drill a hole, reposition the stop, and repeat.
And while cribbage boards inspired the jig, it works for any drill press operation that calls for a row of evenly spaced holes.
Make the Pegboard Indexing Fence
The key to the jig is the unusual pegboard fence.

The fence starts with two layers of 1⁄4"-thick pegboard. But instead of simply gluing the pieces together with their holes aligned, offset one layer by half the distance between the pegboard holes.
For the pegboard used here, that offset is 1⁄2".
Glue the two pieces together in this offset position. Then use the existing holes in one layer as guides to drill through the second layer.
The result is a fence with indexing holes spaced every 1⁄2".
Once all the holes are drilled, rip the top and bottom edges of the laminated pegboard straight and fasten the finished fence to a long plywood base.
Woodsmith Tip: Let the Pegboard Do the Layout. The advantage of this approach is that you don't need to individually measure and lay out a long series of indexing holes. The regular pattern in the pegboard establishes the spacing for you. Just make sure the two layers stay accurately positioned while they're glued together.
Build the Indexing Stop Block
The stop block is what turns the pegboard fence into a repeatable drilling jig.
Two dowels project from the back of the block and fit into the holes in the fence. Insert the dowels into a pair of holes and the block is locked into position.
For 1⁄2" hole spacing, the process couldn't be simpler. Drill the first hole, move the stop block to the next position, slide the workpiece against it, and drill again.
There's no need to measure the distance between individual holes.
Drill Holes 1⁄4" Apart with a Reversible Stop
The really clever feature of this jig is that the same fence can create spacing that's even finer than its 1⁄2" indexing pattern.
Take a close look at the stop block and you'll notice that the dowel holes aren't centered evenly between its two ends.
That's intentional.

The offset is designed so flipping the stop block end for end moves the workpiece 1⁄4". Here's the sequence: 1. Position the stop block and drill the first hole. 2. Remove the block and flip it over. 3. Insert its dowels back into the same fence holes. 4. Slide the workpiece against the stop and drill the second hole. 5. Flip the stop again and move it to the next set of indexing holes. 6. Repeat the sequence down the workpiece. By alternating the stop's orientation, you get 1⁄4"-spaced holes from a fence with indexing holes every 1⁄2".
It may sound complicated on paper, but after a couple of holes the flip-and-move sequence becomes almost automatic.
Set Up the Jig at the Drill Press
The indexing stop controls the distance from one hole to the next, but you still need to establish the location of the first hole and the distance from the edge of the workpiece.
Position the jig on the drill press table so the bit aligns with the desired hole location. Secure the jig so it can't shift during drilling.
Set the workpiece against the fence and stop, drill the first hole, then begin indexing the workpiece along the fence.
From that point on, the jig establishes the spacing instead of a ruler and pencil.
Woodsmith Tip: Drill a Test Piece First. Before drilling your project, run the sequence on a piece of scrap. Drill several holes and check the resulting spacing. This verifies the stop-block setup and gives you a chance to get comfortable with the indexing sequence before working on the actual project.
More Than a Cribbage Board Jig
A cribbage board was the reason for building this drill press jig, but that's hardly its only use. Any project requiring a straight row of consistently spaced holes can benefit from the same indexing system. Instead of repeatedly measuring, marking, and trying to position the drill bit over layout lines, the pegboard fence and indexing stop make the spacing mechanical and repeatable.
And because the stop can be moved quickly, the jig is especially useful when you need to drill a large number of holes.
It's a simple shop-made accessory, but it's exactly the kind of jig I like: the setup does the measuring so I can concentrate on making the cut—or in this case, drilling the hole.
Get More from Your Drill Press
A good fence or jig can turn the drill press into a much more precise woodworking tool. From repeatable hole placement to better workpiece support, a few simple shop-made upgrades can make everyday drilling faster and more accurate.
EXPLORE MORE DRILL PRESS JIGS & TIPS → Drill Press Jigs, Tips & Techniques