

My home shop spreads across the back wall of my garage. This long, narrow space evolved over the last 15+ years into a homey, welcoming refuge that I get to see everyday as I leave to and arrive home from work. That double view inspires me and reminds that there's more to my woodworking than what takes place in front of TV cameras or in Woodsmith.
Workshop envy is real. The shape and confines used to bother me until the shop and I got to know each other. My woodworking methods are shaped by the tools that fit inside. In turn, the layout and fittings I made for it, suit my needs.
Overview/Floorplan
A previous owner of my house built the garage extra deep. This eight foot section gives me a permanent home for my woodworking and allows our family to park two cars in the garage at the same time.
Even with a small space like this, I've created different zones for the different stages and process of working wood. Yes of course, each of these areas overlap, blur, and serve multiple uses. But a quick glance reveals its main function.
I have two goals that drive the overall appearance of the shop. First, I want to preserve as much open space as possible. It's easy to overstuff any size workshop with tools, wood, and workstations. This happened a couple times in the history of my shop, too. When shop time feels like threading through narrow paths, a new floorplan becomes necessary.
My breakthrough came on a family vacation to Gulf Shores, Alabama. We toured the battleship Alabama and the submarine USS Drum. Walking through the Drum, I saw how the boat had everything the crew needed to live and work aboard. All the spaces branch off a long, central corridor. In a moment, my shop space made sense.
In the drawing of the shop, the corridor is evident. A step off in either direction takes you to specific workstations. In several locations, the corridor expands into an open area.
The other goal for my shop is separation. Physically, I want my shop to feel different from the rest of the garage. Decor, lighting, and contents help. I avoid using the shop for tasks other than woodworking. Along one section of the shop, I built a low wall to separate the space. Full walls would close it off too much. Overhead storage racks and a heater form a visual barrier on the other side of the shop.
The floor distinguishes the shop from the garage, as well. Here I used a plastic, dimpled material for a thermal break from the concrete floor. Tongue and groove OSB sheets offer a comfortable, warm floor.
I think of shop in four sections: the lumber storage space, the machine compartment, the bench area, and the tool storage wall. These correspond to videos I filmed that explain the sections.
Check out the full list of the video version of this shop tour series on the Woodsmith YouTube channel.
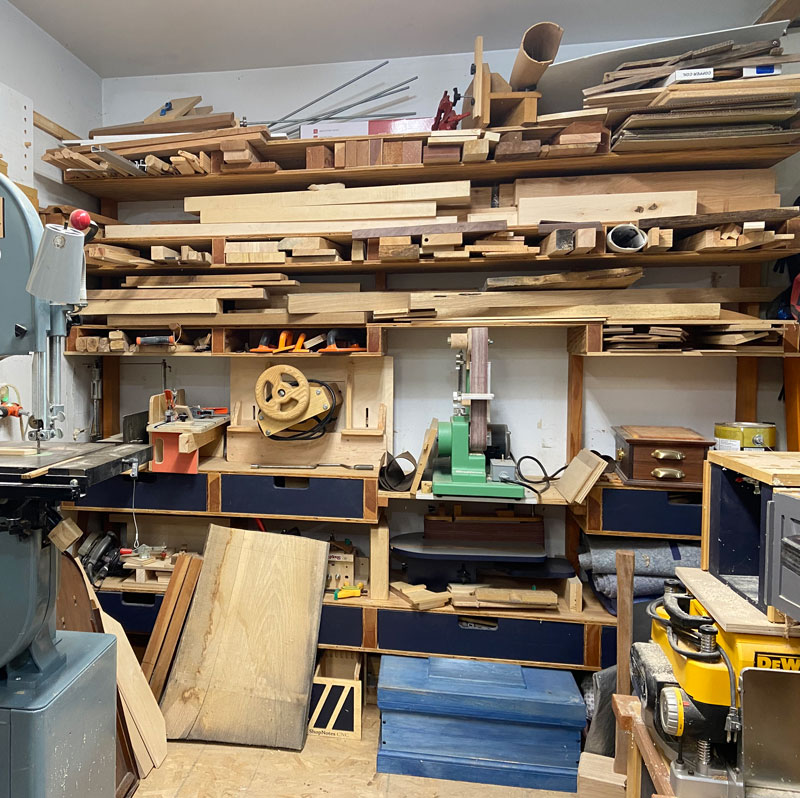
Lumber Rack
Storage centers bookend the shop space. These two are the smallest of the four shop sections. Really they encompas the end walls the the floor immediately in front of them.
The lumber rack is mounted to the wall and includes five shelves. The system is eight feet long and holds quite a pile of boards. Several features of this rack stand out. Below each shelf, a small cubby or a drawer adds more storage based on the structure of the supports. These spaces prove to be handy spots to stash short pieces, dowels, templates, and tool accessories.
I call this a lumber rack, but it holds so much more. The top shelf has tools and gear I don't need often. The lower shelves holds benchtop tools at the ready. Even the floor below serves as a storage space.
In a surprise, this is the most dynamic part of the shop in many ways. I'm constantly restacking and sorting wood to use in projects or in grabbing a tool to use at the bench. "Lumber rack" is hardly the right term for this versatile storage system. But that's what most of the space is, so there you have it.
The space in the left front is where I keep extra wide boards and plywood cutoffs. That's about the only flaw in this system. It's not designed for plywood storage. I don't often use big pieces of plywood. So when a ply-heavy project comes along, those sheets slide next to the cars until I can get them lopped down to smaller pieces.
Machine Space
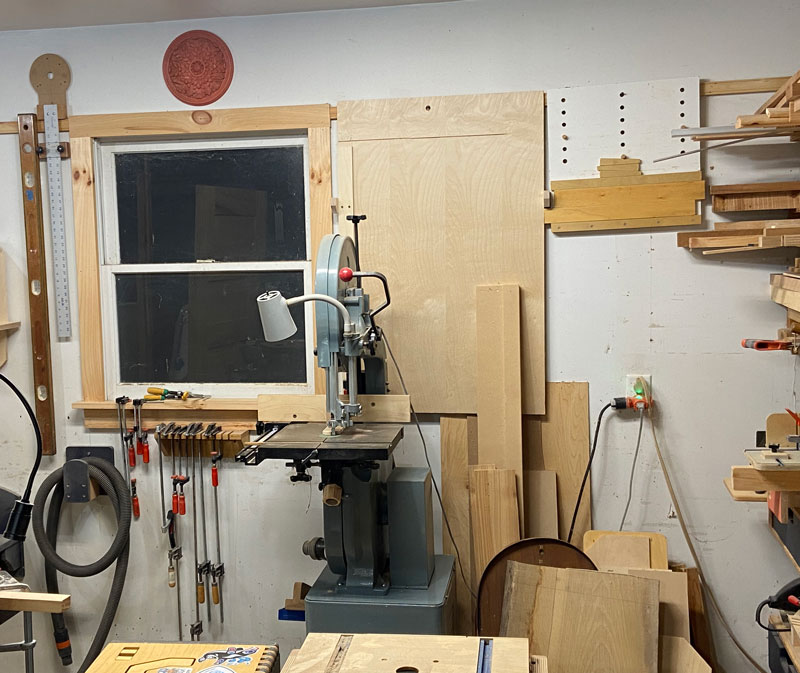
The first large area of the shop is the machine compartment. Stationary and mostly stationary tools occupy this eight-foot square section. The big two are the band saw and drill press. The band saw is my primary cutting tool. Making parts, resawing, and joinery all happen here.
The drill press does more than holes. I use it for shaping parts, metal work, and with the help of a edge sanding jig, refining workpieces no matter the shape or size.
I have a benchtop planer on a low cart. A small router table sits on top. I can use the router table right where it's parked. To use the planer, I roll it out into the corridor.
Just past the band saw and drill press, the shop opens up into a flex space I can set up for assembly, finishing, or a second portable power tool work station away from the main bench. I use a hand crosscut saw to break down long boards with a pair of low sawhorses. And when I have small(er) plywood panels, I set up a panel-cutting jig for my track saw.
This area is the entry into the workshop from the garage. So it's a bit of a transition space due to its location. My shop vac and a wall-mounted cyclone collector sit here. This midpoint of the shop allows the extractor to serve both the machines and handheld tools I use at the bench.
A wall shelf above that provides a space for glue bottles, a charging station, and helps me to keep my workbench clear of clutter — sorta.
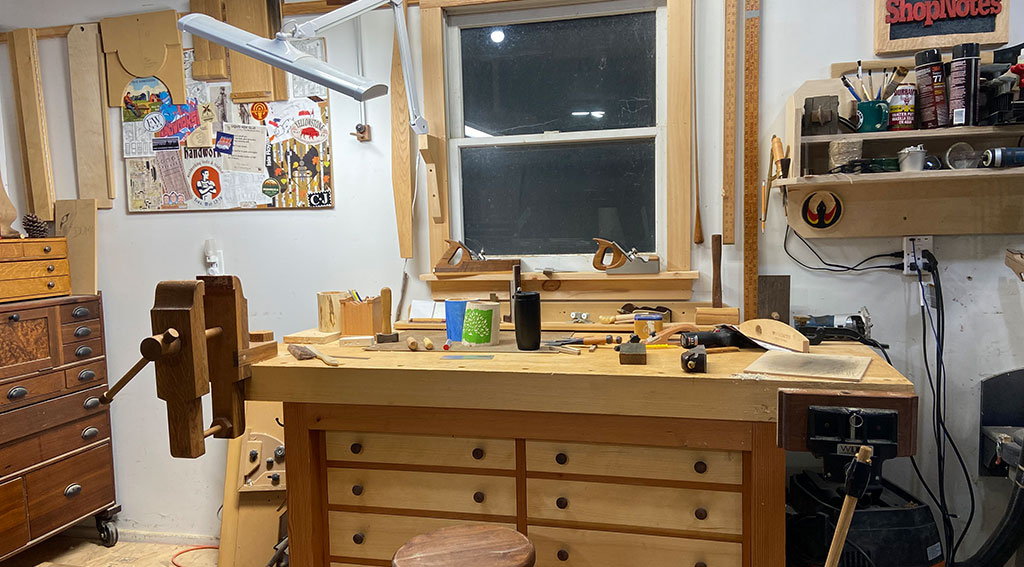
Bench Center
The other large area of the shop is the most used. My workbench is the focal point. In my shop, I've discovered that portable tools, whether hand or electrically powered, offer the greatest cpability in what I make. I enjoy hand tools and skills I learn from them.
Portable power tools save space since they come to the workpiece instead of requiring a separate workstation. I built a cabinet-base workbench with a just-right top to serve all these needs. I like storage space the cabinet offers, but frankly I made it just to keep shavings, dust, and small items from gathering below. No more missing hinge screws.
A raised vise at the end of the bench holds small pieces, carving projects, and other parts at a comfortable height. A wall-mounted task lamp and a tool rack round out the area.
Another open space near the bench is the home for the current project. A few, low, stackable sawhorses form bonus work areas, staging centers, and visitor seating.
A small cart holds portable power tools and defines the entry area of the shop. On top of the cart, I keep a sharpening station ready to go. A cloth protects the oilstones and diamond stone from dust. As many woodworkers have found, it's easy to sharpen if you have a place ready to go.
Running along two walls of the shop, I made a Shaker-inspired rail. Nails and pegs hold jigs, rulers, and other accessories. Besides the function, the items stored there work as a form of shop art that speak to the use of the space as well as the one who occupies it.
Tool Storage
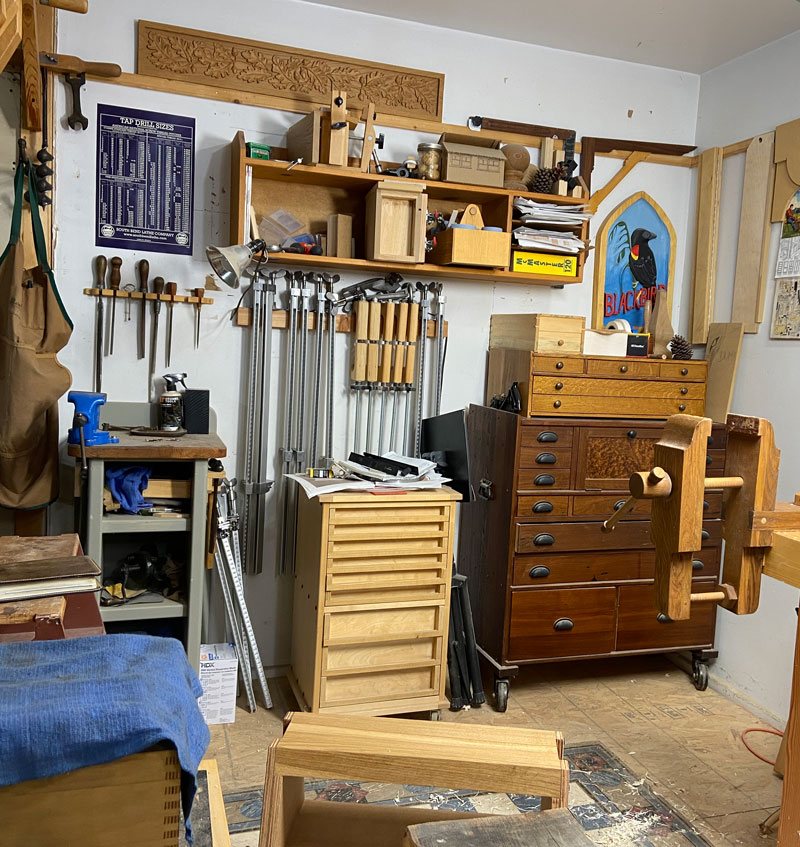
The final space is the storage wall opposite the lumber rack. My rolling tool cabinet and hardware cart anchor the role of this wall. The cabinet and its smaller add-ons house most of my hand tools and a few power tools. Since it's just a step away from the bench, everything is within easy reach. I built the tool cabinet to celebrate my 40th birthday and my 10th anniversary at Woodsmith.
The hardware cart is a riff on one my dad had in his shop. I'm sure it houses many random items that could probably get recycled. However, I like having enough oddball items to satisafy the construction and repair needs for my projects and those around the house.
Behind the hardware cart live my long bar clamps. Here again, I don't have many and there have been few times when a project required more. Above that, a wall shelf holds shop art, jigs, a sanding tote, and narrow shelves with plans, sketches, and printed inspiration for upcoming projects. I'm a tactile person and having physical copies and references help my work succeed.
I do have one workstation tucked along this wall. A small stand holds my machinist bench vise. Here's where I do most of my metal working. (The only other metal work occurs at the drill press.) A hand-cranked grinder shapes tool blades and other metal parts. Files, metalwork hammers, and my hack saw hang on racks on the stand or above it. A small task light defines the work area.
Live with a space long enough and you work out its kinks in flow and capabilites. While I don't consider any shop space "done," the major pieces are here and have worked well for several years now. Personally, I've adapted my work habits, and styles to the space. The time I spend in here is always enjoyable. The list of completed projects bears that out.
Plan Links
Remember the computer commercials from the 90s that ended with the jingle indicating that the PC was powered by an Intel chip? In a similar way, much of my workshop is powered by plans from ShopNotes. I've listed the big ones here. To be honest, there are quite a few others that I didn't list, cuz that would be embarassing.
Some of the projects are stock (Drill press table, lumber rack, etc.). Most of them I have modified, altered, or customized in some way to suit my shop's needs, or my own quirks. You should feel that same urge. The plan gives you confidence that it will turn out and opens up options for you to riff on the details.
This is the link for the Lumber Rack
Copy for the Compact Router Table
Copy for the Clamp-On Router Table
Copy for the Cart Plan
Copy for the Drill Press Table
Copy for the Wall Shelf
Copy for the Workbench ... and the course
Copy for the Sawhorses
Copy for the Tool Cart
Copy for the Vise Stand


