


Half-blind dovetails are a traditional choice for drawer construction. The interlocking pins and tails create a strong mechanical joint, while the drawer front conceals the joinery from view. And with a router and a half-blind dovetail jig, you can cut both halves of the joint in a single setup.
The actual routing goes quickly. The challenge is understanding how your jig works and adjusting it so the finished joint fits properly. A small change in bit height, template position, or workpiece alignment can make a noticeable difference.
I'll walk through the two common styles of half-blind dovetail jig, explain the setup process, and show how to make test cuts before routing the actual drawer parts.

Understanding Half-Blind Dovetail Jigs
At first glance, the dovetail jigs in woodworking catalogs can look quite different. But many common half-blind jigs use one of two basic systems to control the cut.
Both hold the drawer front and side in position while a router, fitted with a dovetail bit and guide bushing, follows the fingers of a template. The main difference is how each jig limits the depth of the sockets.
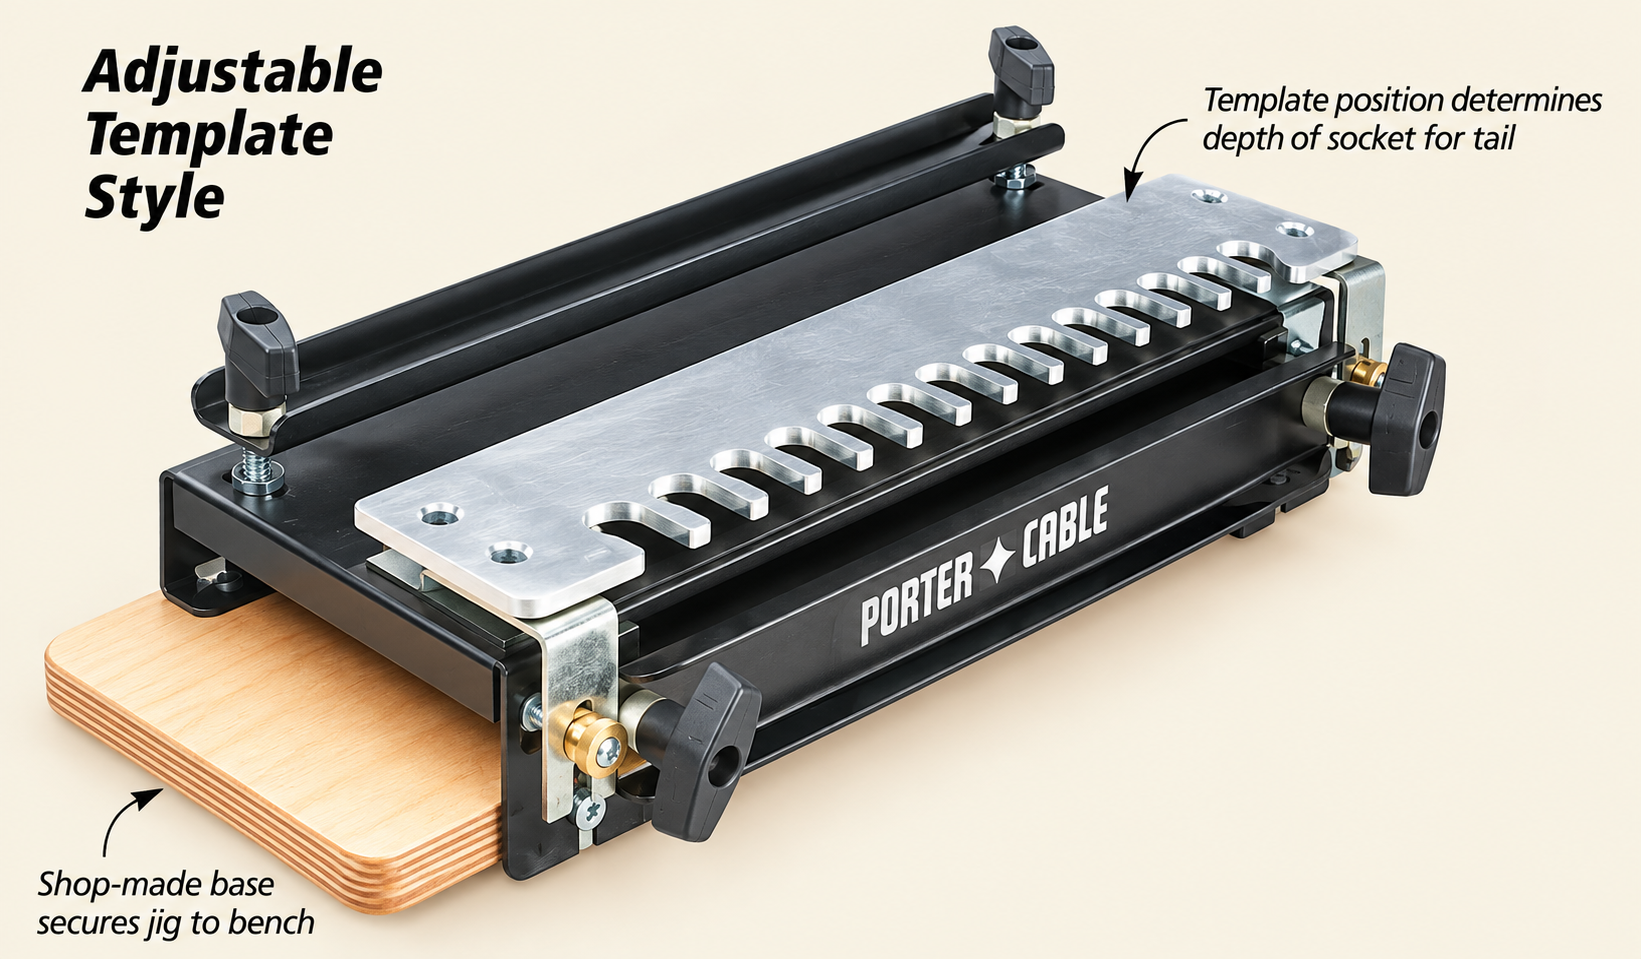
Template-Controlled Dovetail Jigs
On one style of jig, the guide bushing follows the template slot until it reaches the end. That stopping point establishes how far the router can travel into the workpiece and, in turn, controls the socket depth.
The template's position is therefore an important part of the setup. Follow the manufacturer's instructions for positioning it relative to the end of the upper workpiece.
Fence-Controlled Dovetail Jigs
The other style uses an adjustable fence to limit the router's travel. As you move the router into a template slot, its base contacts the fence, establishing the socket depth. The guide bushing still follows the template fingers, but the fence determines how far the cutter travels.
I've found that this style can take a little more adjustment during the initial setup. Once it's dialed in, though, it produces the same clean, accurately fitted half-blind dovetails.
Choose the Right Dovetail Template and Spacing
The template does more than guide the router. Its finger spacing also determines the arrangement of the pins and tails along the height of the drawer.
Many half-blind dovetail templates are designed to cut approximately 1/2"-wide dovetails on 7/8" centers. Other jigs use 1" or 1-1/8" spacing. Woodsmith commonly uses the 7/8" spacing for its projects.
Why does this matter? For a symmetrical joint, you want approximately a half pin at both the top and bottom of the drawer. Planning the drawer height around your template's spacing helps you achieve that balanced appearance.
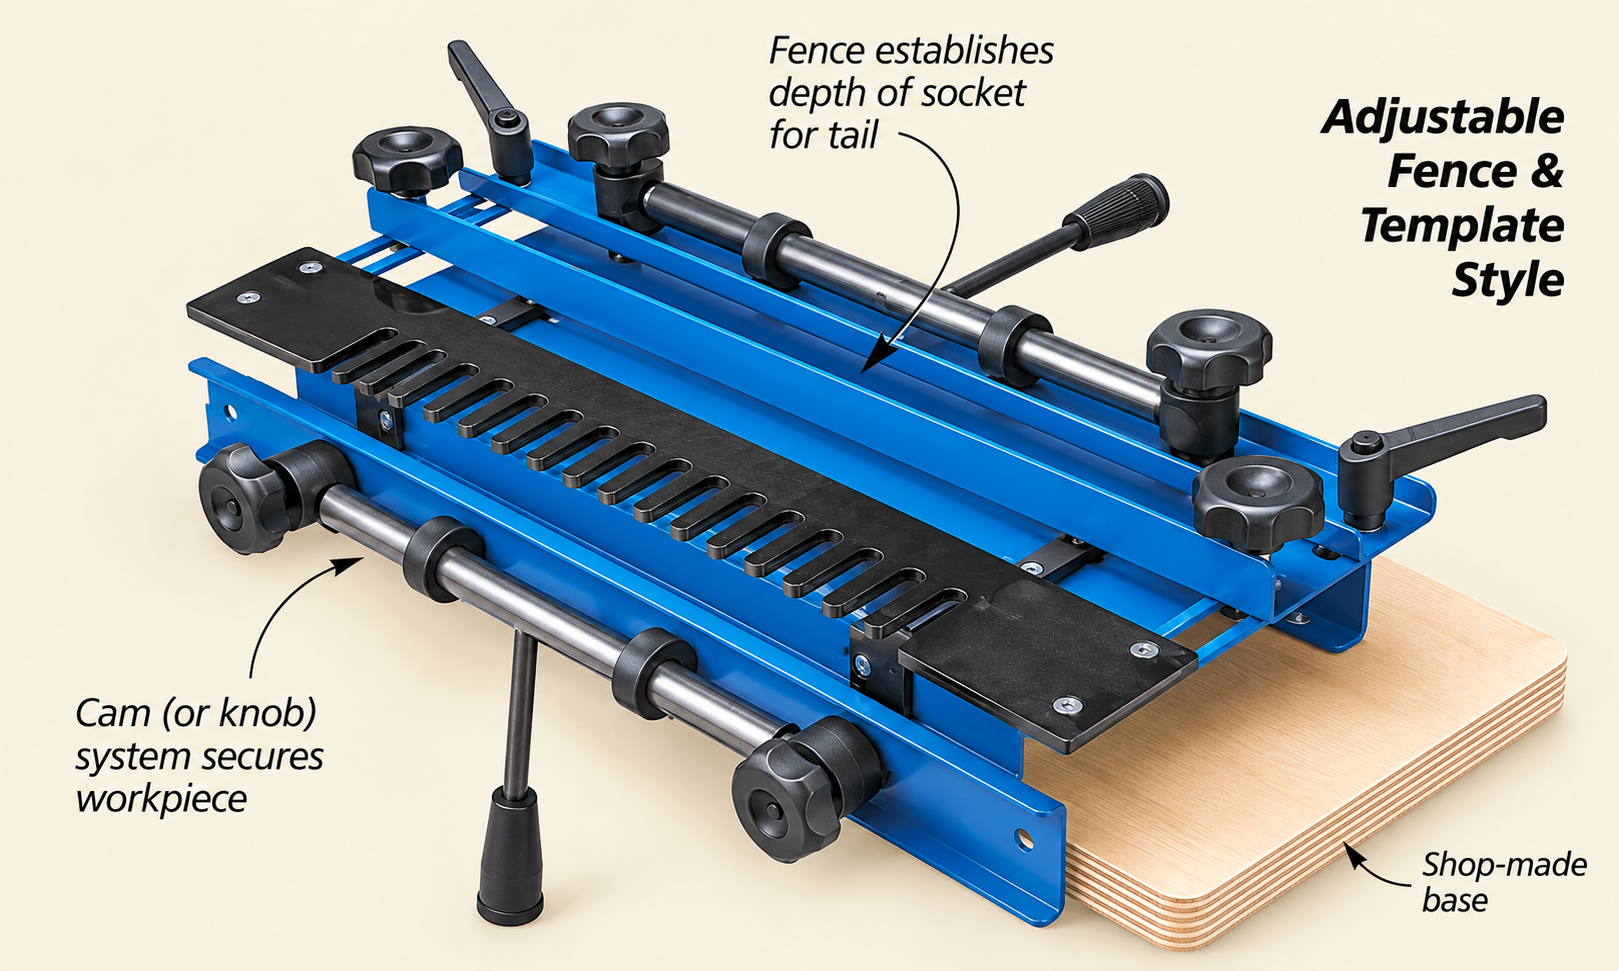
The template material is another consideration. I prefer a metal template because it feels rigid and secure as the router moves across it. A plastic template can work well, too, but it may benefit from additional support.
A couple of scrap pieces placed in the jig can support the template and help the clamping bars grip the workpieces more evenly.
How to Set Up a Half-Blind Dovetail Jig
Before making a cut, I take time to understand how the jig registers the workpieces and controls the router. The following setup sequence is based on a fence-style dovetail jig, but the overall approach is similar for other models.
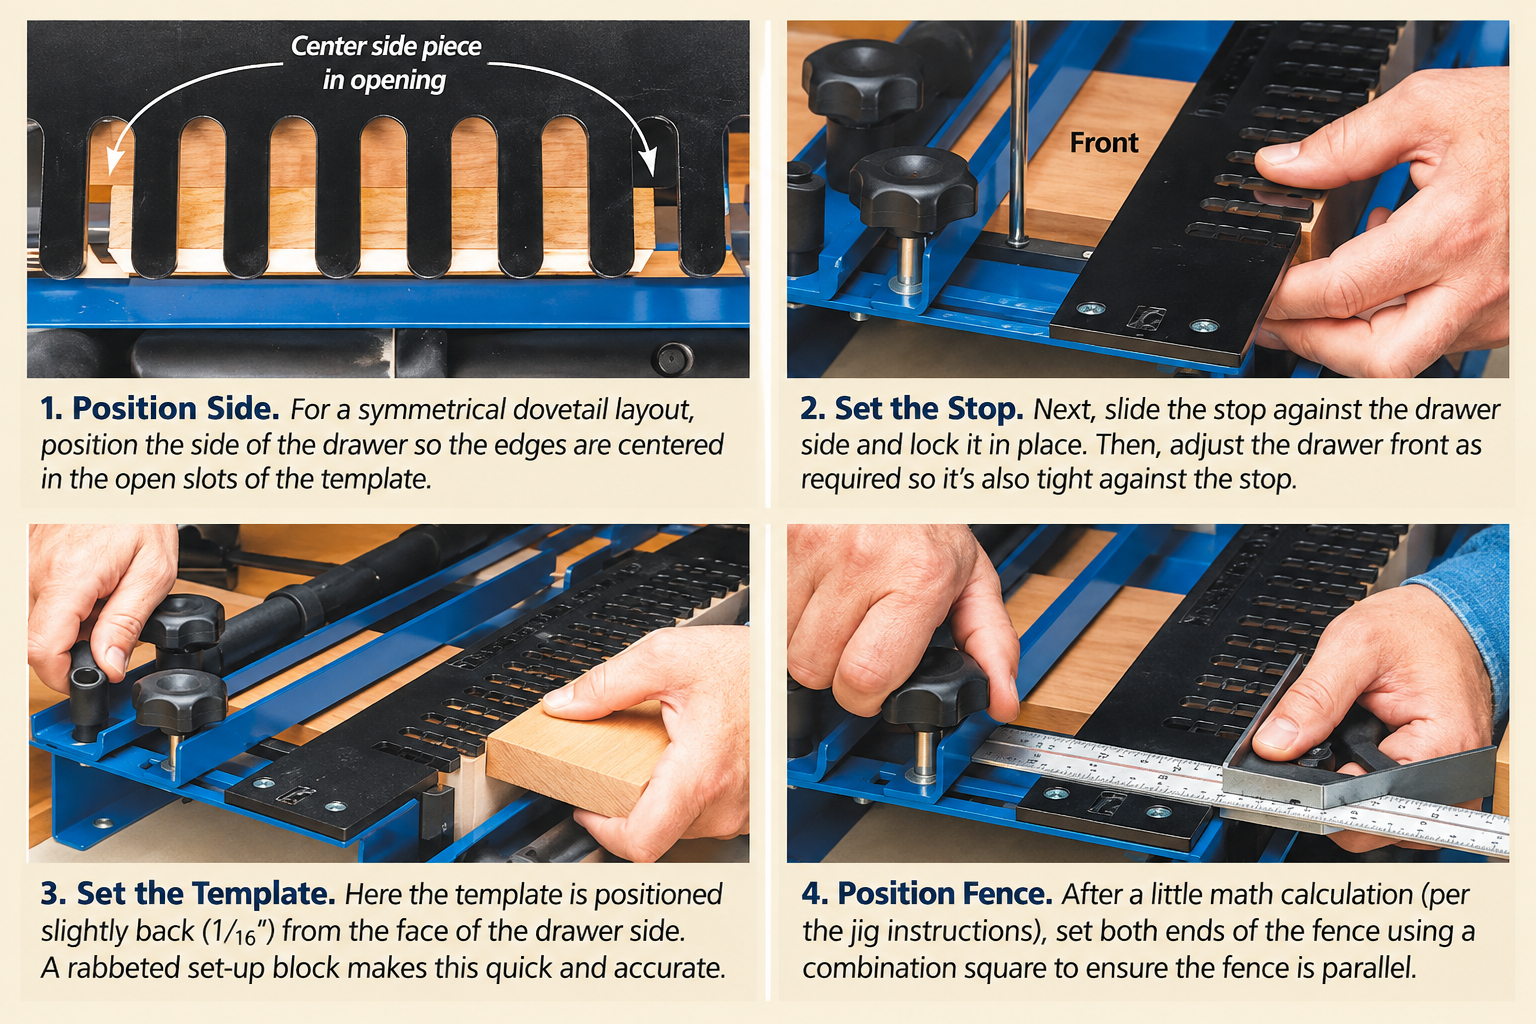
Position the Workpieces and Set the Stops
Start by preparing flat, square test pieces that match the width and thickness of the drawer parts. Position the pieces in the jig according to the manufacturer's instructions and secure them beneath the clamping bars.
Adjust the workpiece stops so the parts register consistently. On a drawer or box, half the joints are cut at the left side of the jig and half at the right, so you'll need to establish the corresponding stop at the other end as well.
Adjust the Fence or Template
On a fence-style jig, position the adjustable fence to establish the socket depth. On a template-controlled jig, position the template itself according to the specified measurement.
Don't assume the setup is correct simply because the parts appear to line up. With the router switched off, make a dry run through the template to verify that the bit, bushing, and router base will clear the jig and travel as intended.
Install the Correct Guide Bushing and Dovetail Bit
Install the guide bushing and dovetail bit specified for your jig. The bit angle, diameter, and bushing size must match the template system.
For the jigs discussed here, the original instructions suggest an initial cutting depth of approximately 1/2" to 9/16". Treat that as a starting point for these particular setups, not a universal setting for every dovetail jig. Check your manufacturer's instructions before making adjustments.
Make Test Cuts Before Routing the Drawer Parts
With the jig set up, it's time to make a test joint. This is where you'll find out whether the settings are correct.
Use scrap that's the same width and thickness as the actual drawer parts. You can reuse the test pieces by cutting off their ends between adjustments.

Step 1: Make a Light Scoring Pass
To reduce chipout along the inside edge of the tail board, begin with a light scoring pass across the front of the workpiece. For the jig shown, this pass travels from right to left.

This is a backrouting operation, so keep the cut shallow and maintain firm control of the router. Follow the routing directions for your particular jig.
Step 2: Rout the Pins and Tails
After scoring the edge, guide the router in and out of the template slots, working from left to right. Keep the router base flat against the template as you move through each finger.

Before removing the workpieces, make sure every pin and socket has been routed cleanly. If necessary, remove the template after the router has stopped to inspect the cuts.
Step 3: Check the Joint Fit
Remove the test pieces and assemble the joint. Don't be surprised if it needs an adjustment on the first try.
The goal is a snug fit that starts with hand pressure and closes with a few light mallet taps. If the joint is too tight or too loose, make a small adjustment to the bit height and cut another test joint.
Once the fit is right, you're ready to rout the actual drawer parts.
Keep the Drawer Parts Organized While Routing
A half-blind dovetail jig cuts mating parts together, so it's important to keep track of which drawer side belongs with each end of the front and back.
I like to label the pieces before routing. That way, I can keep the parts oriented correctly as I move from the left side of the jig to the right.

Taking a moment to label the stock is especially helpful when you're making several drawers at once.
Troubleshooting Half-Blind Dovetail Fit
Even with careful setup, you may need to adjust the jig to get the fit just right. The key is to change one setting at a time, then make another test cut.

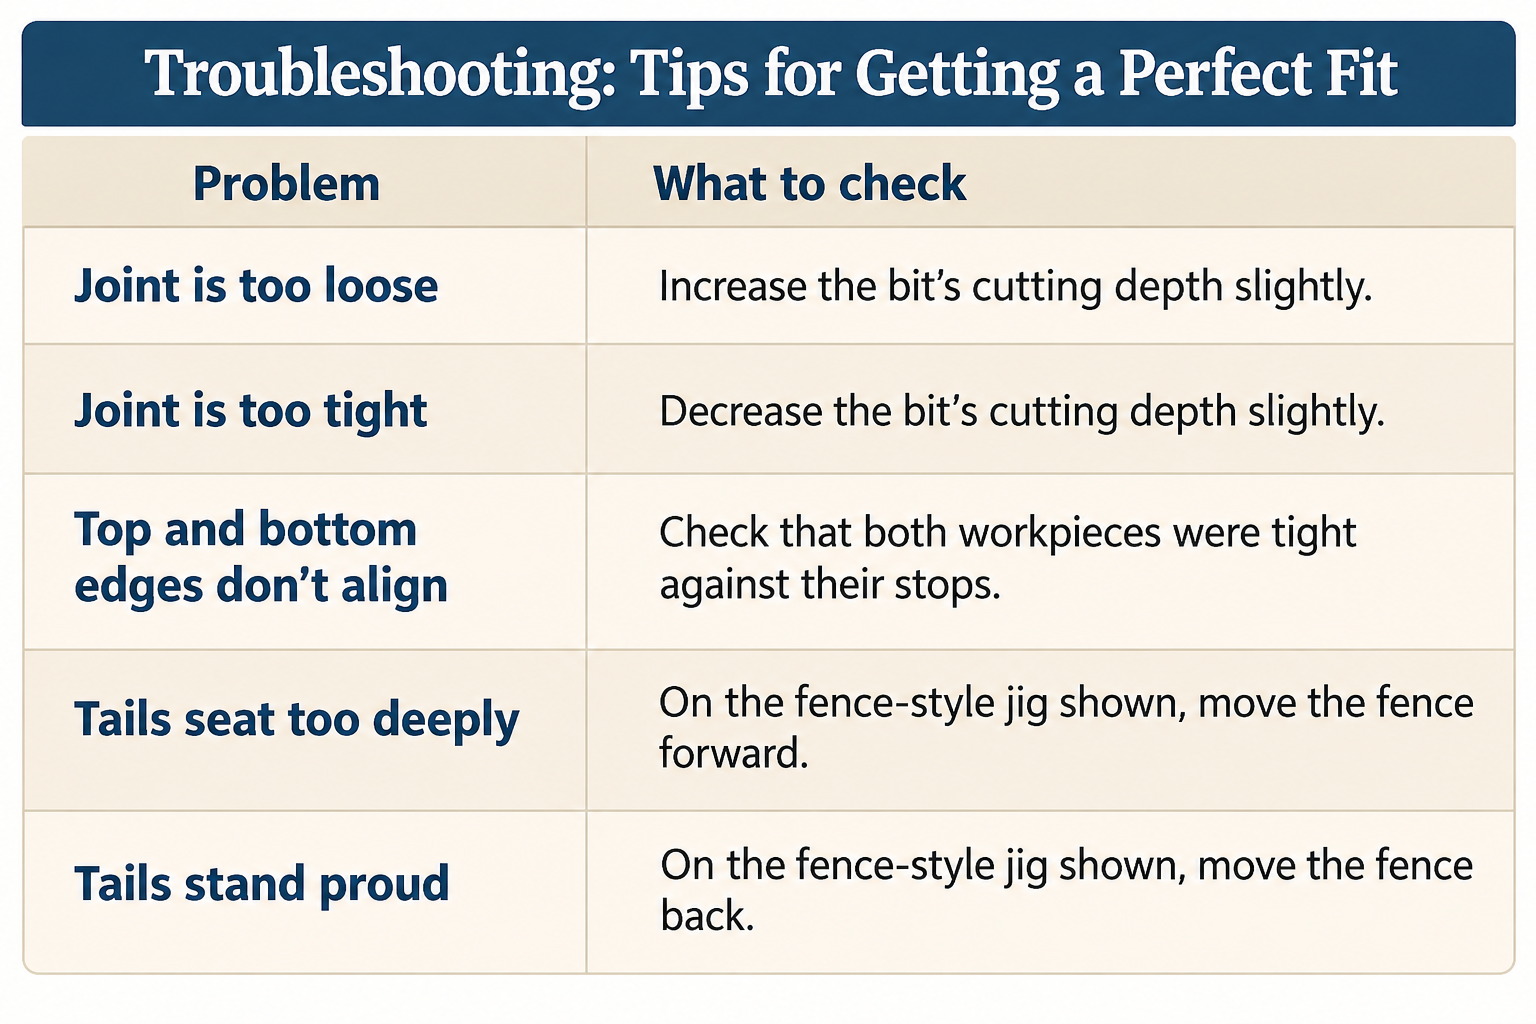
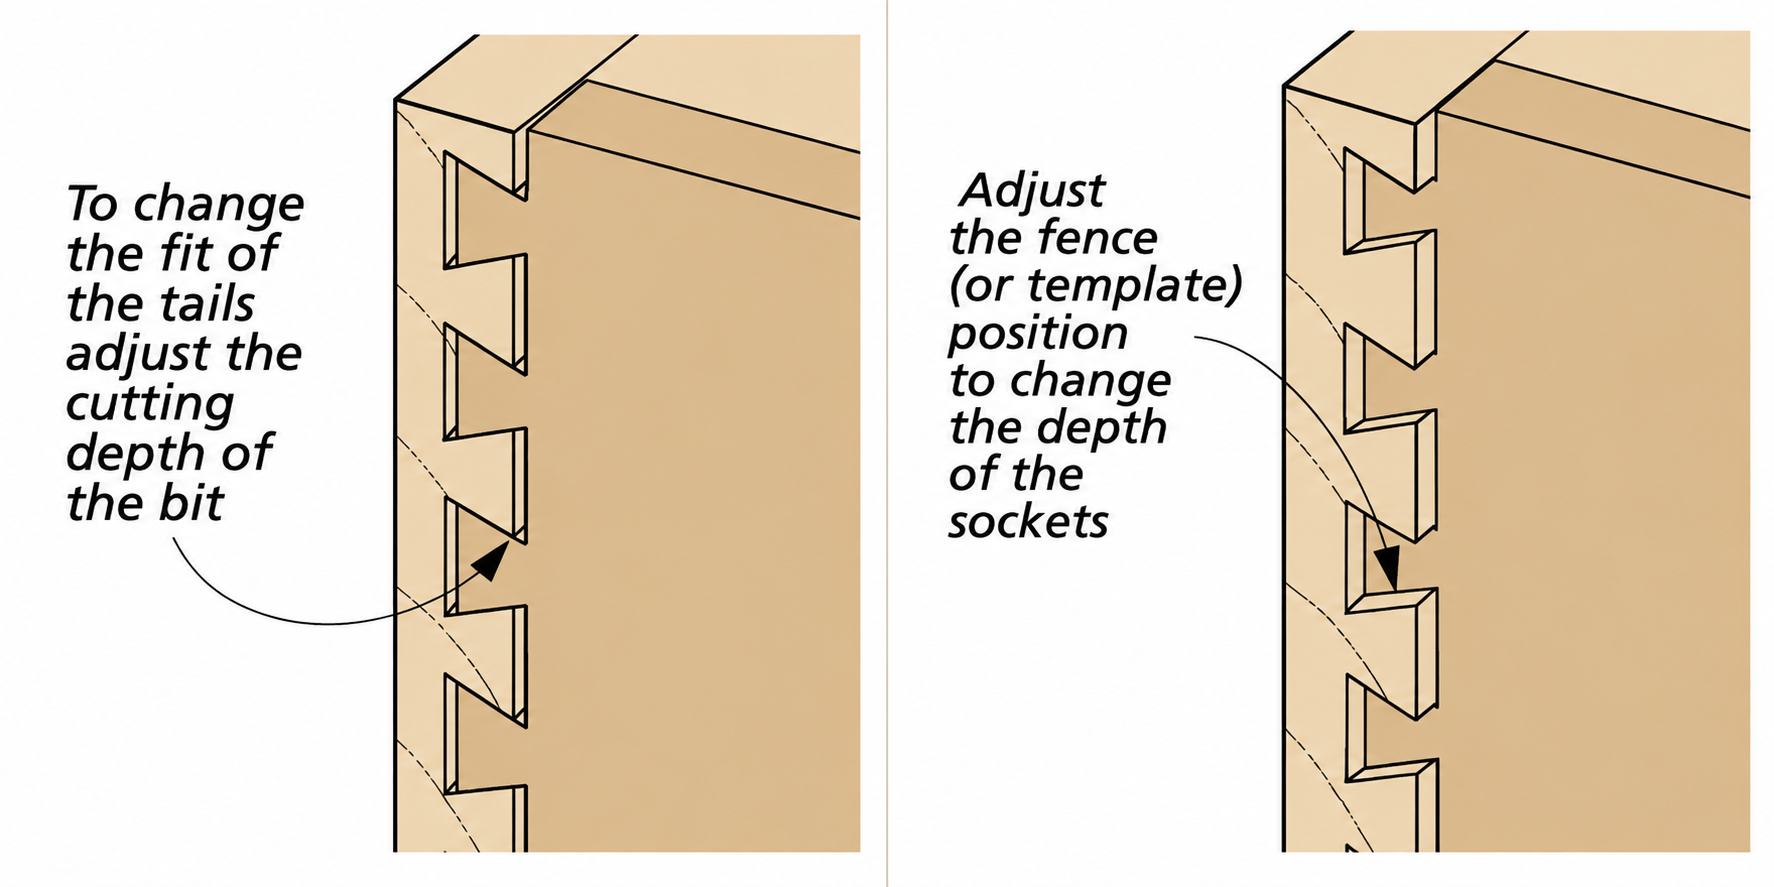
These adjustments apply to the jig configuration described in this article. Other dovetail systems may use different controls or adjustment directions, so consult your jig's instructions before changing the setup.
For a more detailed guide to diagnosing joint-fit problems, see Dovetail Jig Troubleshooting: Fix Loose Joints, Tearout & Misalignment.
Make Your Dovetail Jig Easier to Use
Once you've learned how to set up your jig, a dedicated workstation can make repeated dovetail cuts more comfortable and consistent.
Our Portable Dovetail Jig Workcenter raises the jig to a convenient working height and includes support bars to help keep workpieces properly positioned. Fold-down wings give you a place to set the router between cuts, and a built-in drawer stores the jig, templates, and accessories when you're finished.
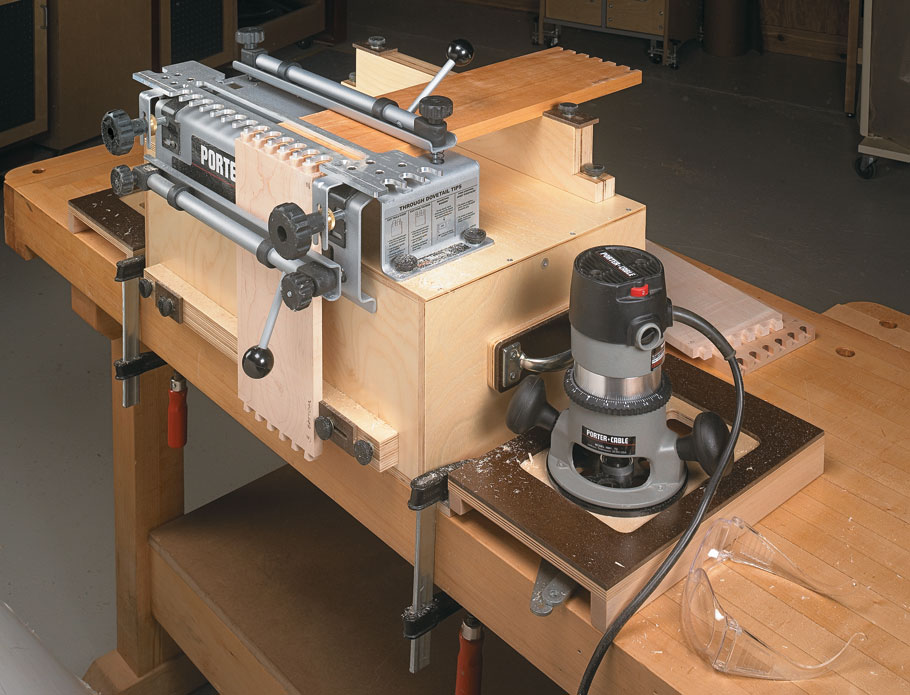
The workcenter folds up for compact storage, making it a practical upgrade even if you don't have room for a permanent dovetail station.
Start with the Setup, Then Let the Jig Do the Work
Cutting half-blind dovetails with a router is a straightforward process once you understand how your jig controls the cut. Start with accurately prepared stock, follow the manufacturer's setup instructions, and make test cuts before working on your drawer parts.
Take your time adjusting the fit and keep the pieces organized as you rout. With the jig dialed in, you'll be able to produce strong, attractive dovetail joints quickly and consistently.
For additional advice on drawer sizing, workholding, routing technique, and assembly, see our 12 Tips for Perfect Dovetailed Drawers.
It’s hard to think of a woodworking joint you can cut faster than a half-blind dovetail — both parts of the joint are cut at the same time with a hand-held router and a half-blind dovetail jig (photo above).
The real challenge is setting up a dovetail jig so that routing the joint is fast, easy, and accurate. And doing that depends on the style of dovetail jig you have (or might be thinking about getting).
A tale of two jigs. Page through a number of woodworking catalogs and it might seem like there are over a dozen different dovetail jigs. But if you look closely, you’ll notice that most of them resemble one of the half-blind dovetail jigs below.
 What’s the difference? On the jig at the far left, the depth of the socket that accepts the tail is established when a bushing reaches the end of the slot on the template. On the other jig, the base of the router contacts an adjustable fence to limit the cutting depth. The bushing simply guides the router in and out of the template slots.
I know this doesn’t sound like much of a difference. But to be honest, the dovetail jig with the fence took me a little longer to “tweak” before I was able to rout perfect half-blind dovetails.
The template. Another difference worth mentioning is the template that comes with the jig. A jig with a metal template will probably be more expensive (around $100). While a jig with the plastic template can be found for $50.
I prefer a metal template since it’s less likely to sag. As you’re routing, it just feels more secure. To provide solid support on the plastic template, I had to slip a scrap piece in place to support the opposite end. You can see this in the main photo at the beginning of this post. Note: A couple scrap pieces are a good idea with either jig since they allow the clamp bars to hold the workpieces more securely.
What’s the difference? On the jig at the far left, the depth of the socket that accepts the tail is established when a bushing reaches the end of the slot on the template. On the other jig, the base of the router contacts an adjustable fence to limit the cutting depth. The bushing simply guides the router in and out of the template slots.
I know this doesn’t sound like much of a difference. But to be honest, the dovetail jig with the fence took me a little longer to “tweak” before I was able to rout perfect half-blind dovetails.
The template. Another difference worth mentioning is the template that comes with the jig. A jig with a metal template will probably be more expensive (around $100). While a jig with the plastic template can be found for $50.
I prefer a metal template since it’s less likely to sag. As you’re routing, it just feels more secure. To provide solid support on the plastic template, I had to slip a scrap piece in place to support the opposite end. You can see this in the main photo at the beginning of this post. Note: A couple scrap pieces are a good idea with either jig since they allow the clamp bars to hold the workpieces more securely.
 A more important consideration regarding the template is how it controls the spacing of the dovetails. Most templates are designed to cut 1⁄2"-wide dovetails spaced 7⁄8" apart. Other jigs space the dovetails 1" or 1 1⁄8" apart. (We use the 7⁄8" spacing for Woodsmith projects.)
Why is that important? The spacing determines the width (height) of the drawers. The drawer heights should be a multiple of the spacing. This way, you’ll be sure to end up with a joint that’s symmetrical — a perfect half-pin on both the top and the bottom, as in the photo above.
A more important consideration regarding the template is how it controls the spacing of the dovetails. Most templates are designed to cut 1⁄2"-wide dovetails spaced 7⁄8" apart. Other jigs space the dovetails 1" or 1 1⁄8" apart. (We use the 7⁄8" spacing for Woodsmith projects.)
Why is that important? The spacing determines the width (height) of the drawers. The drawer heights should be a multiple of the spacing. This way, you’ll be sure to end up with a joint that’s symmetrical — a perfect half-pin on both the top and the bottom, as in the photo above.
Setting Up The Jig
There are a few key steps you’ll need to be concerned with when you initially set up a half-blind dovetail jig. You can see how I did this for a dovetail jig with a fence in the How-To below.


 Note: When you’re making a drawer or box, half the joints are cut on the left side of the jig and half are cut on the right. So you’ll need to repeat the setup for the stop at the other end of the jig once you’ve completed the initial setup.
The process for setting up the other dovetail jig is virtually identical. Since there’s no fence, the template simply has to be positioned according to the instructions that come with the jig. Most often this is just a matter of measuring from the back of a template slot to the end of the upper workpiece.
Jig instructions. There is one thing to mention about the instructions that come with some of the fence-style dovetail jigs. While the jigs work great once they’re set up, I felt that the instructions that came with the dovetail jig weren’t as clear as I thought they could be.
It’s always best to think through each step of the process and do a little “common-sense check” before making any changes. And always make a “dry run” with the router off before actually routing any workpieces. This way, you won’t inadvertently cut into the workpiece, template, or jig. (Believe me, it’s easy to do.)
Cutting depth. Finally, the last thing to do before making any test cuts is to install the bushing and dovetail bit recommended by the manufacturer. For the depth of cut, most manufacturers suggest an initial setting around 1⁄2" to 9⁄16". I’ve found that to be a good starting point.
Note: When you’re making a drawer or box, half the joints are cut on the left side of the jig and half are cut on the right. So you’ll need to repeat the setup for the stop at the other end of the jig once you’ve completed the initial setup.
The process for setting up the other dovetail jig is virtually identical. Since there’s no fence, the template simply has to be positioned according to the instructions that come with the jig. Most often this is just a matter of measuring from the back of a template slot to the end of the upper workpiece.
Jig instructions. There is one thing to mention about the instructions that come with some of the fence-style dovetail jigs. While the jigs work great once they’re set up, I felt that the instructions that came with the dovetail jig weren’t as clear as I thought they could be.
It’s always best to think through each step of the process and do a little “common-sense check” before making any changes. And always make a “dry run” with the router off before actually routing any workpieces. This way, you won’t inadvertently cut into the workpiece, template, or jig. (Believe me, it’s easy to do.)
Cutting depth. Finally, the last thing to do before making any test cuts is to install the bushing and dovetail bit recommended by the manufacturer. For the depth of cut, most manufacturers suggest an initial setting around 1⁄2" to 9⁄16". I’ve found that to be a good starting point.
Routing The Dovetails
Now that the jig settings are “in the ballpark,” you’re ready to start making some test cuts and tweaking the settings one by one to get a perfect fit.
test cuts. The template may control the spacing of the dovetails, but the settings you’ve made are what really control the fit of the joint.
The fit probably won’t be perfect the first time, so it’s best to practice on test pieces before you rout your actual workpieces. The test pieces should be the same width and thickness as your drawer pieces. (You can use them several times by just cutting off the ends.) Once you get a perfect fit, then you can rout the dovetails in the actual workpieces.
With the test pieces clamped in place, the first step is to minimize any chipout by making a light scoring pass from right to left, as in Figure 1 below.
I know. It’s not usually a good idea to rout in this direction (backrouting), but since you’re making a light pass, it’s okay.
After the initial scoring pass, you can rout the tails by moving the router in and out of the slots in the template, working from left to right (Figure 2).
Before removing the pieces from the jig, make sure that every pin and socket is routed cleanly. You can remove the template to check this.
Next, remove the test pieces and see how they fit (photo below).
Don’t worry if the fit isn’t perfect on the first try. It rarely is. To see how to get everything just right, check out the tips in the box below.
Once you have a good fit, you’re ready to rout the actual workpieces. The only thing to worry about is keeping all the drawer pieces organized as you do this. To help keep things straight, I like to label all my pieces like you see in the drawing below.
Troubleshooting:Tips for Getting a Perfect Fit
Setting up to rout machine-cut dovetails is always a trial and error task. So don’t be surprised if you have to spend a little time adjusting the jig to get a perfect fit. A few of the “problems” you might run into are shown in the drawings at right. As you make adjustments, it’s best to make a small change to one setting and make another test cut. Then move on once you have that just right.
Loose Fit.
If the top and bottom edges don’t align, the workpieces may not have been tight against the stops.

Loose Fit.
If the joint is too loose, increase the depth of cut.
Tight Fit.
If the joint is too tight, decrease the depth of cut.

Too Deep.
If the tails go too deep move the fence forward.
Too Shallow.
If the tails are proud, move the fence back.


