


How to Make Pocket Holes with a Router-Powered Jig
Pocket hole joinery is one of the fastest ways to assemble woodworking projects. Whether you're building cabinets, face frames, furniture, or shop fixtures, pocket screws provide a strong, practical connection without complicated joinery. But did you know you can make pocket holes with a handheld router instead of a conventional pocket hole drilling jig?
This clever shop-built pocket hole jig uses a router mounted in a pivoting carriage to cut clean, accurately positioned pockets. A built-in drill guide then helps you create the pilot hole at the proper angle for the screw. It's an unusual but effective approach to pocket hole joinery, and the jig itself is straightforward to build from plywood.
Best of all, you can build the jig in a day in the shop using common woodworking tools and materials.
Build Your Own Pocket Hole Jig: Get the complete Pocket Hole Jig woodworking plan with the construction details and drawings needed to build this router-powered jig for your shop.
How Does a Router-Powered Pocket Hole Jig Work?
Most commercial pocket hole jigs use a specially designed drill bit to bore an angled pocket and pilot hole. This shop-made jig takes a different approach by separating the operation into two steps: routing the pocket and drilling the pilot hole.
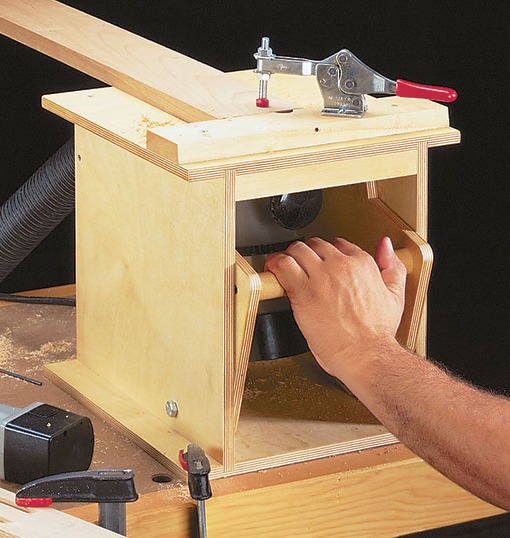
The router is mounted inside a plywood case on a swinging carriage. With the workpiece clamped securely to the top of the jig, pulling the carriage handle pivots the router forward. As the router moves, its bit rises through a slot in the top and cuts an angled pocket into the underside of the workpiece.
Once the pocket is complete, a long drill bit passes through an angled guide in the fence to create the pilot hole for the screw. The workpiece stays clamped in the same position for both operations, helping keep the pocket and pilot hole properly aligned.
The result is a clean pocket that provides clearance for the screw head and allows the screw to enter the adjoining workpiece at the intended angle.
Building the DIY Pocket Hole Jig
One of the appealing features of this jig is its simple construction. The main housing is a plywood box, while the router carriage uses shaped plywood sides, a hardboard mounting platform, and a dowel handle.
Most of the parts can be cut and assembled using a table saw, drill press, band saw, and router.
Build the Plywood Case
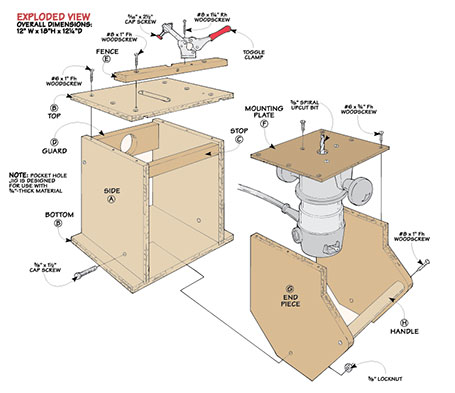
The case consists of a top, bottom, two sides, and a pair of stretchers. Dados cut in the top and bottom hold the 1/2"-thick plywood sides, creating a sturdy housing for the moving router carriage.
The top also needs an elongated opening to provide clearance for the router bit as it swings upward. To make the opening, drill a hole at each end of the slot using a drill press. Then remove the waste between the holes with a jigsaw and clean up the edges.
The front and rear stretchers help keep the case rigid. The front stretcher also acts as a stop for the carriage as it swings forward, limiting its travel. The rear stretcher includes an opening sized for a shop vacuum hose, allowing chips to be collected as the router cuts the pocket.
Add the Fence, Drill Guide, and Toggle Clamp
The fence serves two important purposes. First, it provides a reference for positioning the workpiece. Second, it holds the angled drill guide used to create the pilot hole.
Drilling this guide hole accurately is important. If the pilot hole is positioned incorrectly, the pocket screw may emerge through the finished face of the workpiece instead of entering the adjoining piece properly.
To establish the correct drilling angle, the back edge of the fence is beveled so it can rest at the required angle on the drill press table. A hole is then drilled through the fence and fitted with a brass tube.
The brass tube guides the long drill bit and helps prevent wear that could gradually enlarge the hole and reduce accuracy.
A toggle clamp mounted on top of the fence holds the workpiece securely during both routing and drilling. This eliminates the need to reposition the board between operations.
Make the Pivoting Router Carriage
The swinging carriage is what makes this pocket hole jig different from conventional designs.
Two shaped plywood sides support the router mounting platform. Their profile is designed to provide clearance for the router while also establishing stops at the ends of the carriage's travel.
Start by cutting one carriage side to its rough shape at the band saw, then sand it smooth. Use that completed side as a template for the second piece. Double-sided tape holds the two pieces together while a flush-trim router bit duplicates the profile.
A dowel connects the carriage sides at the front and serves as a handle for swinging the router forward and back. A hardboard platform connects the upper portions of the sides and provides a mounting surface for the router base.
Finally, bolts through the sides of the case form the pivots that allow the carriage to swing.
With the carriage installed, the router can move smoothly from its retracted position to its forward cutting position.
How to Make Pocket Holes with the Router Jig
With the jig assembled, making a pocket hole involves setting the router bit height, clamping the workpiece, routing the pocket, and drilling the pilot hole.
The process is straightforward once the jig has been adjusted for the material you're using.
Step 1: Set the Router Bit Height
For the demonstration, the jig is equipped with a 3/8"-diameter spiral upcut router bit. The spiral cutting action helps produce a clean pocket while carrying chips away from the cut.
With the router switched off and unplugged, swing the carriage into its fully forward position. Adjust the bit so it reaches the desired cutting depth at the highest point of its travel.
In the video, the bit is set to cut a pocket approximately 1/2" deep.
The correct depth depends on the thickness of your workpiece and the pocket screw you're using. Make a test cut in scrap material before routing your project parts to confirm that the pocket leaves enough material beneath the screw head.
[IMAGE: Close-up of the router bit or router carriage showing the bit-height setup.]
Step 2: Position and Clamp the Workpiece
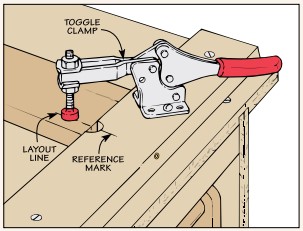
The fence includes a centerline that helps position the pocket accurately.
Place the workpiece against the fence and align the desired pocket location with the centerline. Then secure the workpiece using the toggle clamp.
Make sure the board is seated firmly against the jig and cannot shift during the cut. The toggle clamp keeps the workpiece stationary while the router carriage moves beneath it.
For projects that require multiple pocket screws, mark the pocket locations before beginning so the joints are spaced consistently.
Step 3: Rout the Pocket Hole
With the workpiece secured and the router properly mounted, start the router while the carriage is in its retracted position.
Using the dowel handle, smoothly pivot the carriage forward. The router bit rises through the opening in the jig's top and cuts an elongated pocket into the underside of the board.
Once the carriage reaches its forward stop, return it to the starting position and allow the bit to clear the workpiece before switching off the router.
The pivoting action creates the pocket without requiring you to move the workpiece across a spinning bit.
Step 4: Drill the Pilot Hole
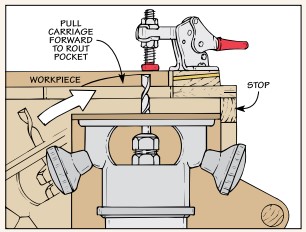
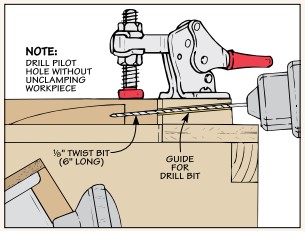
After routing the pocket, leave the workpiece clamped in place. This maintains the alignment between the routed pocket and the pilot hole.
The demonstration uses a 6"-long, 1/8"-diameter drill bit inserted through the brass guide in the fence. The guide directs the bit through the end of the routed pocket at the required angle.
Drill the pilot hole to the depth appropriate for the screw and joint. Then withdraw the bit and release the toggle clamp.
The result is a completed pocket hole with an accurately positioned pilot hole, ready for assembly.
Step 5: Assemble the Pocket Screw Joint
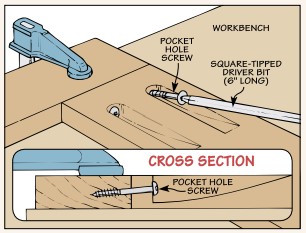
Once the pockets and pilot holes are complete, position the mating workpieces and clamp them securely in alignment.
Drive the appropriate pocket screws through the routed pockets and into the adjoining workpiece. The screw heads seat inside the pockets, keeping them recessed below the surface.
Choose screw length and thread type to suit the material. Avoid overtightening, particularly when working with softwoods or plywood.
Why Use a Router to Make Pocket Holes?
A router-powered pocket hole jig isn't necessarily a replacement for every commercial pocket hole system. However, it offers several advantages for woodworkers who enjoy building their own shop accessories.
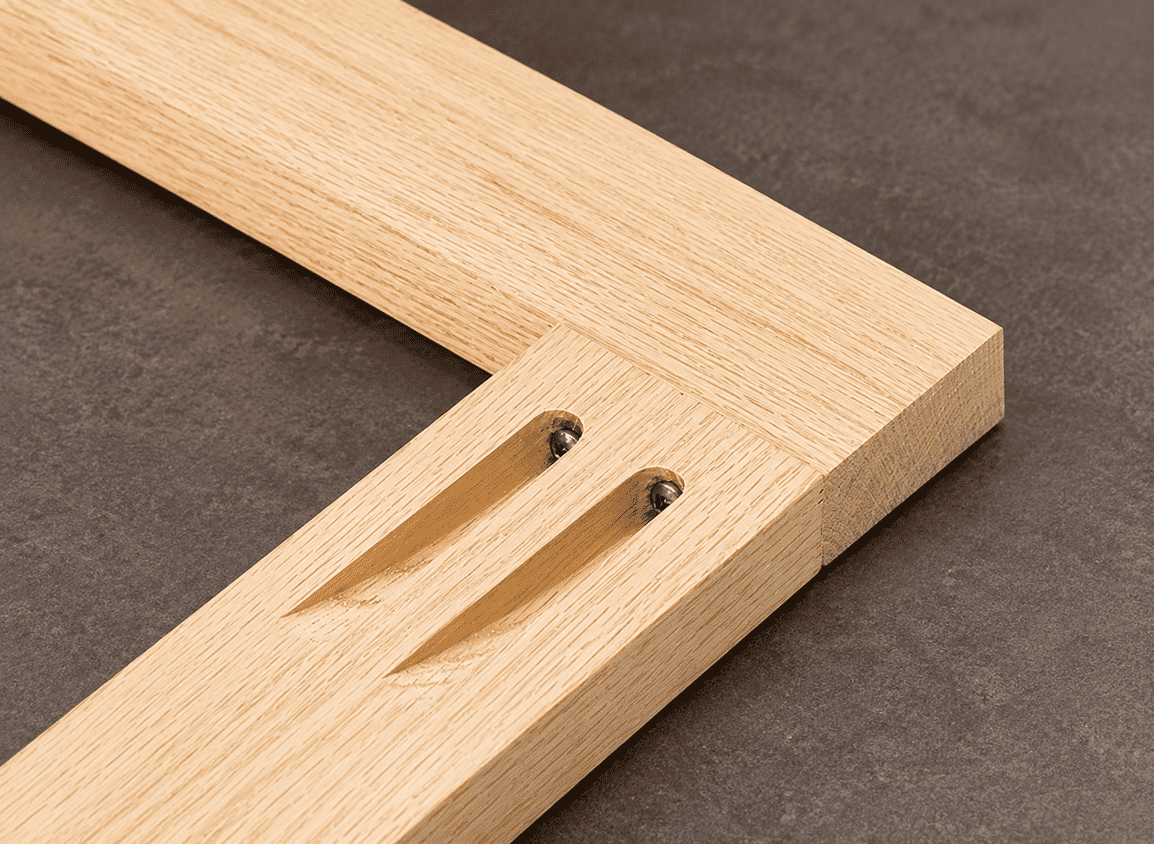
Clean pocket holes. A spiral upcut router bit produces a smooth, consistent pocket with good chip removal.
Accurate pilot hole alignment. The brass-lined drill guide establishes the drilling angle, reducing guesswork during setup.
Repeatable results. The fixed fence, toggle clamp, and pivoting carriage help maintain consistent pocket locations and cutting depth.
A practical shop-built alternative. The jig uses common plywood, simple hardware, and a handheld router you may already own.
Versatile woodworking joinery. Pocket screws work well for many cabinet, face frame, furniture, and shop project assemblies.
For occasional pocket hole joinery, or simply as an interesting router jig project, this design offers a clever way to get more use from your handheld router.
Tips for Better Pocket Hole Joints
A well-made jig is only part of the equation. Proper setup and assembly help ensure the finished joint is strong and accurate.
Start by making test pockets in scrap material of the same thickness as your project. This allows you to verify the router bit depth, pilot hole position, and screw length before cutting your finished parts.
Keep the workpiece firmly clamped during both operations, and make sure the router bit has stopped before reaching into the jig or making adjustments. Check that the router carriage moves freely and that the bit has adequate clearance throughout its travel.
When assembling the joint, clamp the mating pieces so they cannot shift as the screws are driven. Pocket screws can pull parts out of alignment if the workpieces aren't held securely.
For projects where the pocket holes will be visible, plan their locations carefully. Positioning the pockets on the inside or underside of an assembly can help conceal the joinery.
Download the Pocket Hole Jig Woodworking Plan
If you're looking for a different way to make pocket holes, this router-powered jig is a rewarding workshop project. The pivoting carriage, integrated drill guide, and simple plywood construction combine to make an accurate and easy-to-use pocket hole system.
With a little time in the shop, you can build a jig that turns your handheld router into a useful pocket hole joinery tool.
READY TO BUILD YOUR OWN? — GET THE POCKET HOLE JIG PLANS
The complete Woodsmith woodworking plan provides the construction details needed to build the case, carriage, and drill guide.
More Woodworking Jigs and Joinery Techniques
Pocket hole joinery is just one way to assemble woodworking projects. A router can also be used for mortises, grooves, dadoes, and other useful joints.
If you'd like to expand your joinery options, take a look at our Router Mortising Jig woodworking plan. This shop-made jig uses a plunge router to create accurately positioned mortises for furniture and cabinet projects.
You can also explore more Woodsmith woodworking plans for shop-made jigs, router accessories, and practical workshop projects.
Get the step-by-step plans to build this Pocket Hole Jig from WoodsmithPlans.com.


