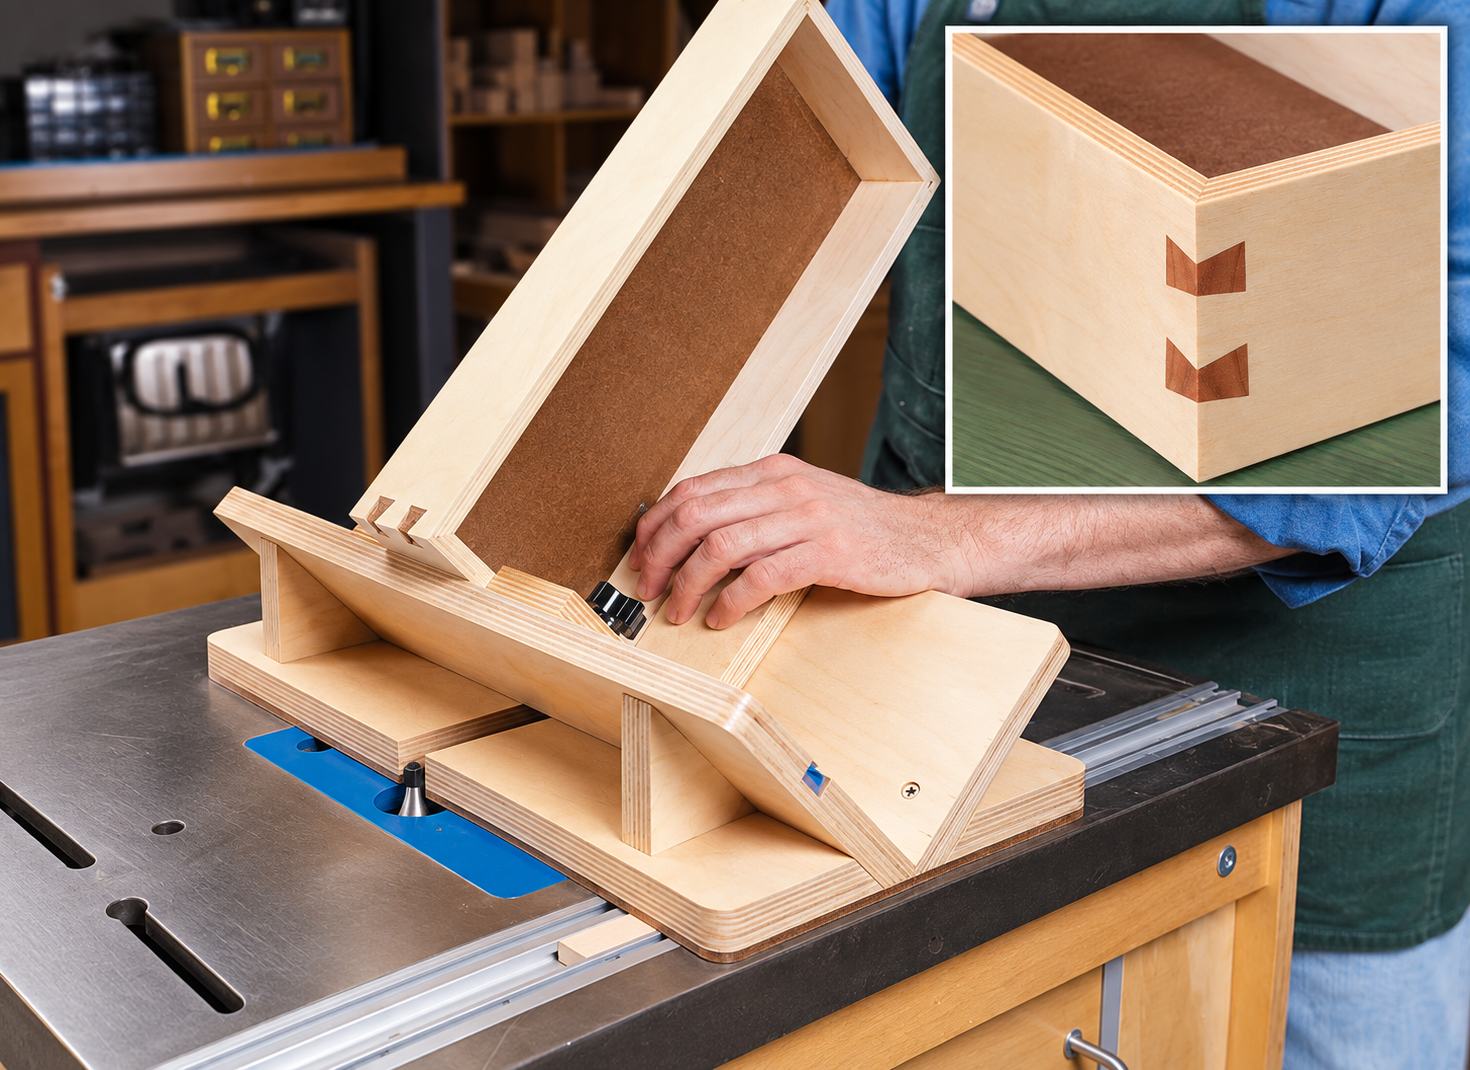
A clean miter joint is a great way to show off the grain on a wooden box. But there's one drawback: a conventional miter relies heavily on glue applied to end grain, which doesn't provide the same strength as a well-made long-grain glue joint. One attractive solution is to add dovetail splines, also called dovetail keys, across the mitered corners.
At first glance, a box with contrasting dovetail keys might look like it was assembled using traditional dovetail joinery. Look closer, though, and you'll see that the sides are actually mitered. The dovetail-shaped keys run across the corners, adding reinforcement while creating a striking decorative detail.
The best part? You can make these keys with a router table, a dovetail bit, and a simple shop-made jig. In the video above, we'll show you how the technique works, from routing the slots to fitting and trimming the keys.
Download the FREE Dovetailed Keys Technique Guide
Why Add Dovetail Splines to a Miter Joint?
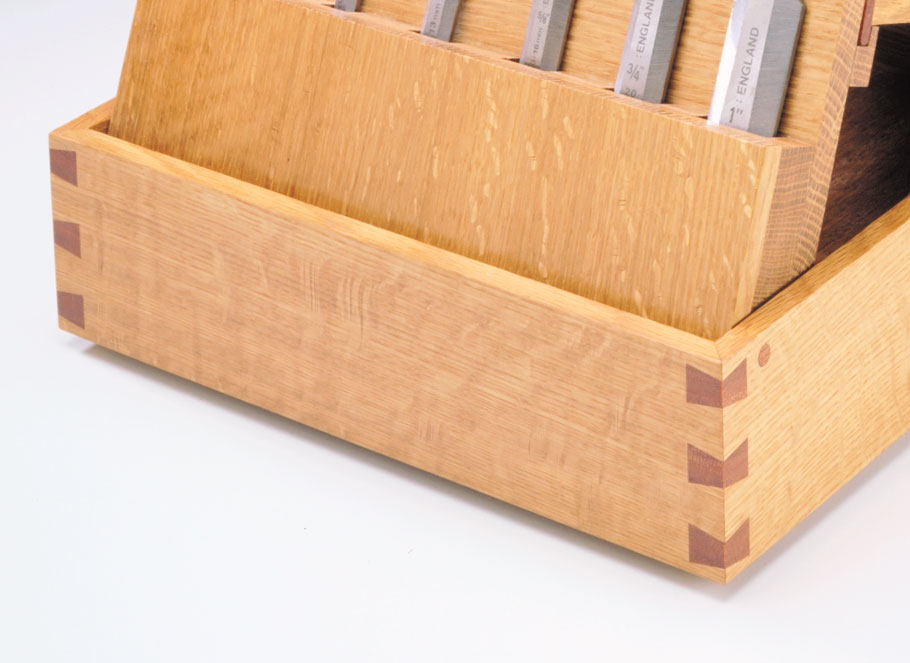
Dovetail keys offer two benefits: strength and appearance. A conventional miter joint brings two angled end-grain surfaces together. By routing a dovetail-shaped slot across the assembled corner and gluing in a matching key, you create additional glue surfaces that reinforce the joint. The dovetail shape also provides a mechanical connection across the miter, helping hold the two sides together.
There's a visual benefit, too. Using a contrasting wood species makes the keys stand out. For example, mahogany keys set into an oak box produce an attractive pattern that resembles traditional dovetail joinery. You can use this technique on keepsake boxes, decorative cases, small chests, and other woodworking projects with mitered corners.
How to Make Dovetail Splines with a Router Table
The process is easier than the finished joint might suggest. First, you'll rout dovetail-shaped slots across the mitered corners. Then you'll make matching wood keys, glue them into the slots, and trim them flush.
The challenge isn't cutting the slots themselves. It's supporting the box at the proper angle and making sure the slots line up consistently from one corner to the next. That's where a sliding router table jig comes in.
Build a Simple Dovetail Spline Jig
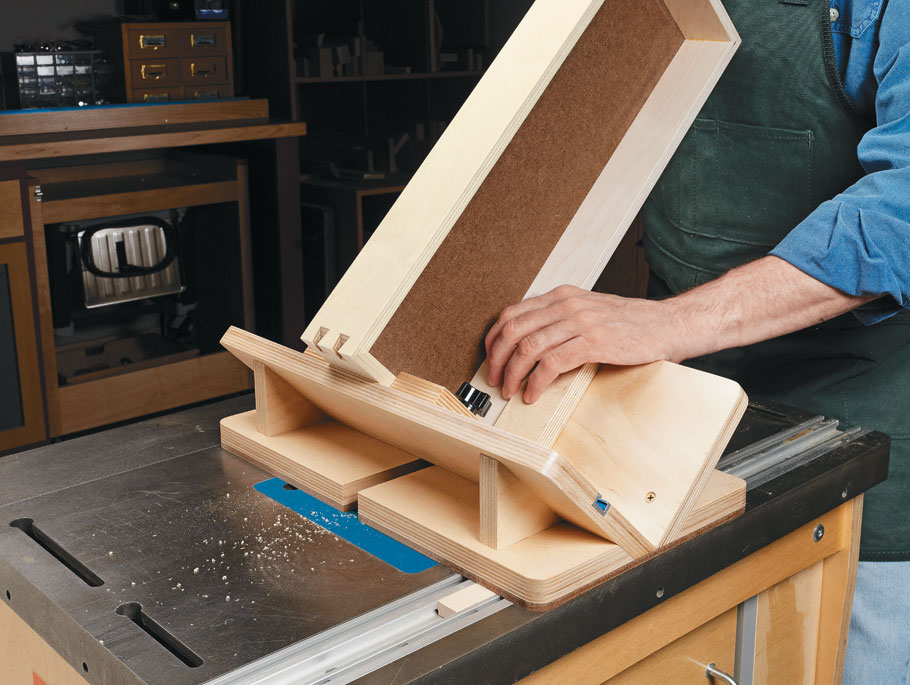
The shop-made jig is a sliding cradle that holds the box at 45° as it passes over the dovetail bit. A V-shaped groove in the base supports the corner of the box, while a runner on the underside rides in the router table's miter slot. This guides the jig in a straight line across the bit.
Two removable cleats act as positioning stops. Once they're set, you can rout corresponding slots in all four corners without relying on individual measurements for every cut.
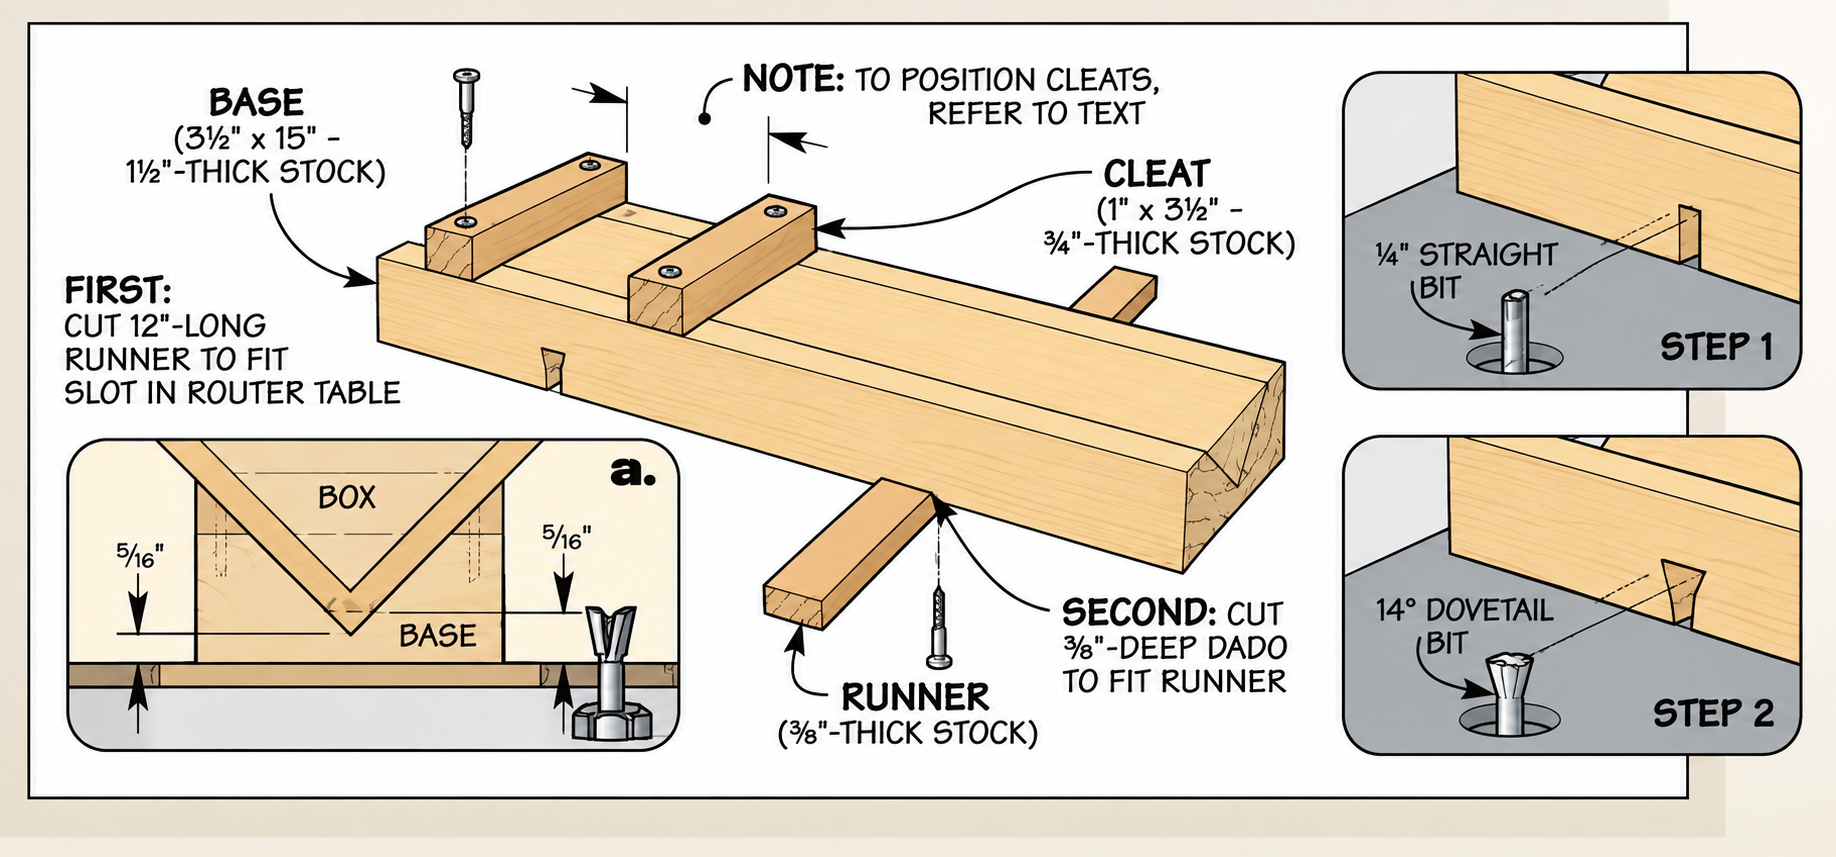
Because the cradle raises the corner of the box above the router table, the dovetail bit must extend high enough to reach the workpiece. Before routing the dovetail-shaped opening in the jig, use a straight bit to create a clearance slot in the base. Then complete the opening with the dovetail bit to provide clearance for the cutter and its shank.
Make sure the bit is securely held in the collet with adequate shank engagement. Use appropriate guarding, secure the box in the jig, and keep your hands away from the cutter.
Want a More Versatile Router Table Dovetail Key Jig?
The simple cradle works well for adding decorative keys to mitered boxes. But if you plan to use this technique regularly, a dedicated jig can be a worthwhile addition to your shop.
Our Router Table Dovetail Key Jig woodworking plan provides another jig-building project for adding decorative dovetail keys to your woodworking projects.
GET THE ROUTER TABLE DOVETAIL KEY JIG PLANS
Step 1 — Lay Out the Dovetail Key Locations
The first step is deciding where the keys will go. Mark the center of the box corner and transfer that location to the jig's base. Attach the cleats so they hold the box securely at this position. Once the cleats are installed, you can rout the slot in each corner using the same setup.
Step 2 — Rout the Dovetail Slots
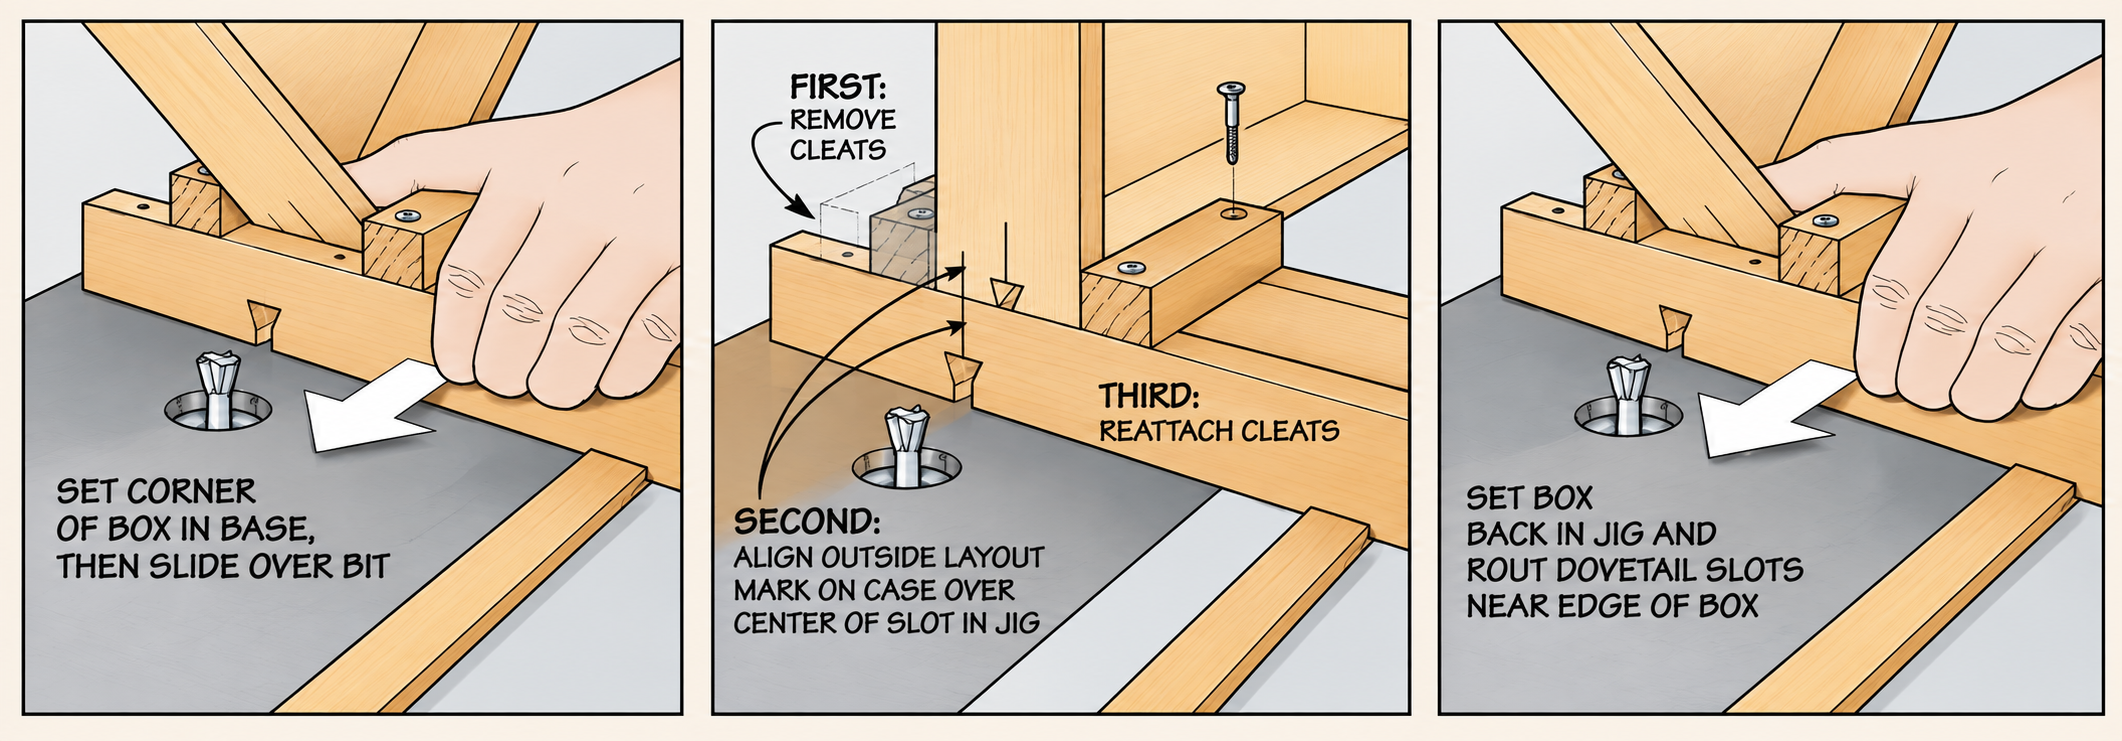
With the box positioned against the cleats, carefully slide the cradle across the dovetail bit to rout the slot. Repeat the operation on each corner of the box.
Next, remove the cleats and reposition them using the outside layout mark. Reattach them to the jig, then rout the slots near one edge of the box. Finally, turn the box around and rout the remaining outside slots.
This approach keeps the slot locations consistent without requiring you to reset the jig for every cut.
Step 3 — Make the Dovetail Keys
Once the slots are complete, it's time to make the matching keys. Rather than trying to machine a series of tiny pieces individually, start with a long, extra-wide wood blank. This gives you a larger, more manageable workpiece while you're shaping the dovetail profile.
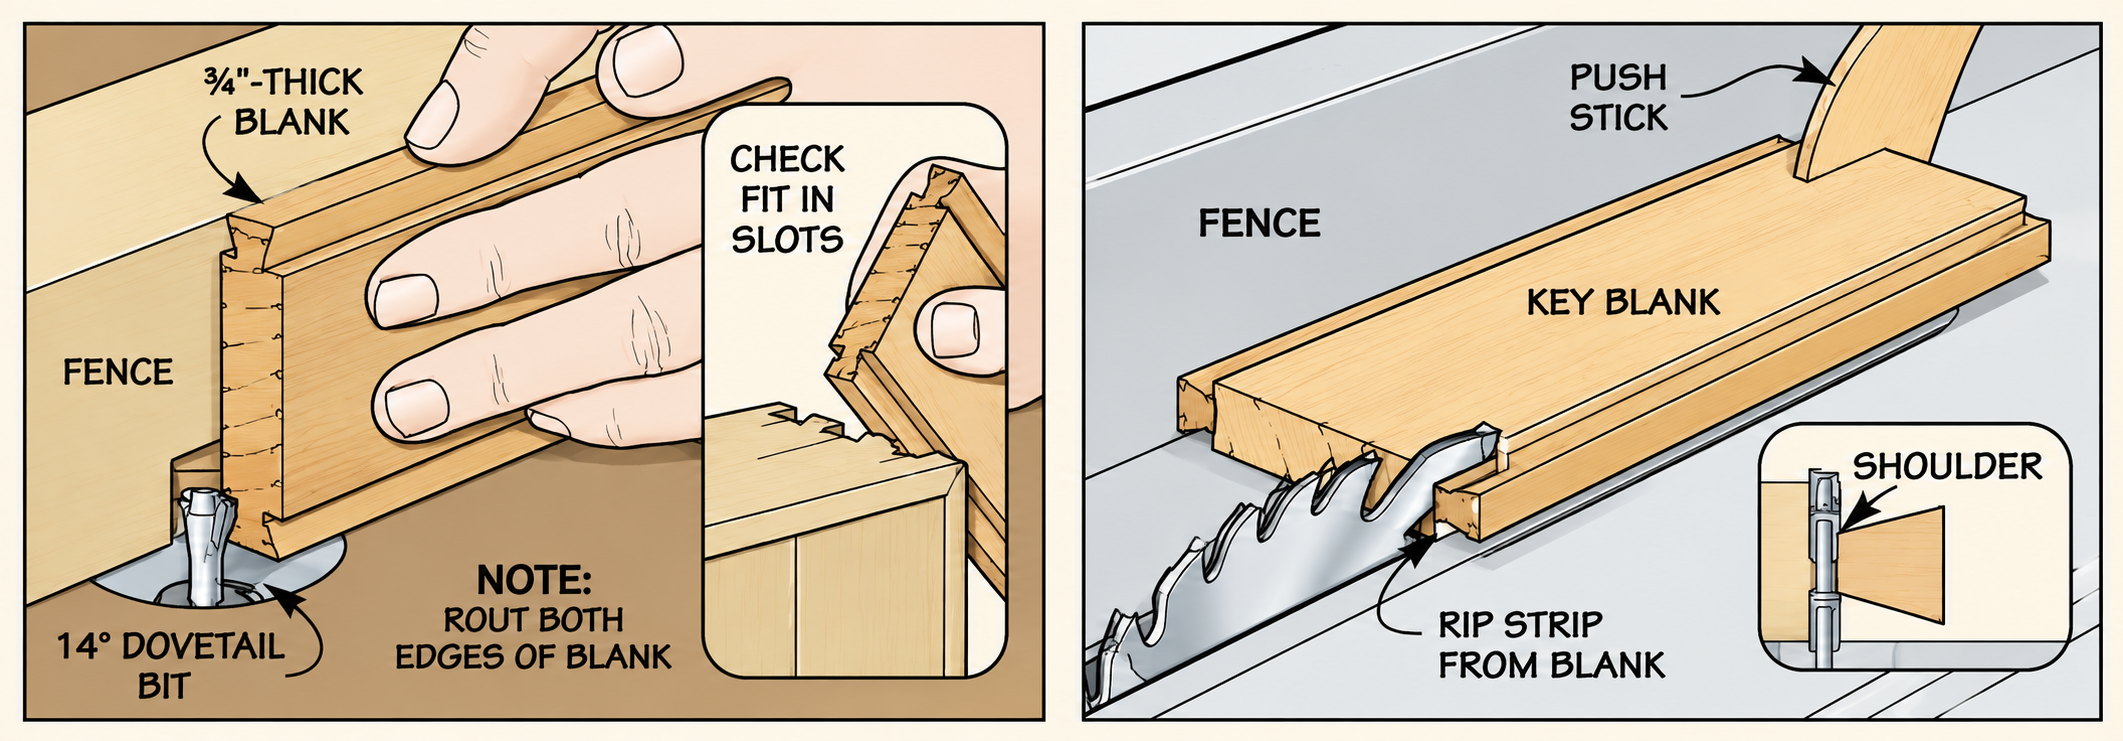
Use the same dovetail bit that you used to cut the slots. Raise the bit approximately 1/16" higher than the depth of the slots, then rout both edges of the blank. Make a series of light passes, checking the fit against a slot as you go. The goal is a snug fit that doesn't require excessive force.
Once the profile fits correctly, rip the shaped strips from the blank at the table saw. Position the fence so the blade cuts on the waste side of the shoulder, and use a push stick to control the workpiece. Then cut the strips into individual keys.
Step 4 — Glue the Dovetail Splines Into the Box
Before reaching for the glue, test-fit each key in its slot. A key should fit snugly without splitting the surrounding wood or requiring heavy blows to seat it. If necessary, lightly sand one side to fine-tune the fit.
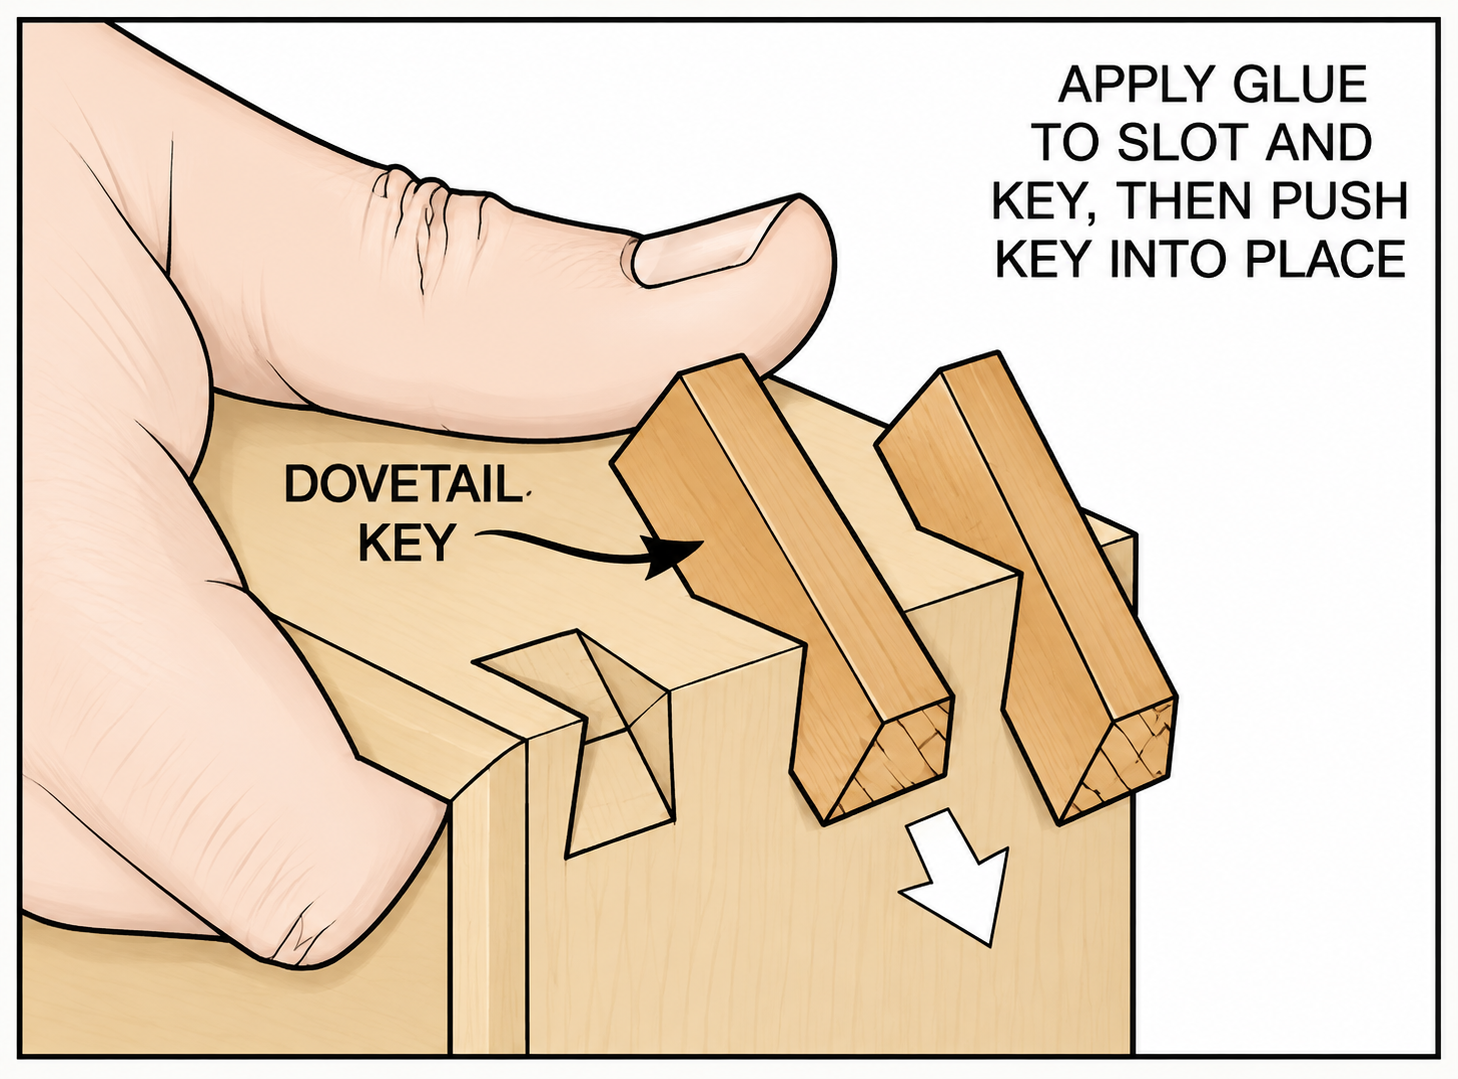
Apply glue to the slot and key, then push the key fully into place. Allow the glue to dry before trimming away the excess material.
Step 5 — Trim the Keys Flush
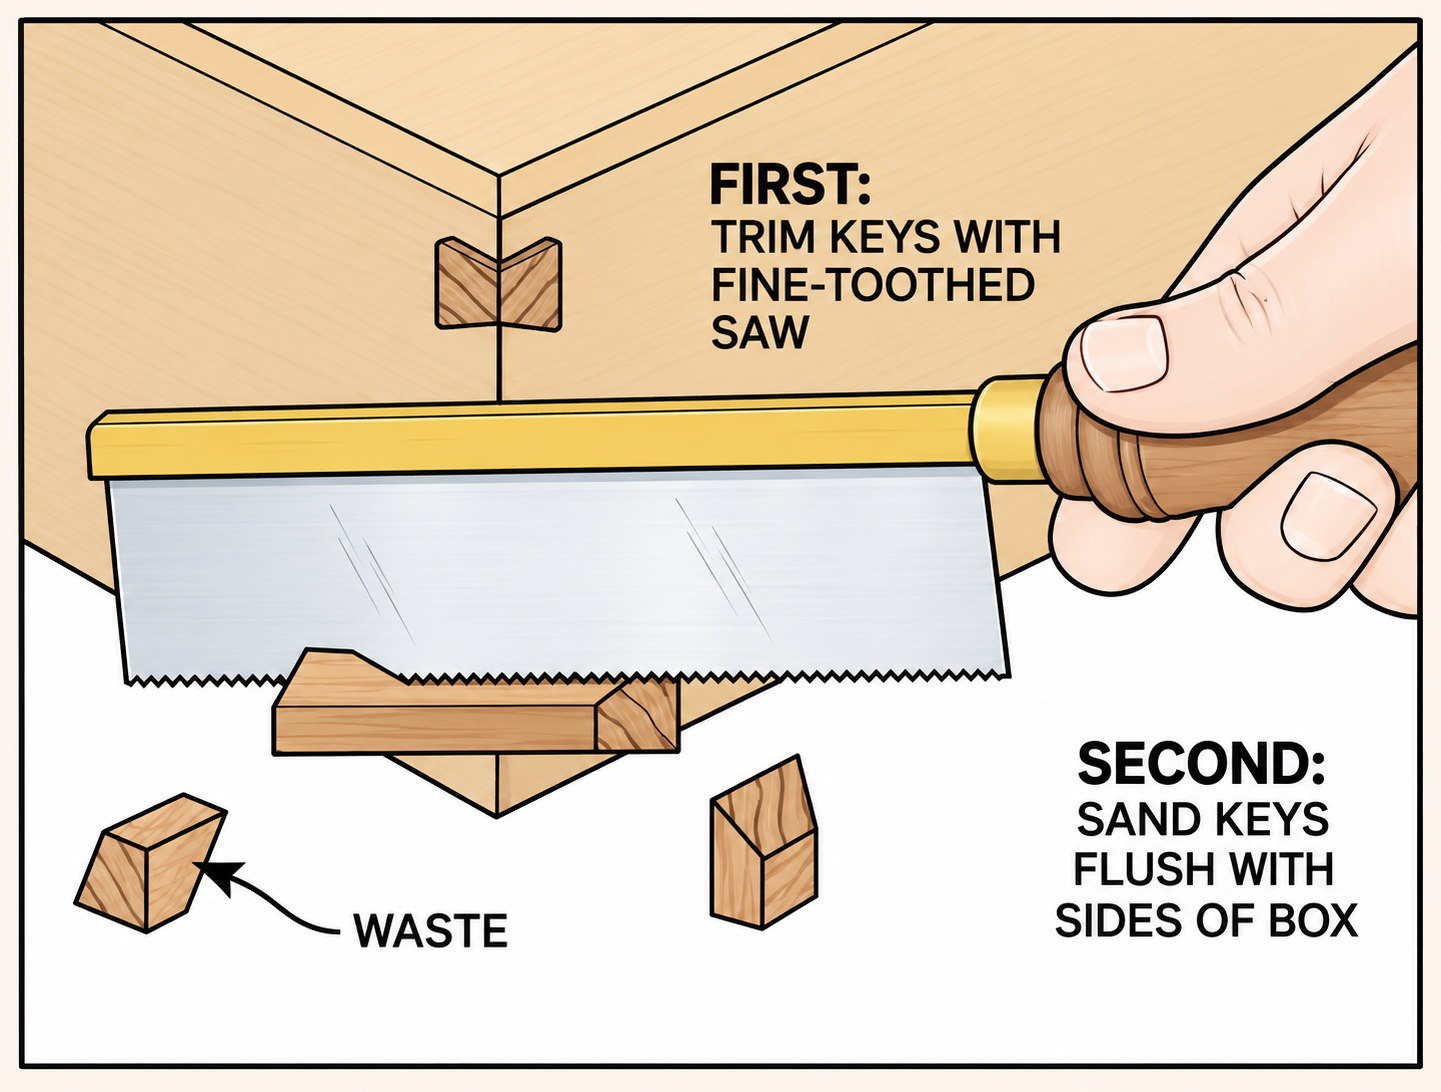
Once the glue has cured, remove the projecting ends of the keys. Start by trimming the waste with a fine-toothed handsaw, taking care not to scratch the box. Then sand the keys flush with the surrounding surfaces.
The finished result is a clean mitered corner with decorative dovetail-shaped accents that also reinforce the joint. This is where contrasting wood really pays off. A darker key against a lighter box, or the reverse, makes the joinery a deliberate part of the design.
Dovetail Keys vs. Straight Splines: What's the Difference?
Both techniques reinforce mitered corners by adding material across the joint, but they produce different appearances. Straight splines use rectangular slots and matching wood strips. They can be cut with a table saw or a suitable router jig and create a simple, clean accent across the miter.
Dovetail keys use dovetail-shaped slots and matching keys. The distinctive profile creates a more decorative, dovetail-like appearance while adding an interlocking shape across the joint.
Neither technique requires you to cut traditional dovetails into the ends of the box sides. Both are added after the mitered joint has been assembled. For a box where you want the corner joinery to become a prominent design feature, dovetail keys offer an attractive alternative.
Download the Free Dovetailed Keys Woodworking Guide
Adding dovetail splines is a useful technique to have in your woodworking repertoire. It lets you build a box with clean mitered corners while adding strength and the visual interest of contrasting wood. Once you've made the sliding cradle, you can use the same basic process on future boxes, adjusting the key locations and wood species to suit each project.
The free Woodsmith Dovetailed Keys technique guide includes illustrated instructions for routing the slots, making the matching keys, and using the shop-made cradle jig.
GET THE FREE DOVETAILED KEYS GUIDE
If you'd like to take the technique further, check out our dedicated Router Table Dovetail Key Jig woodworking plan. It's another way to add decorative, reinforcing joinery to your woodworking projects.
GET THE ROUTER TABLE DOVETAIL KEY JIG PLANS